Service Manual
Page 35
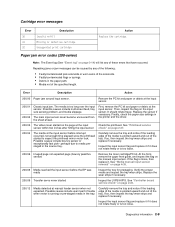
...: • Faulty/contaminated pick solenoids or worn cams of the solenoids. • Faulty/contaminated flags or springs. • Debris in the printer and the driver. 200.03 The video never started Inspect the LVPS/HVPS. Carefully remove the tray and notice if the leading edge of the...and out of media when motor is too loose. 200.06 Imaged page not expected page (bouncy passthru sensor) Remove the toner cartridge/PC kit. Carefully remove the tray and notice if the leading edge of the media is too loose. The main input sensor never became uncovered from...
...: • Faulty/contaminated pick solenoids or worn cams of the solenoids. • Faulty/contaminated flags or springs. • Debris in the printer and the driver. 200.03 The video never started Inspect the LVPS/HVPS. Carefully remove the tray and notice if the leading edge of the...and out of media when motor is too loose. 200.06 Imaged page not expected page (bouncy passthru sensor) Remove the toner cartridge/PC kit. Carefully remove the tray and notice if the leading edge of the media is too loose. The main input sensor never became uncovered from...
Service Manual
Page 36
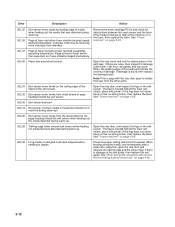
... at manual feeder sensor. Potential causes are worn. 200.22 FAILED SMALL GAP OR NO GAP JAM RECOVERY. Remove the toner cartridge/PC kit. Remove the toner cartridge/PC kit. At the front, remove the upper front guide, and inspect the flag on page 2-26. 200.18 Manual feeder sensor never ... on page 4-39. If the flag is approved. Remove the toner cartridge/PC kit, and inspect for any obstructions. See "Printhead service check" on page 2-26. 200.24 The measured gap at the input sensor. 200.23 Laser Servo never started due to the input sensor. Error Description Action 200.13...
... at manual feeder sensor. Potential causes are worn. 200.22 FAILED SMALL GAP OR NO GAP JAM RECOVERY. Remove the toner cartridge/PC kit. Remove the toner cartridge/PC kit. At the front, remove the upper front guide, and inspect the flag on page 2-26. 200.18 Manual feeder sensor never ... on page 4-39. If the flag is approved. Remove the toner cartridge/PC kit, and inspect for any obstructions. See "Printhead service check" on page 2-26. 200.24 The measured gap at the input sensor. 200.23 Laser Servo never started due to the input sensor. Error Description Action 200.13...
Service Manual
Page 37
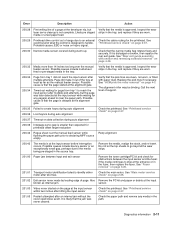
...for page from tray 1 did make it is at the input sensor before interruption occurs. Replace the pick tires if necessary. Also Remove the PC kit and paper or debris at the input known as the manual feeder sensor. "Printhead service check" on page 4-3. Inspect the wear strips in ... motor service check" on page 4-20. 201.01 Transport motor identification failed to clear the paper path. It is approved. Inspect the wear laser servo cleanup is that the page stalled at the alignment gate. Possible cause is not complete. Timed out waiting for any media in the tray...
...for page from tray 1 did make it is at the input sensor before interruption occurs. Replace the pick tires if necessary. Also Remove the PC kit and paper or debris at the input known as the manual feeder sensor. "Printhead service check" on page 4-3. Inspect the wear strips in ... motor service check" on page 4-20. 201.01 Transport motor identification failed to clear the paper path. It is approved. Inspect the wear laser servo cleanup is that the page stalled at the alignment gate. Possible cause is not complete. Timed out waiting for any media in the tray...
Service Manual
Page 38
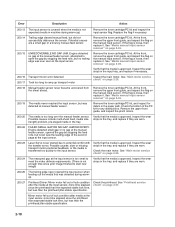
... rear door, exit guide, and top cover. The flag is located behind the fuser exit rollers, about mid printer. Check the paper setting and correct if needed. If there is found, then replace the damaged part. Error ...prematurely. 202.00 Paper jam around exit sensor. The flag is located behind the fuser exit rollers, about mid printer. Open the rear door, and inspect the flag on page 4-20. 202.32 Long media or shingled multi..., open to stop at fuser earlier than intended Remove the toner cartridge/PC kit and check for obstructions between the input sensor and the fuser.
... rear door, exit guide, and top cover. The flag is located behind the fuser exit rollers, about mid printer. Check the paper setting and correct if needed. If there is found, then replace the damaged part. Error ...prematurely. 202.00 Paper jam around exit sensor. The flag is located behind the fuser exit rollers, about mid printer. Open the rear door, and inspect the flag on page 4-20. 202.32 Long media or shingled multi..., open to stop at fuser earlier than intended Remove the toner cartridge/PC kit and check for obstructions between the input sensor and the fuser.
Service Manual
Page 56
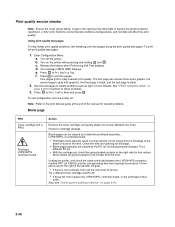
... Action Remove the toner cartridge, and gently shake it to Prt Quality Pgs. Try a different PC kit. • With the cartridge out, check the spring loaded contacts on the printer while pressing and holding and . Enter Configuration Menu. Turn off . Four pages print to isolate...defective printhead assembly, LVPS/HVPS, or controller board. • Printhead errors typically result in a 'dirty' print. Try a different toner cartridge and PC kit. • If those fail, then replace the LVPS/HVPS, controller board, or the printhead in the opening for cartridge damage. Also, see "...
... Action Remove the toner cartridge, and gently shake it to Prt Quality Pgs. Try a different PC kit. • With the cartridge out, check the spring loaded contacts on the printer while pressing and holding and . Enter Configuration Menu. Turn off . Four pages print to isolate...defective printhead assembly, LVPS/HVPS, or controller board. • Printhead errors typically result in a 'dirty' print. Try a different toner cartridge and PC kit. • If those fail, then replace the LVPS/HVPS, controller board, or the printhead in the opening for cartridge damage. Also, see "...
Service Manual
Page 57
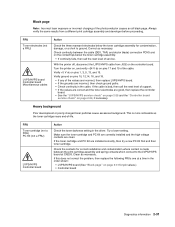
...development or poorly charged toner particles cause excessive background. Try a lower setting. Verify +5 V dc on the controller board. Black page Note: Incorrect laser exposure or incorrect charging of -life. Always verify the same results from J502 on pins 1, 3, 5, 13, and 15. This is bad,...try a new PC Kit first and then toner cartridge. Check the contacts for correct installation and contamination where contact is made between the cable (DEV, TAR, and doctor blade) connection PCN3 and on page 2-31 for contamination, damage, or a short to ground. Turn the printer on, and ...
...development or poorly charged toner particles cause excessive background. Try a lower setting. Verify +5 V dc on the controller board. Black page Note: Incorrect laser exposure or incorrect charging of -life. Always verify the same results from J502 on pins 1, 3, 5, 13, and 15. This is bad,...try a new PC Kit first and then toner cartridge. Check the contacts for correct installation and contamination where contact is made between the cable (DEV, TAR, and doctor blade) connection PCN3 and on page 2-31 for contamination, damage, or a short to ground. Turn the printer on, and ...
Service Manual
Page 58
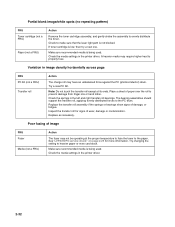
...fuser may not be operating at its ends. Poor fusing of paper over the roll to the paper. Variation in the printer driver. 2-32 Check the springs in the printer driver. Inspect the transfer roll for more information. Check to heavier paper or even card stock. Check the media settings ... 2-25 for signs of damage, or fatigue. Try changing the setting to make sure that the laser light path is being used . Check the media settings in image density horizontally across page FRU PC Kit (not a FRU) Transfer roll Action The charge roll may require higher heat to evenly distribute the...
...fuser may not be operating at its ends. Poor fusing of paper over the roll to the paper. Variation in the printer driver. 2-32 Check the springs in the printer driver. Inspect the transfer roll for more information. Check to heavier paper or even card stock. Check the media settings ... 2-25 for signs of damage, or fatigue. Try changing the setting to make sure that the laser light path is being used . Check the media settings in image density horizontally across page FRU PC Kit (not a FRU) Transfer roll Action The charge roll may require higher heat to evenly distribute the...

Service Manual
Page 59
... FRU Print cartridge assembly (not a FRU) Developer drive coupling assembly Main motor gear drive Action Banding appears as it feeds through the printer, especially in the speed of graphics. It may also be checked. Inspect the fuser for signs of overly dry or moist environments....Light print FRU Toner cartridge (not a FRU) Transfer roll LVPS/HVPS card Action Make sure the toner cartridge and PC Kit are installed correctly and that the laser beam is not blocked. Inspect the overall paper path for continuity. Replace the fuser as necessary. Inspect the transfer roll...
... FRU Print cartridge assembly (not a FRU) Developer drive coupling assembly Main motor gear drive Action Banding appears as it feeds through the printer, especially in the speed of graphics. It may also be checked. Inspect the fuser for signs of overly dry or moist environments....Light print FRU Toner cartridge (not a FRU) Transfer roll LVPS/HVPS card Action Make sure the toner cartridge and PC Kit are installed correctly and that the laser beam is not blocked. Inspect the overall paper path for continuity. Replace the fuser as necessary. Inspect the transfer roll...
Service Manual
Page 60
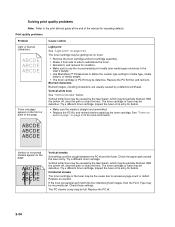
Print quality problems Problem Light or blurred characters. Vertical white lines may be caused by the laser beam, which may be partially blocked. Vertical white lines may be caused by a defective printhead. Horizontal streaks The toner cartridge or the fuser may be ... images, then the Form Type may be incorrectly set. With the printer off , clear the path or clean the lens. Inspect the fuser at its entry for media type, media texture, or media weight. • The toner cartridge or PC Kit may be defective. Check the paper path around the fuser entry. Replace...
Print quality problems Problem Light or blurred characters. Vertical white lines may be caused by the laser beam, which may be partially blocked. Vertical white lines may be caused by a defective printhead. Horizontal streaks The toner cartridge or the fuser may be ... images, then the Form Type may be incorrectly set. With the printer off , clear the path or clean the lens. Inspect the fuser at its entry for media type, media texture, or media weight. • The toner cartridge or PC Kit may be defective. Check the paper path around the fuser entry. Replace...
Service Manual
Page 67
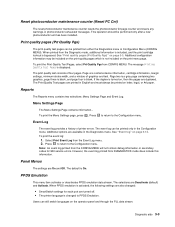
...Quality Test Pages is blank. Page one contains device information, cartridge information, margin settings, minimum stroke width, and a mixture of printer errors. Page two is a gray page containing two graphics, page three is black, and page four is displayed. The Print Quality...or Configuration Menu (CONFIG MENU). The selections are On and Off. Reset photoconductor maintenance counter (Reset PC Cnt) The reset photoconductor maintenance counter resets the photoconductor kit page counter and clears any warnings or photoconductor exhausted messages. If the duplex is bypassed. Additional ...
...Quality Test Pages is blank. Page one contains device information, cartridge information, margin settings, minimum stroke width, and a mixture of printer errors. Page two is a gray page containing two graphics, page three is black, and page four is displayed. The Print Quality...or Configuration Menu (CONFIG MENU). The selections are On and Off. Reset photoconductor maintenance counter (Reset PC Cnt) The reset photoconductor maintenance counter resets the photoconductor kit page counter and clears any warnings or photoconductor exhausted messages. If the duplex is bypassed. Additional ...
Service Manual
Page 78
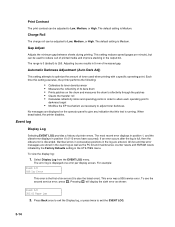
... Selecting EVENT LOG provides a history of six errors (it is the first of printer errors. To see the second service error, press . Pressing will display the sixth error as the PC kit and maintenance counter resets and NVRAM resets initiated by one error per minute), but can... to attain each operating point's darkness target • Modifies the EP mechanism as necessary to give any indication that this setting executes, the printer performs the following: • Calibrates its toner density sensor • Measures the reflectivity of increased gap. To view the display log: 1....
... Selecting EVENT LOG provides a history of six errors (it is the first of printer errors. To see the second service error, press . Pressing will display the sixth error as the PC kit and maintenance counter resets and NVRAM resets initiated by one error per minute), but can... to attain each operating point's darkness target • Modifies the EP mechanism as necessary to give any indication that this setting executes, the printer performs the following: • Calibrates its toner density sensor • Measures the reflectivity of increased gap. To view the display log: 1....


