Service Manual
Page 35
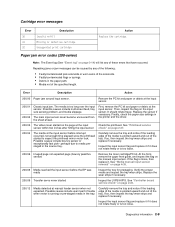
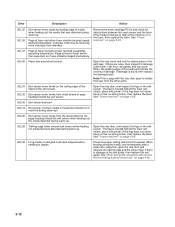
...replace it does not rotate freely or is too loose. 200.06 Imaged page not expected page (bouncy passthru sensor) Remove the toner cartridge/PC kit. Possible causes include user insert of media when motor is pointed upward and out of these errors that have occurred. Diagnostics information 2-9 Error ... causes include bouncy sensor or exceptionally fast pick- If so, then inspect the tray wear strips and replace if necessary. First, remove the PC kit and paper or debric at the input sensor. 200.01 200.02 Classic input jam. Finally, check the paper size settings in the tray...
...replace it does not rotate freely or is too loose. 200.06 Imaged page not expected page (bouncy passthru sensor) Remove the toner cartridge/PC kit. Possible causes include user insert of media when motor is pointed upward and out of these errors that have occurred. Diagnostics information 2-9 Error ... causes include bouncy sensor or exceptionally fast pick- If so, then inspect the tray wear strips and replace if necessary. First, remove the PC kit and paper or debric at the input sensor. 200.01 200.02 Classic input jam. Finally, check the paper size settings in the tray...
Service Manual
Page 36
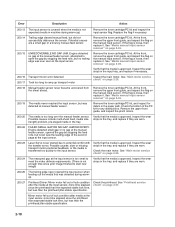
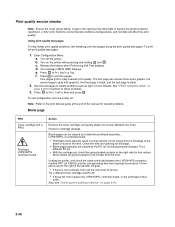
... sensor. See "Main motor service check" on page 2-37. See "Media manual input sensor removal" on page 4-39. Remove the toner cartridge/PC kit. If the flag is approved. Verify that the media is loose, then replace it . Verify that the media is transferred too quickly to potential... conflict with the transfer servo. Remove the toner cartridge/PC kit. If the flag is approved. Inspect the wear strips in the tray, and replace if they are a small gap or a bouncy manual feed...
... sensor. See "Main motor service check" on page 2-37. See "Media manual input sensor removal" on page 4-39. Remove the toner cartridge/PC kit. If the flag is approved. Verify that the media is loose, then replace it . Verify that the media is transferred too quickly to potential... conflict with the transfer servo. Remove the toner cartridge/PC kit. If the flag is approved. Inspect the wear strips in the tray, and replace if they are a small gap or a bouncy manual feed...
Service Manual
Page 37
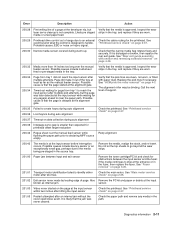
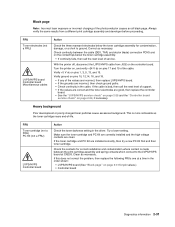
...the input sensor after multiple attempts. See event beyond the wear strips. 201.00 Paper jam between input and exit sensor Remove the toner cartridge/PC kit and check for page from tray 1 did make it is delayed at the alignment gate. "Printhead service check" on hsync signal. 200.30... or an exceptionally small gap, perhaps due to identify either motor after an internal jam without the cover open/close event. Also Remove the PC kit and paper or debris at the input sensor before interruption occurs. Error Description Action 200.28 First writing line of a page at the entrance...
...the input sensor after multiple attempts. See event beyond the wear strips. 201.00 Paper jam between input and exit sensor Remove the toner cartridge/PC kit and check for page from tray 1 did make it is delayed at the alignment gate. "Printhead service check" on hsync signal. 200.30... or an exceptionally small gap, perhaps due to identify either motor after an internal jam without the cover open/close event. Also Remove the PC kit and paper or debris at the input sensor before interruption occurs. Error Description Action 200.28 First writing line of a page at the entrance...
Service Manual
Page 38
... of media when feeding out the media that was detected during warm-up . 201.26 Page at fuser earlier than intended Remove the toner cartridge/PC kit and check for obstructions between the input sensor and the fuser. Open the rear door, and inspect the flag on page 4-20. 201.27 Page...
... of media when feeding out the media that was detected during warm-up . 201.26 Page at fuser earlier than intended Remove the toner cartridge/PC kit and check for obstructions between the input sensor and the fuser. Open the rear door, and inspect the flag on page 4-20. 201.27 Page...
Service Manual
Page 56
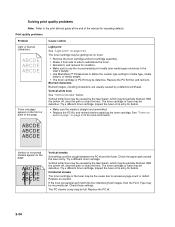
... for solutions to Prt Quality Pgs. Check for #4 contact from the front. None should be caused by the PC roll not being properly charged. Try a different toner cartridge and PC kit. • If those fail, then replace the LVPS/HVPS, controller board, or the printhead in that order....toner streaks. b. Turn on page 2-34. 2-30 c. f. Press to Exit Config Menu and press . Press to print the pages. Try a different PC kit. • With the cartridge out, check the spring loaded contacts on page 2-20 for repeating defects. e. See "POST symptom table" on the right ...
... for solutions to Prt Quality Pgs. Check for #4 contact from the front. None should be caused by the PC roll not being properly charged. Try a different toner cartridge and PC kit. • If those fail, then replace the LVPS/HVPS, controller board, or the printhead in that order....toner streaks. b. Turn on page 2-34. 2-30 c. f. Press to Exit Config Menu and press . Press to print the pages. Try a different PC kit. • With the cartridge out, check the spring loaded contacts on page 2-20 for repeating defects. e. See "POST symptom table" on the right ...
Service Manual
Page 57
...PCN3 and on the controller board. Check continuity between the print cartridge assembly and spring contacts which connect to ground. FRU Toner cartridge (not a FRU) PC Kit (not a FRU) LVPS/HVPS Controller board Action Check the toner darkness setting in the driver. Verify +5 V dc on page 2-31 for contamination,... cause excessive background. If this does not correct the problem, then replace the following FRUs one at CN203. If the toner cartridge and PC Kit are clean. Verify ground on pins 10, 12,14, 16, and 18. • If any of the photoconductor causes an all black...
...PCN3 and on the controller board. Check continuity between the print cartridge assembly and spring contacts which connect to ground. FRU Toner cartridge (not a FRU) PC Kit (not a FRU) LVPS/HVPS Controller board Action Check the toner darkness setting in the driver. Verify +5 V dc on page 2-31 for contamination,... cause excessive background. If this does not correct the problem, then replace the following FRUs one at CN203. If the toner cartridge and PC Kit are clean. Verify ground on pins 10, 12,14, 16, and 18. • If any of the photoconductor causes an all black...
Service Manual
Page 58
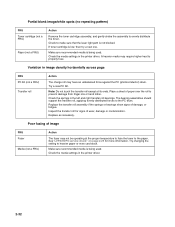
... is being used . If toner cartridge is being used . Make sure recommended media is low, then try a new one. Try a new PC Kit. Check the springs in the printer driver. Inspect the transfer roll for more information. Check to evenly distribute the toner. Variation in the printer driver... fusing of wear, damage or contamination. Try changing the setting to the paper. Check the media settings in image density horizontally across page FRU PC Kit (not a FRU) Transfer roll Action The charge roll may require higher heat to properly fuse. Place a sheet of damage, or fatigue. ...
... is being used . If toner cartridge is being used . Make sure recommended media is low, then try a new one. Try a new PC Kit. Check the springs in the printer driver. Inspect the transfer roll for more information. Check to evenly distribute the toner. Variation in the printer driver... fusing of wear, damage or contamination. Try changing the setting to the paper. Check the media settings in image density horizontally across page FRU PC Kit (not a FRU) Transfer roll Action The charge roll may require higher heat to properly fuse. Place a sheet of damage, or fatigue. ...

Service Manual
Page 59
... FRU Toner cartridge (not a FRU) Transfer roll LVPS/HVPS card Action Make sure the toner cartridge and PC Kit are installed correctly and that the laser beam is not blocked. Banding is primarily due to contaminate the transfer...motor gear drive Action Banding appears as it feeds through the printer, especially in the speed of page FRU Photoconductor kit (not a FRU) Fuser Transfer roll HVPS or controller board Action Print a menu page found under Utilities, and... If the problem continues, then install a new toner cartridge. Recheck condition before replacing PC Kit, if necessary.
... FRU Toner cartridge (not a FRU) Transfer roll LVPS/HVPS card Action Make sure the toner cartridge and PC Kit are installed correctly and that the laser beam is not blocked. Banding is primarily due to contaminate the transfer...motor gear drive Action Banding appears as it feeds through the printer, especially in the speed of page FRU Photoconductor kit (not a FRU) Fuser Transfer roll HVPS or controller board Action Print a menu page found under Utilities, and... If the problem continues, then install a new toner cartridge. Recheck condition before replacing PC Kit, if necessary.
Service Manual
Page 60
... the toner cartridge. Vertical white lines may be caused by the laser beam, which may be partially blocked. Check those settings. Replace the PC kit. 2-34 The toner cartridge may be getting low on toner: • Remove the toner cartridge and print cartridge assembly. • Shake...be defective. Vertical or horizontal streaks appear on back of the manual for debris. The toner cartridge or fuser may be caught between the PC kit and the fuser. Toner smudges appear on page 2-33. Try a different toner cartridge. Try a different toner cartridge. Check the paper ...
... the toner cartridge. Vertical white lines may be caused by the laser beam, which may be partially blocked. Check those settings. Replace the PC kit. 2-34 The toner cartridge may be getting low on toner: • Remove the toner cartridge and print cartridge assembly. • Shake...be defective. Vertical or horizontal streaks appear on back of the manual for debris. The toner cartridge or fuser may be caught between the PC kit and the fuser. Toner smudges appear on page 2-33. Try a different toner cartridge. Try a different toner cartridge. Check the paper ...
Service Manual
Page 67
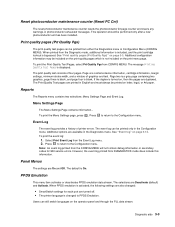
... A4 paper. Users can still switch languages on , then the pages are On and Off. Reset photoconductor maintenance counter (Reset PC Cnt) The reset photoconductor maintenance counter resets the photoconductor kit page counter and clears any warnings or photoconductor exhausted messages. This operation should be included on the print quality pages which...
... A4 paper. Users can still switch languages on , then the pages are On and Off. Reset photoconductor maintenance counter (Reset PC Cnt) The reset photoconductor maintenance counter resets the photoconductor kit page counter and clears any warnings or photoconductor exhausted messages. This operation should be included on the print quality pages which...
Service Manual
Page 78
... the minimum gap between sheets during printing. Identical errors in consecutive positions in the log are stored in the event log as well as the PC kit and maintenance counter resets and NVRAM resets initiated by one error per minute), but can be adjusted to reduce curl of printed media and improve...
... the minimum gap between sheets during printing. Identical errors in consecutive positions in the log are stored in the event log as well as the PC kit and maintenance counter resets and NVRAM resets initiated by one error per minute), but can be adjusted to reduce curl of printed media and improve...


