User Guide
Page 1
... OSD Setting the Optimal Resolution Using the Dell Soundbar (Optional) Rotating Your Monitor Changing the Rotation of Dell Inc; has determined that this document is a registered trademark of Dell Inc. All rights reserved. Dell™ 1704FPV Flat Panel Monitor About Your Monitor Front View Back View Side View Bottom View Monitor Specifications Dell Soundbar (Optional) Specifications Caring for energy efficiency...
... OSD Setting the Optimal Resolution Using the Dell Soundbar (Optional) Rotating Your Monitor Changing the Rotation of Dell Inc; has determined that this document is a registered trademark of Dell Inc. All rights reserved. Dell™ 1704FPV Flat Panel Monitor About Your Monitor Front View Back View Side View Bottom View Monitor Specifications Dell Soundbar (Optional) Specifications Caring for energy efficiency...
User Guide
Page 2
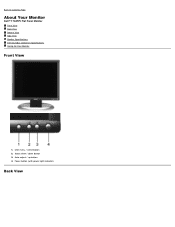
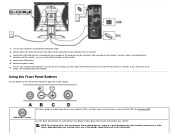
Power button (with power light indicator) Back View OSD menu / select button 2. Input select / down button 3. Back to Contents Page About Your Monitor Dell™ 1704FPV Flat Panel Monitor Front View Back View Bottom View Side View Monitor Specifications Dell Soundbar (Optional) Specifications Caring for Your Monitor Front View 1. Auto-adjust / up button 4.
Power button (with power light indicator) Back View OSD menu / select button 2. Input select / down button 3. Back to Contents Page About Your Monitor Dell™ 1704FPV Flat Panel Monitor Front View Back View Bottom View Side View Monitor Specifications Dell Soundbar (Optional) Specifications Caring for Your Monitor Front View 1. Auto-adjust / up button 4.
User Guide
Page 3
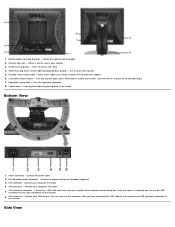
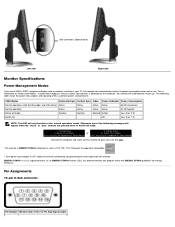
.... Connect the power cable 2. Attach a lock to the desired height. 7. DVI connector - Connect your monitor. 3. Bottom View 1. Dell Soundbar power connector - You can use this label if you have connected the USB cable to mount the monitor. 5. Attach the optional Dell Soundbar. 2. Security lock slot - VESA mounting holes (100mm [Behind attached base plate]) - Connect...
.... Connect the power cable 2. Attach a lock to the desired height. 7. DVI connector - Connect your monitor. 3. Bottom View 1. Dell Soundbar power connector - You can use this label if you have connected the USB cable to mount the monitor. 5. Attach the optional Dell Soundbar. 2. Security lock slot - VESA mounting holes (100mm [Behind attached base plate]) - Connect...
User Guide
Page 4
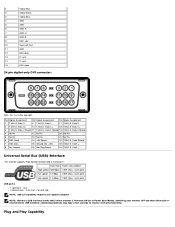
...Cable ENERGY STAR® is ENERGY STAR®-compliant as well as 'Power Save Mode'*. Pin Assignments 15-pin D-Sub connector: Pin Number Monitor Side of this product meets the ENERGY STAR® guidelines for energy efficiency. Digital Input In Power Save Mode or In Power Save Mode... compliance display card or software installed in your PC, the monitor can only be achieved by disconnecting the main cable from keyboard, mouse or other input devices is referred to the OSD. As an ENERGY STAR® Partner, DELL has determined that this automatic power saving feature: VESA Modes ...
...Cable ENERGY STAR® is ENERGY STAR®-compliant as well as 'Power Save Mode'*. Pin Assignments 15-pin D-Sub connector: Pin Number Monitor Side of this product meets the ENERGY STAR® guidelines for energy efficiency. Digital Input In Power Save Mode or In Power Save Mode... compliance display card or software installed in your PC, the monitor can only be achieved by disconnecting the main cable from keyboard, mouse or other input devices is referred to the OSD. As an ENERGY STAR® Partner, DELL has determined that this automatic power saving feature: VESA Modes ...
User Guide
Page 5
...17 T.M.D.S. Data 1+ 18 T.M.D.S. Data 0+ 3 T.M.D.S. Data 0 Shield 4 No Pin 12 No Pin 20 No Pin 5 No Pin 13 No Pin 21 No Pin 6 DDC Clock 14 +5V Power 22 T.M.D.S. Plug and Play Capability Data 2- 9 T.M.D.S. Clock Shield 7 DDC Data 15 Ground (for +5V) 23 T.M.D.S. Universal Serial Bus (USB) Interface This monitor...left side NOTE: USB 2.0 capability requires 2.0 capable computer NOTE: Monitor's USB interface works ONLY when monitor is at the top right. Data 2+ 10 T.M.D.S. Clock - Switching your monitor OFF and then ON would reenumerate its USB interface; Data 0-...
...17 T.M.D.S. Data 1+ 18 T.M.D.S. Data 0+ 3 T.M.D.S. Data 0 Shield 4 No Pin 12 No Pin 20 No Pin 5 No Pin 13 No Pin 21 No Pin 6 DDC Clock 14 +5V Power 22 T.M.D.S. Plug and Play Capability Data 2- 9 T.M.D.S. Clock Shield 7 DDC Data 15 Ground (for +5V) 23 T.M.D.S. Universal Serial Bus (USB) Interface This monitor...left side NOTE: USB 2.0 capability requires 2.0 capable computer NOTE: Monitor's USB interface works ONLY when monitor is at the top right. Data 2+ 10 T.M.D.S. Clock - Switching your monitor OFF and then ON would reenumerate its USB interface; Data 0-...
User Guide
Page 6
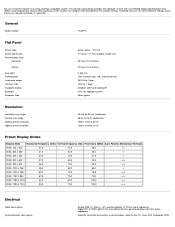
... x 600 46.9 75.0 49.5 +/+ VESA, 1024 x 768 48.4 60.0 65.0 -/- TFT LCD 17 inches (17-inch viewable image size) 337 mm (13.3 inches) 270 mm (10.6 inches) 0.264 mm 178... synchronizations, polarity-free TTL level, SOG (Composite SYNC General Model number 1704FPV Flat Panel Screen type Screen dimensions Preset display area: Horizontal Vertical Pixel ... 25.2 -/- You can install the monitor in most cases monitor installation is automatic. If desired, the user can configure itself and optimize the monitor settings. The monitor automatically provides the computer system with hard...
... x 600 46.9 75.0 49.5 +/+ VESA, 1024 x 768 48.4 60.0 65.0 -/- TFT LCD 17 inches (17-inch viewable image size) 337 mm (13.3 inches) 270 mm (10.6 inches) 0.264 mm 178... synchronizations, polarity-free TTL level, SOG (Composite SYNC General Model number 1704FPV Flat Panel Screen type Screen dimensions Preset display area: Horizontal Vertical Pixel ... 25.2 -/- You can install the monitor in most cases monitor installation is automatic. If desired, the user can configure itself and optimize the monitor settings. The monitor automatically provides the computer system with hard...
User Guide
Page 7
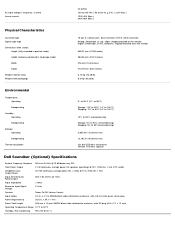
...90%(noncondensing) 3,657.6m (12,000 ft) max 12,192 m (40,000 ft) max 221.937 BTU/hour (maximum) 109.261 BTU/hour (typical) Dell Soundbar (Optional) Specifications System Frequency Response 95 Hz to 240 VAC / 50 or 60 Hz + 3 Hz / 2.0A (Max.) 120V:42A (Max.) 240V:... Physical Characteristics Connector type Signal cable type Dimensions (with stand): Height (fully extended in portrait mode) Height (compressed/locked in landscape mode) Width Depth Weight (monitor only) Weight (with DC plug (5.5 x 2.1 x 12 mm) Operating Temperature Range 10°C to 40°C Humidity, Non-condensing 95% RH @ ...
...90%(noncondensing) 3,657.6m (12,000 ft) max 12,192 m (40,000 ft) max 221.937 BTU/hour (maximum) 109.261 BTU/hour (typical) Dell Soundbar (Optional) Specifications System Frequency Response 95 Hz to 240 VAC / 50 or 60 Hz + 3 Hz / 2.0A (Max.) 120V:42A (Max.) 240V:... Physical Characteristics Connector type Signal cable type Dimensions (with stand): Height (fully extended in portrait mode) Height (compressed/locked in landscape mode) Width Depth Weight (monitor only) Weight (with DC plug (5.5 x 2.1 x 12 mm) Operating Temperature Range 10°C to 40°C Humidity, Non-condensing 95% RH @ ...

User Guide
Page 8
... scratch and show white scuff marks more than lighter-colored monitor. Do not use a special screen-cleaning tissue or solution suitable for Your Monitor CAUTION: Read and follow the safety instructions before cleaning the monitor. Avoid using detergent of the monitor. To clean your monitor with care as some detergents leave a milky film on the...
... scratch and show white scuff marks more than lighter-colored monitor. Do not use a special screen-cleaning tissue or solution suitable for Your Monitor CAUTION: Read and follow the safety instructions before cleaning the monitor. Avoid using detergent of the monitor. To clean your monitor with care as some detergents leave a milky film on the...
User Guide
Page 9
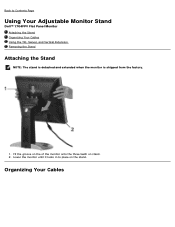
Back to place on stand. 2. Fit the groove on the of the monitor onto the three teeth on the stand. Lower the monitor until it locks in to Contents Page Using Your Adjustable Monitor Stand Dell™ 1704FPV Flat Panel Monitor Attaching the Stand Organizing Your Cables Using the Tilt, Swivel, and Vertical Extension Removing the Stand Attaching the Stand NOTE: The stand is detached and extended when the monitor is shipped from the factory. 1. Organizing Your Cables
Back to place on stand. 2. Fit the groove on the of the monitor onto the three teeth on the stand. Lower the monitor until it locks in to Contents Page Using Your Adjustable Monitor Stand Dell™ 1704FPV Flat Panel Monitor Attaching the Stand Organizing Your Cables Using the Tilt, Swivel, and Vertical Extension Removing the Stand Attaching the Stand NOTE: The stand is detached and extended when the monitor is shipped from the factory. 1. Organizing Your Cables

User Guide
Page 10
... in clicks in to the desired position. Using the Tilt, Swivel, and Vertical Extension Adjusting Your Monitor Using Tilt, Swivel, and Vertical Extension. You can adjust your monitor to best fit your monitor and computer, (See Connecting Your Monitor for cable attachment,) use the cable holder to 5.12 inches (130mm) using the stand lock...
... in clicks in to the desired position. Using the Tilt, Swivel, and Vertical Extension Adjusting Your Monitor Using Tilt, Swivel, and Vertical Extension. You can adjust your monitor to best fit your monitor and computer, (See Connecting Your Monitor for cable attachment,) use the cable holder to 5.12 inches (130mm) using the stand lock...
User Guide
Page 11
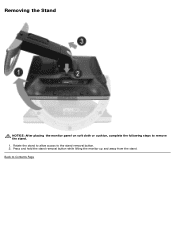
Removing the Stand NOTICE: After placing the monitor panel on soft cloth or cushion, complete the following steps to Contents Page Press and hold the stand removal button while lifting the monitor up and away from the stand. Back to remove the stand. 1. Rotate the stand to allow access to the stand removal button. 2.
Removing the Stand NOTICE: After placing the monitor panel on soft cloth or cushion, complete the following steps to Contents Page Press and hold the stand removal button while lifting the monitor up and away from the stand. Back to remove the stand. 1. Rotate the stand to allow access to the stand removal button. 2.
User Guide
Page 12
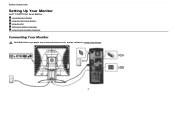
Back to Contents Page Setting Up Your Monitor Dell™ 1704FPV Flat Panel Monitor Connecting Your Monitor Using the Front Panel Buttons Using the OSD Setting the Optimal Resolution Using the Dell Soundbar (Optional) Connecting Your Monitor CAUTION: Before you begin any of the procedures in this section, follow the safety instructions. or
Back to Contents Page Setting Up Your Monitor Dell™ 1704FPV Flat Panel Monitor Connecting Your Monitor Using the Front Panel Buttons Using the OSD Setting the Optimal Resolution Using the Dell Soundbar (Optional) Connecting Your Monitor CAUTION: Before you begin any of the procedures in this section, follow the safety instructions. or
User Guide
Page 13
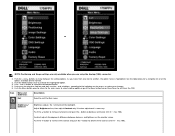
...Buttons Use the buttons on -screen display (OSD), exit from menus and sub-menus, and to adjust the image settings. NOTE: The floating 'Dell - The Menu button is selected. Connect any USB devices. 5. Connect either the white DVI or blue VGA cables to the computer and the upstream... USB connector on the computer and the monitor. 3. Turn off your monitor and computer. See Using the OSD OSD menu / select Use the Input Select button to select between two different video signals that...
...Buttons Use the buttons on -screen display (OSD), exit from menus and sub-menus, and to adjust the image settings. NOTE: The floating 'Dell - The Menu button is selected. Connect any USB devices. 5. Connect either the white DVI or blue VGA cables to the computer and the upstream... USB connector on the computer and the monitor. 3. Turn off your monitor and computer. See Using the OSD OSD menu / select Use the Input Select button to select between two different video signals that...
User Guide
Page 14
... using the Pixel Clock (Coarse), Phase (Fine) controls in the OSD. The green light indicates the monitor is on and off. Power Button and Indicator Using the OSD NOTE: If you make an adjustment and then either proceed to activate automatic setup ...-adjusts to the current input: Auto Adjust In Progress Auto Adjust Auto Adjustment button allows the monitor to self-adjust to turn the monitor on and fully functional. An amber light indicates power save mode. If you make an adjustment and then wait for Digital (DVI) Input Use the ...
... using the Pixel Clock (Coarse), Phase (Fine) controls in the OSD. The green light indicates the monitor is on and off. Power Button and Indicator Using the OSD NOTE: If you make an adjustment and then either proceed to activate automatic setup ...-adjusts to the current input: Auto Adjust In Progress Auto Adjust Auto Adjustment button allows the monitor to self-adjust to turn the monitor on and fully functional. An amber light indicates power save mode. If you make an adjustment and then wait for Digital (DVI) Input Use the ...
User Guide
Page 15
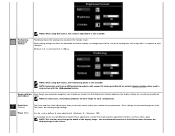
... slide bar and then use the - button to decrease the contrast (min 0 ~ max 100). Contrast adjusts the degree of all the options available for the monitor. 3. Adjust Brightness first, then adjust Contrast only if further adjustment is highlighted. button to decrease luminance (min 0 ~ max 100). Push the - or NOTE: Positioning and... two or three times to exit from the OSD. and + buttons to increase luminance and push the - and + buttons, according to the indicators on the monitor screen. and + button to make your changes. 6.
... slide bar and then use the - button to decrease the contrast (min 0 ~ max 100). Contrast adjusts the degree of all the options available for the monitor. 3. Adjust Brightness first, then adjust Contrast only if further adjustment is highlighted. button to decrease luminance (min 0 ~ max 100). Push the - or NOTE: Positioning and... two or three times to exit from the OSD. and + buttons to increase luminance and push the - and + buttons, according to the indicators on the monitor screen. and + button to make your changes. 6.
User Guide
Page 16
...NOTE: Horizontal and Vertical OSD positioning adjusts with respect to landscape (default) or portrait display rotation when used in response to your monitor on the screen. Image settings: Auto Adjust Even though your computer recognizes your preference. These settings are not obtained using the Phase ...the OSD rotation feature. Pixel Clock (Coarse) Phase (Fine) The Phase and Pixel Clock adjustments allow you to more closely adjust your monitor to your configuration. NOTE: This function may change the width of the viewing area, the image shifts in conjunction with your particular ...
...NOTE: Horizontal and Vertical OSD positioning adjusts with respect to landscape (default) or portrait display rotation when used in response to your monitor on the screen. Image settings: Auto Adjust Even though your computer recognizes your preference. These settings are not obtained using the Phase ...the OSD rotation feature. Pixel Clock (Coarse) Phase (Fine) The Phase and Pixel Clock adjustments allow you to more closely adjust your monitor to your configuration. NOTE: This function may change the width of the viewing area, the image shifts in conjunction with your particular ...
User Guide
Page 18
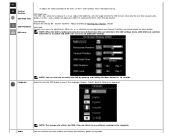
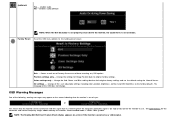
... the OSD settings menu, with OSD Lock selected. NOTE: When the OSD is selected, no effect on any software running on or off when the monitor is in one of five languages (English, French, Spanish, German or Japanese). Select No (-) to unlock and allow user access to 60 seconds. Select... a button. Vertical Position OSD Hold Time OSD Rotation OSD Lock To adjust the vertical position of the OSD, use . Adjust according to Rotating Your Monitor setction OSD Lock: Controls user access to have the audio on the computer. You can also lock or unlock the OSD by 90 ° counter...
... the OSD settings menu, with OSD Lock selected. NOTE: When the OSD is selected, no effect on any software running on or off when the monitor is in one of five languages (English, French, Spanish, German or Japanese). Select No (-) to unlock and allow user access to 60 seconds. Select... a button. Vertical Position OSD Hold Time OSD Rotation OSD Lock To adjust the vertical position of the OSD, use . Adjust according to Rotating Your Monitor setction OSD Lock: Controls user access to have the audio on the computer. You can also lock or unlock the OSD by 90 ° counter...
User Guide
Page 19
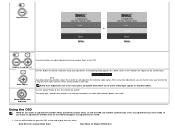
disables audio (default) NOTE: When the Dell Soundbar is not available. The language of Factory Reset menu without resetting any OSD options. (optional) Yes - enables audio No - Change the settings for the monitor to the factory defaults. Recommended mode is receiving from the computer. All ... factory settings and set the default setting for the Horizontal and Vertical frequency ranges addressable by this monitor. Position settings only - NOTE: The floating Dell Self-test Feature Check dialog appears on the screen indicating that it is 1280 X 1024 @ 60Hz.
disables audio (default) NOTE: When the Dell Soundbar is not available. The language of Factory Reset menu without resetting any OSD options. (optional) Yes - enables audio No - Change the settings for the monitor to the factory defaults. Recommended mode is receiving from the computer. All ... factory settings and set the default setting for the Horizontal and Vertical frequency ranges addressable by this monitor. Position settings only - NOTE: The floating Dell Self-test Feature Check dialog appears on the screen indicating that it is 1280 X 1024 @ 60Hz.
User Guide
Page 20
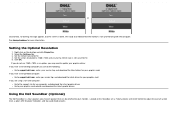
... Set the screen resolution to your graphics card website and download the latest graphic drivers Using the Dell Soundbar (Optional) The Dell Soundbar is a four-speaker, two-channel speaker that the monitor is still set at 60 Hz. 5. See Solving Problems for power indication, and two audio ...headset jacks. If you have a Dell desktop computer you computer and download the latest graphic drivers Go to your monitor. or Occasionally, no warning message appears, but the screen is blank, this could also indicate that...
... Set the screen resolution to your graphics card website and download the latest graphic drivers Using the Dell Soundbar (Optional) The Dell Soundbar is a four-speaker, two-channel speaker that the monitor is still set at 60 Hz. 5. See Solving Problems for power indication, and two audio ...headset jacks. If you have a Dell desktop computer you computer and download the latest graphic drivers Go to your monitor. or Occasionally, no warning message appears, but the screen is blank, this could also indicate that...
User Guide
Page 21
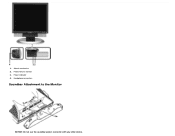
Headphone connectors Soundbar Attachment to the Monitor NOTICE: Do not use the soundbar power connector with any other device. 1. Power indicator 4. Power/volume control 3. Attach mechanism 2.
Headphone connectors Soundbar Attachment to the Monitor NOTICE: Do not use the soundbar power connector with any other device. 1. Power indicator 4. Power/volume control 3. Attach mechanism 2.


