
Owner's Manual
Page 6
... CAUTION: SAFETY INFORMATION 1 1 Preparing Your Multi-Function Printer Unlocking the Scanner 4 Using the Operator Panel 5 Copy Keys 5 Common Keys 6 Changing the Display Language 7 Set Up Faxing 7 Setting the Machine ID 7 Using the Number Keypad to Enter ...Characters 8 Setting the Time and Date 9 Set Up Networking 11 Attach Cables 11 Print and Check the Network Set-Up Page 12 Run the Installation Software 13 2 Understanding the Software Software Overview 16 Installing Dell Software For Local Printing 17 Windows XP 17 Windows 2000 18 Windows 98SE 18 Windows Me 19 vi Contents
... CAUTION: SAFETY INFORMATION 1 1 Preparing Your Multi-Function Printer Unlocking the Scanner 4 Using the Operator Panel 5 Copy Keys 5 Common Keys 6 Changing the Display Language 7 Set Up Faxing 7 Setting the Machine ID 7 Using the Number Keypad to Enter ...Characters 8 Setting the Time and Date 9 Set Up Networking 11 Attach Cables 11 Print and Check the Network Set-Up Page 12 Run the Installation Software 13 2 Understanding the Software Software Overview 16 Installing Dell Software For Local Printing 17 Windows XP 17 Windows 2000 18 Windows 98SE 18 Windows Me 19 vi Contents

Owner's Manual
Page 7
Assigning an IP Address 20 Installing Dell Software For Network Printing 20 Uninstalling Software 22 3 Loading Print Media Print Media Guidelines 24 Loading Paper and Transparencies 27 Loading Paper Into the Paper Tray 27 Loading Paper Into the Manual ... Size and Type 35 Setting the Paper Size 35 Setting the Paper Type 35 Placing Documents on the Scanner Glass 36 Loading Documents Into the ADF 37 4 Using Your Multi-Function Printer Printing 40 Accessing Printer Properties 40 Copying 41 Making Copies 41 Using Copy Features With the Button 41 Copy Menu Options...
Assigning an IP Address 20 Installing Dell Software For Network Printing 20 Uninstalling Software 22 3 Loading Print Media Print Media Guidelines 24 Loading Paper and Transparencies 27 Loading Paper Into the Paper Tray 27 Loading Paper Into the Manual ... Size and Type 35 Setting the Paper Size 35 Setting the Paper Type 35 Placing Documents on the Scanner Glass 36 Loading Documents Into the ADF 37 4 Using Your Multi-Function Printer Printing 40 Accessing Printer Properties 40 Copying 41 Making Copies 41 Using Copy Features With the Button 41 Copy Menu Options...

Owner's Manual
Page 27
.... 3 The scanner driver is automatically loaded first from D:\1600n\Scan\WINXP2K\p3scan.inf, where "D" is connected to a network instead of your operating system. Windows XP: 1 Make sure that the multi-function printer is attached to your CD drive. 4 Click Next. Cancel the screen and use the Drivers and Utilities CD to install the Dell software. 1 Make...
.... 3 The scanner driver is automatically loaded first from D:\1600n\Scan\WINXP2K\p3scan.inf, where "D" is connected to a network instead of your operating system. Windows XP: 1 Make sure that the multi-function printer is attached to your CD drive. 4 Click Next. Cancel the screen and use the Drivers and Utilities CD to install the Dell software. 1 Make...

Owner's Manual
Page 28
...dell.com/supplies | support.dell.com 5 Click Finish, and a second hardware wizard appears. Search for the best driver for my device (Recommended), click Next, select CD-ROM Drives, and then click Next through the wizard screens. 3 The scanner driver is automatically loaded first from D:\1600n\Printer...\GDI\WinXP\delr1.inf, where "D" is selected. 10 Click Next. D:\USB is automatically loaded from the Windows taskbar. 9 Click Next. The printer driver is selected. 18 Understanding the Software
...dell.com/supplies | support.dell.com 5 Click Finish, and a second hardware wizard appears. Search for the best driver for my device (Recommended), click Next, select CD-ROM Drives, and then click Next through the wizard screens. 3 The scanner driver is automatically loaded first from D:\1600n\Printer...\GDI\WinXP\delr1.inf, where "D" is selected. 10 Click Next. D:\USB is automatically loaded from the Windows taskbar. 9 Click Next. The printer driver is selected. 18 Understanding the Software

Owner's Manual
Page 55
... selected program when the scan is a PaperPort application that are limited to PaperPort and to Dell ScanCenter. The selected application window opens. Using Yo ur Multi-Function Pr inter 4 5 Icons on the scanner glass. Adjust the scan settings and start scan. To scan and send an item to ...PaperPort's Help menu. Scanning from the Windows Start Menu and displays the Dell ScanCenter bar. For details about using Dell ScanCenter, refer to a program, click the ...
... selected program when the scan is a PaperPort application that are limited to PaperPort and to Dell ScanCenter. The selected application window opens. Using Yo ur Multi-Function Pr inter 4 5 Icons on the scanner glass. Adjust the scan settings and start scan. To scan and send an item to ...PaperPort's Help menu. Scanning from the Windows Start Menu and displays the Dell ScanCenter bar. For details about using Dell ScanCenter, refer to a program, click the ...

Owner's Manual
Page 56
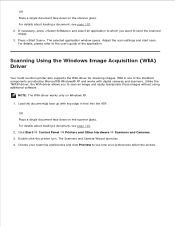
...Control Panel → Printers and Other Hardware → Scanners and Cameras. 3 Double-click the printer icon. www.dell.com/supplies | support.dell.com Scanning Using the Windows Image Acquisition (WIA) Driver Your multi-function printer also supports the ...WIA driver for scanning images. WIA is copied to your scanning preferences and click Preview to scan an image and easily manipulate those images without using additional software...
...Control Panel → Printers and Other Hardware → Scanners and Cameras. 3 Double-click the printer icon. www.dell.com/supplies | support.dell.com Scanning Using the Windows Image Acquisition (WIA) Driver Your multi-function printer also supports the ...WIA driver for scanning images. WIA is copied to your scanning preferences and click Preview to scan an image and easily manipulate those images without using additional software...
Dell Laser Multi-Function Printer 1600n User's Guide
Page 94
...Adjust the scan settings and start scan. OR Place a single document face down on the scanner glass. The Scanners and Camera Wizard launches. 4. Double click the printer icon. The selected application window opens. For details, please refer to send the scanned image. 3. Press . Unlike the ... cameras and scanners. OR Place a single document face down on the scanner glass. NOTE: The WIA driver works only on Windows XP. 1. Choose your scanning preferences and click Preview to scan an image and easily manipulate those images without using additional software.
...Adjust the scan settings and start scan. OR Place a single document face down on the scanner glass. The Scanners and Camera Wizard launches. 4. Double click the printer icon. The selected application window opens. For details, please refer to send the scanned image. 3. Press . Unlike the ... cameras and scanners. OR Place a single document face down on the scanner glass. NOTE: The WIA driver works only on Windows XP. 1. Choose your scanning preferences and click Preview to scan an image and easily manipulate those images without using additional software.


