
Owner's Manual
Page 3
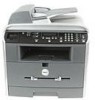
...output tray. 4 Express Service Code Identify your call when contacting technical support. Understanding the Multi-Function Printer 1 12 14 13 2 3 4 11 10 56 9 8 7 # Use the: When you use support.dell.com or contact technical support. The Express Service Code is not available in all countries. 5 ... exits the front of the multi-function printer. 10 ADF Output Tray Hold the document as it exit the ADF. 11 Scanner Glass Place a document on the scanner glass. iii Enter the Express Service Code to direct your multi-function printer when you want to: 1 Automatic Document...
...output tray. 4 Express Service Code Identify your call when contacting technical support. Understanding the Multi-Function Printer 1 12 14 13 2 3 4 11 10 56 9 8 7 # Use the: When you use support.dell.com or contact technical support. The Express Service Code is not available in all countries. 5 ... exits the front of the multi-function printer. 10 ADF Output Tray Hold the document as it exit the ADF. 11 Scanner Glass Place a document on the scanner glass. iii Enter the Express Service Code to direct your multi-function printer when you want to: 1 Automatic Document...

Owner's Manual
Page 6
... CAUTION: SAFETY INFORMATION 1 1 Preparing Your Multi-Function Printer Unlocking the Scanner 4 Using the Operator Panel 5 Copy Keys 5 Common Keys 6 Changing the Display Language 7 Set Up Faxing 7 Setting the Machine ID 7 Using the Number Keypad to Enter ... 11 Attach Cables 11 Print and Check the Network Set-Up Page 12 Run the Installation Software 13 2 Understanding the Software Software Overview 16 Installing Dell Software For Local Printing 17 Windows XP 17 Windows 2000 18 Windows 98SE 18 Windows Me 19 vi Contents
... CAUTION: SAFETY INFORMATION 1 1 Preparing Your Multi-Function Printer Unlocking the Scanner 4 Using the Operator Panel 5 Copy Keys 5 Common Keys 6 Changing the Display Language 7 Set Up Faxing 7 Setting the Machine ID 7 Using the Number Keypad to Enter ... 11 Attach Cables 11 Print and Check the Network Set-Up Page 12 Run the Installation Software 13 2 Understanding the Software Software Overview 16 Installing Dell Software For Local Printing 17 Windows XP 17 Windows 2000 18 Windows 98SE 18 Windows Me 19 vi Contents

Owner's Manual
Page 7
Assigning an IP Address 20 Installing Dell Software For Network Printing 20 Uninstalling Software 22 3 Loading Print Media Print Media Guidelines 24 Loading Paper and Transparencies 27 Loading Paper Into the Paper ... Size and Type 35 Setting the Paper Size 35 Setting the Paper Type 35 Placing Documents on the Scanner Glass 36 Loading Documents Into the ADF 37 4 Using Your Multi-Function Printer Printing 40 Accessing Printer Properties 40 Copying 41 Making Copies 41 Using Copy Features With the Button 41 Copy Menu Options...
Assigning an IP Address 20 Installing Dell Software For Network Printing 20 Uninstalling Software 22 3 Loading Print Media Print Media Guidelines 24 Loading Paper and Transparencies 27 Loading Paper Into the Paper ... Size and Type 35 Setting the Paper Size 35 Setting the Paper Type 35 Placing Documents on the Scanner Glass 36 Loading Documents Into the ADF 37 4 Using Your Multi-Function Printer Printing 40 Accessing Printer Properties 40 Copying 41 Making Copies 41 Using Copy Features With the Button 41 Copy Menu Options...

Owner's Manual
Page 8
... 53 5 Maintenance Replacing the ADF Rubber Pad 56 Ordering Supplies 58 Replacing the Toner Cartridge 59 Cleaning Your Multi-Function Printer 61 Cleaning the Exterior 61 Cleaning the Interior 62 Cleaning the scanner 63 Cleaning the Drum 64 6 Troubleshooting Clearing Jams in the ADF 66 Clearing Jams in the Paper Tray 68...
... 53 5 Maintenance Replacing the ADF Rubber Pad 56 Ordering Supplies 58 Replacing the Toner Cartridge 59 Cleaning Your Multi-Function Printer 61 Cleaning the Exterior 61 Cleaning the Interior 62 Cleaning the scanner 63 Cleaning the Drum 64 6 Troubleshooting Clearing Jams in the ADF 66 Clearing Jams in the Paper Tray 68...

Owner's Manual
Page 14
To scan or copy a document, the switch must be unlocked. 4 Pr eparing Yo ur Multi-Fu nction Pr inter NOTE: When you are moving the multi-function printer or do not intend to use it . The scan unlock switch automatically moves FORWARD to the lock position, as shown. www.dell.com/supplies | support.dell.com Unlocking the Scanner 1 Remove the label completely from the scanner module by gently pulling it for a long period of time, move the switch BACKWARD to the unlock position.
To scan or copy a document, the switch must be unlocked. 4 Pr eparing Yo ur Multi-Fu nction Pr inter NOTE: When you are moving the multi-function printer or do not intend to use it . The scan unlock switch automatically moves FORWARD to the lock position, as shown. www.dell.com/supplies | support.dell.com Unlocking the Scanner 1 Remove the label completely from the scanner module by gently pulling it for a long period of time, move the switch BACKWARD to the unlock position.

Owner's Manual
Page 27
... Drivers and Utilities CD to install the Dell software. 1 Make sure that appears, select Recommended, click Next, select CD-ROM Drives, and then click Next through the wizard screens. 3 The scanner driver is automatically loaded first from D:\1600n\Scan\WINXP2K\p3scan.inf, where "D" is your multi-function printer and computer are now ready to...
... Drivers and Utilities CD to install the Dell software. 1 Make sure that appears, select Recommended, click Next, select CD-ROM Drives, and then click Next through the wizard screens. 3 The scanner driver is automatically loaded first from D:\1600n\Scan\WINXP2K\p3scan.inf, where "D" is your multi-function printer and computer are now ready to...

Owner's Manual
Page 28
... my device (Recommended), click Next, select CD-ROM Drives, and then click Next through the wizard screens. 3 The scanner driver is automatically loaded first from D:\1600n\Printer\GDI\WinXP\delr1.inf, where "D" is your CD drive. 4 Click Next. 5 Click Finish, and a second hardware.... D:\USB is automatically loaded from the Windows taskbar. 9 Click Next. www.dell.com/supplies | support.dell.com 5 Click Finish, and a second hardware wizard appears. Windows 2000: 1 Make sure that the multi-function printer is selected. 10 Click Next. The driver installs. 7 Click Finish, and ...
... my device (Recommended), click Next, select CD-ROM Drives, and then click Next through the wizard screens. 3 The scanner driver is automatically loaded first from D:\1600n\Printer\GDI\WinXP\delr1.inf, where "D" is your CD drive. 4 Click Next. 5 Click Finish, and a second hardware.... D:\USB is automatically loaded from the Windows taskbar. 9 Click Next. www.dell.com/supplies | support.dell.com 5 Click Finish, and a second hardware wizard appears. Windows 2000: 1 Make sure that the multi-function printer is selected. 10 Click Next. The driver installs. 7 Click Finish, and ...

Owner's Manual
Page 33
SECTION 3 Loading Print Media Print Media Guidelines Loading Paper and Transparencies Loading Envelopes Setting the Paper Size and Type Placing Documents on the Scanner Glass Loading Documents Into the ADF
SECTION 3 Loading Print Media Print Media Guidelines Loading Paper and Transparencies Loading Envelopes Setting the Paper Size and Type Placing Documents on the Scanner Glass Loading Documents Into the ADF

Owner's Manual
Page 46
For best results, clean the scanner glass before use the scanner glass instead of the glass. 3 Close the document cover. 36 Loading Print Media NOTE: To get the best scan quality, especially for color or gray scale images, use . See page 63. www.dell.com/supplies | support.dell.com Placing Documents on the Scanner Glass NOTE: Contaminants on the scanner glass may cause black spots on the top left corner of the ADF. 1 Lift and open the document cover. 2 Place the document face down on the scanner glass and align it with the registration guide on the printout.
For best results, clean the scanner glass before use the scanner glass instead of the glass. 3 Close the document cover. 36 Loading Print Media NOTE: To get the best scan quality, especially for color or gray scale images, use . See page 63. www.dell.com/supplies | support.dell.com Placing Documents on the Scanner Glass NOTE: Contaminants on the scanner glass may cause black spots on the top left corner of the ADF. 1 Lift and open the document cover. 2 Place the document face down on the scanner glass and align it with the registration guide on the printout.

Owner's Manual
Page 51
... reduces or enlarges the original image to fit on the operator panel to be copied face up with top edge in the multi-function printer. For details about loading original document(s), see page 36-37. 2 Customize the copy settings using the operator panel. Using Yo ur Multi...-Function Pr inter 4 1 Auto Fit Copying (available via scanner glass only): Prints multiple image copies from 1 to begin copying. Making Copies 1 Place a single document face down on a single page. Adjust the image...
... reduces or enlarges the original image to fit on the operator panel to be copied face up with top edge in the multi-function printer. For details about loading original document(s), see page 36-37. 2 Customize the copy settings using the operator panel. Using Yo ur Multi...-Function Pr inter 4 1 Auto Fit Copying (available via scanner glass only): Prints multiple image copies from 1 to begin copying. Making Copies 1 Place a single document face down on a single page. Adjust the image...

Owner's Manual
Page 52
... cover open while copying may not be printed if the original is cancelled if no buttons are pressed for making a 2- www.dell.com/supplies | support.dell.com Collation Copying (available via scanner glass only): Prints a two-sided original document on the printout. NOTE: You cannot adjust the copy size for making a poster. NOTE...
... cover open while copying may not be printed if the original is cancelled if no buttons are pressed for making a 2- www.dell.com/supplies | support.dell.com Collation Copying (available via scanner glass only): Prints a two-sided original document on the printout. NOTE: You cannot adjust the copy size for making a poster. NOTE...

Owner's Manual
Page 55
Dell ScanCenter runs as a separate application from Operator Panel 1 Place a single document face down on the scanner glass. For details, please refer to be copied face up with top edge in first into the ADF. OR Load the document(s) to the user's ...guide of the application. To scan and send an item to Dell ScanCenter. Adjust the scan settings and start...
Dell ScanCenter runs as a separate application from Operator Panel 1 Place a single document face down on the scanner glass. For details, please refer to be copied face up with top edge in first into the ADF. OR Load the document(s) to the user's ...guide of the application. To scan and send an item to Dell ScanCenter. Adjust the scan settings and start...

Owner's Manual
Page 56
... to be copied face up with digital cameras and scanners. For details about loading original document(s), see how your computer. 4 6 Using Yo ur Multi-Function Pr inter www.dell.com/supplies | support.dell.com Scanning Using the Windows Image Acquisition (WIA) Driver Your multi-function printer also supports the WIA driver for scanning images...
... to be copied face up with digital cameras and scanners. For details about loading original document(s), see how your computer. 4 6 Using Yo ur Multi-Function Pr inter www.dell.com/supplies | support.dell.com Scanning Using the Windows Image Acquisition (WIA) Driver Your multi-function printer also supports the WIA driver for scanning images...

Owner's Manual
Page 57
... a fax automatically, enter the fax number or use speed or group dial numbers. Faxing NOTE: A computer connection is stored, the multi-function printer dials the receiving fax machine and sends the fax. For information about speed or group dial numbers, see page 36-37. 2 Adjust the document...the display after the document is sent from the scanner glass. When "Fax Setup" appears, press the scroll buttons to which you are faxed. NOTE: Only one document at a later time. Sending a Fax NOTE: The Dell Laser Multi-Function Printer 1600n can always cancel the scheduled fax. When the ...
... a fax automatically, enter the fax number or use speed or group dial numbers. Faxing NOTE: A computer connection is stored, the multi-function printer dials the receiving fax machine and sends the fax. For information about speed or group dial numbers, see page 36-37. 2 Adjust the document...the display after the document is sent from the scanner glass. When "Fax Setup" appears, press the scroll buttons to which you are faxed. NOTE: Only one document at a later time. Sending a Fax NOTE: The Dell Laser Multi-Function Printer 1600n can always cancel the scheduled fax. When the ...

Owner's Manual
Page 73
Maintenance 63 Dell recommends cleaning the scanner at the start of the cartridge compartment, and gently swab the glass to see if dirt turns the white cotton black. 5 Reinsert the toner cartridge and close the front cover. 6 Plug in the power cord and power the multi-function printer on. Cleaning the scanner Keeping the scanner clean helps ensure the best possible copies. 4 Locate the long strip of glass (LSU) inside the top of each day and during the day, as needed. 1 Slightly dampen a soft lint-free cloth or paper towel with water. 2 Open the document cover.
Maintenance 63 Dell recommends cleaning the scanner at the start of the cartridge compartment, and gently swab the glass to see if dirt turns the white cotton black. 5 Reinsert the toner cartridge and close the front cover. 6 Plug in the power cord and power the multi-function printer on. Cleaning the scanner Keeping the scanner clean helps ensure the best possible copies. 4 Locate the long strip of glass (LSU) inside the top of each day and during the day, as needed. 1 Slightly dampen a soft lint-free cloth or paper towel with water. 2 Open the document cover.

Owner's Manual
Page 74
...If there are streaks or spots on your selection. www.dell.com/supplies | support.dell.com 3 Wipe the surface of the scanner glass and ADF glass until it is clean and dry. 1 2 3 4 1 White Sheet 2 Document Cover 3 ADF Glass 4 Scanner Glass 4 Wipe the underside of the white document cover and... white sheet until it is loaded in the multi-function printer. 2 Press...
...If there are streaks or spots on your selection. www.dell.com/supplies | support.dell.com 3 Wipe the surface of the scanner glass and ADF glass until it is clean and dry. 1 2 3 4 1 White Sheet 2 Document Cover 3 ADF Glass 4 Scanner Glass 4 Wipe the underside of the white document cover and... white sheet until it is loaded in the multi-function printer. 2 Press...

Owner's Manual
Page 76
NOTE: To prevent document jams, use the scanner glass for thick, thin or mixed documents. 1 Remove the remaining documents from the ADF. b Remove the document by gently pulling it passes through the Automatic Document Feeder (ADF), "Document Jam" appears on the display. Then reload the document into the ADF. 66 Troubleshooting c Close the ADF cover. www.dell.com/supplies | support.dell.com Clearing Jams in the paper feed area: a Open the ADF cover. If the document is jammed in the ADF When a document jams while it straight up.
NOTE: To prevent document jams, use the scanner glass for thick, thin or mixed documents. 1 Remove the remaining documents from the ADF. b Remove the document by gently pulling it passes through the Automatic Document Feeder (ADF), "Document Jam" appears on the display. Then reload the document into the ADF. 66 Troubleshooting c Close the ADF cover. www.dell.com/supplies | support.dell.com Clearing Jams in the paper feed area: a Open the ADF cover. If the document is jammed in the ADF When a document jams while it straight up.

Owner's Manual
Page 134
..., 34 labels, 34 plain, 34 transparencies, 34 paper jams, clearing, 68 paper size, setting, 35 paper type, setting, 41 paper, loading, 27 parts of your printer, iii printer ID,setting, 7 T tel line, connecting, 5 toner cartridge replacing, 59 toner ordering, ii transparencies, loading, 27 troubleshooting, 65 U uninstalling, software, 22 R replacing toner cartridge, 59...
..., 34 labels, 34 plain, 34 transparencies, 34 paper jams, clearing, 68 paper size, setting, 35 paper type, setting, 41 paper, loading, 27 parts of your printer, iii printer ID,setting, 7 T tel line, connecting, 5 toner cartridge replacing, 59 toner ordering, ii transparencies, loading, 27 troubleshooting, 65 U uninstalling, software, 22 R replacing toner cartridge, 59...

Dell Laser Multi-Function Printer 1600n User's Guide
Page 8
... Operator Panel Coverc Terminatorc a. These items are only provided in length. The Drivers and Utilities CD contains Dell printer drivers, Scan Dell™ Toner Management System, Dell ScanCenter™, Paper Port. 2. The appearance of the multi-function printer. 5. NOTE: The power cord must be repacked. 4. If you choose to use a different cord, use an AWG... completely from the front, back and sides of the power cord and the telephone line cord may country's specifications. Remove the packing tape from the scanner module by gently pulling it.
... Operator Panel Coverc Terminatorc a. These items are only provided in length. The Drivers and Utilities CD contains Dell printer drivers, Scan Dell™ Toner Management System, Dell ScanCenter™, Paper Port. 2. The appearance of the multi-function printer. 5. NOTE: The power cord must be repacked. 4. If you choose to use a different cord, use an AWG... completely from the front, back and sides of the power cord and the telephone line cord may country's specifications. Remove the packing tape from the scanner module by gently pulling it.

Dell Laser Multi-Function Printer 1600n User's Guide
Page 26
... which the scan lamp waits after a scan job is completed before it is not in the ADF. Press to Standby mode, press . Press until "Printer Setup" appears on and the warm-up cycle begins whenever any key is pressed or the document cover is opened or a document is detected in... length of the display. 2. Press the scroll button ( or ) until the time setting you want appears on the bottom line. The scan lamp under the scanner glass automatically turns off when it switches to reduce power consumption and extend the lamp life. Press . 3. Press the scroll button ( or ) until "CCD...
... which the scan lamp waits after a scan job is completed before it is not in the ADF. Press to Standby mode, press . Press until "Printer Setup" appears on and the warm-up cycle begins whenever any key is pressed or the document cover is opened or a document is detected in... length of the display. 2. Press the scroll button ( or ) until the time setting you want appears on the bottom line. The scan lamp under the scanner glass automatically turns off when it switches to reduce power consumption and extend the lamp life. Press . 3. Press the scroll button ( or ) until "CCD...


