
Owner's Manual
Page 4
... document feeding. 15 23 22 16 21 17 20 19 18 # Use the: When you want to: 15 Rear Cover Open to remove the paper jams and use the rear output slot when you print the documents from the manual feeder. 16 Rear Output Slot Hold paper as Germany, Sweden, Denmark... Switzerland), remove the plug from the Phone connector ( ) and insert the supplied terminator. 19 Wall Jack Connector Connect the telephone line to your multi-function printer. 20 Optional Tray 2 Cable Connect the optional Tray 2 to your country (such as it exits at the rear of the multi-function...
... document feeding. 15 23 22 16 21 17 20 19 18 # Use the: When you want to: 15 Rear Cover Open to remove the paper jams and use the rear output slot when you print the documents from the manual feeder. 16 Rear Output Slot Hold paper as Germany, Sweden, Denmark... Switzerland), remove the plug from the Phone connector ( ) and insert the supplied terminator. 19 Wall Jack Connector Connect the telephone line to your multi-function printer. 20 Optional Tray 2 Cable Connect the optional Tray 2 to your country (such as it exits at the rear of the multi-function...

Owner's Manual
Page 8
...Function Printer 61 Cleaning the Exterior 61 Cleaning the Interior 62 Cleaning the scanner 63 Cleaning the Drum 64 6 Troubleshooting Clearing Jams in the ADF 66 Clearing Jams in the Paper Tray 68 Paper Feed Jam (Tray 1 68 Paper Exit Jam 70 Fuser Area Jam 71 Manual Feeder Jam 73 Paper Feed Jam ...(Optional Tray 2 73 Tips for Avoiding Paper Jams 74 More Troubleshooting 74 viii Contents
...Function Printer 61 Cleaning the Exterior 61 Cleaning the Interior 62 Cleaning the scanner 63 Cleaning the Drum 64 6 Troubleshooting Clearing Jams in the ADF 66 Clearing Jams in the Paper Tray 68 Paper Feed Jam (Tray 1 68 Paper Exit Jam 70 Fuser Area Jam 71 Manual Feeder Jam 73 Paper Feed Jam ...(Optional Tray 2 73 Tips for Avoiding Paper Jams 74 More Troubleshooting 74 viii Contents

Owner's Manual
Page 40
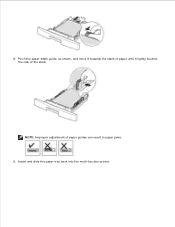
For details, see page 35. 30 Loading Print Media www.dell.com/supplies | support.dell.com 8 Pinch the paper width guide, as shown and move it towards the stack of paper until it lightly touches the side of paper guides can result in paper jams. 9 Insert and slide the paper tray back into the multi-function printer. 10 Set the paper type and size. NOTE: Improper adjustment of the stack.
For details, see page 35. 30 Loading Print Media www.dell.com/supplies | support.dell.com 8 Pinch the paper width guide, as shown and move it towards the stack of paper until it lightly touches the side of paper guides can result in paper jams. 9 Insert and slide the paper tray back into the multi-function printer. 10 Set the paper type and size. NOTE: Improper adjustment of the stack.

Owner's Manual
Page 78
... printer. Jam] Manual Feeder Jam page 73. page 73. If the paper does not exit, continue to clear the jam. Follow the steps below . www.dell.com/supplies | support.dell.com Clearing Jams in the Paper Tray Operator Panel Message Location of Jam Go to [Paper Jam 0] Open/Close Door [Paper Jam 1] Open/Close Door Paper Feed Jam (Tray 1) Paper Feed Jam...
... printer. Jam] Manual Feeder Jam page 73. page 73. If the paper does not exit, continue to clear the jam. Follow the steps below . www.dell.com/supplies | support.dell.com Clearing Jams in the Paper Tray Operator Panel Message Location of Jam Go to [Paper Jam 0] Open/Close Door [Paper Jam 1] Open/Close Door Paper Feed Jam (Tray 1) Paper Feed Jam...

Owner's Manual
Page 80
Skip to step 2. 2 Gently pull the paper out of the front output tray. www.dell.com/supplies | support.dell.com Paper Exit Jam 1 Open and close the front cover. The jammed paper automatically exits the multi-function printer. If the paper does not exit, continue to step 6. 3 If you cannot see the paper in the front output tray or the paper does not move when pulled, open the rear cover. 70 Troubleshooting
Skip to step 2. 2 Gently pull the paper out of the front output tray. www.dell.com/supplies | support.dell.com Paper Exit Jam 1 Open and close the front cover. The jammed paper automatically exits the multi-function printer. If the paper does not exit, continue to step 6. 3 If you cannot see the paper in the front output tray or the paper does not move when pulled, open the rear cover. 70 Troubleshooting

Owner's Manual
Page 81
Take care when removing paper from the multi-function printer. 1 Open the front cover and lightly pull the toner cartridge straight out. Troubleshooting 71 Fuser Area Jam NOTE: The fuser area is hot. 4 Remove the paper by gently pulling it straight out. 5 Close the rear cover. 6 Open and close the front cover to resume printing.
Take care when removing paper from the multi-function printer. 1 Open the front cover and lightly pull the toner cartridge straight out. Troubleshooting 71 Fuser Area Jam NOTE: The fuser area is hot. 4 Remove the paper by gently pulling it straight out. 5 Close the rear cover. 6 Open and close the front cover to resume printing.

Owner's Manual
Page 83
Paper Feed Jam (Optional Tray 2) 1 Pull the optional Tray 2 open . If you try to print using the manual feeder and the multi-function printer does not detect paper, due to step 3. 3 Pull the standard Tray 1 open . 2 Remove the jammed paper from the multi-function printer. Jam" appears on the display when you cannot see the paper in this area or the paper does not move when pulled, go to improper paper loading. 1 Locate the jammed paper in the manual feeder 2 Gently pull the paper straight out of the multi-function printer. Troubleshooting 73 Manual Feeder Jam "Manual F.
Paper Feed Jam (Optional Tray 2) 1 Pull the optional Tray 2 open . If you try to print using the manual feeder and the multi-function printer does not detect paper, due to step 3. 3 Pull the standard Tray 1 open . 2 Remove the jammed paper from the multi-function printer. Jam" appears on the display when you cannot see the paper in this area or the paper does not move when pulled, go to improper paper loading. 1 Locate the jammed paper in the manual feeder 2 Gently pull the paper straight out of the multi-function printer. Troubleshooting 73 Manual Feeder Jam "Manual F.
Owner's Manual
Page 84
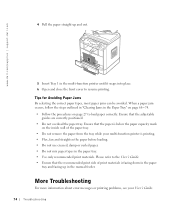
... Ensure that the adjustable guides are correctly positioned. • Do not overload the paper tray. Tips for Avoiding Paper Jams By selecting the correct paper types, most paper jams can be avoided. Ensure that the recommended print side of the paper tray. • Do not remove the paper...tray while your User's Guide. 74 Troubleshooting www.dell.com/supplies | support.dell.com 4 Pull the paper straight up in the manual feeder. More Troubleshooting For more information about error messages or printing problems, see your multi-function printer is facing down in the paper tray and ...
... Ensure that the adjustable guides are correctly positioned. • Do not overload the paper tray. Tips for Avoiding Paper Jams By selecting the correct paper types, most paper jams can be avoided. Ensure that the recommended print side of the paper tray. • Do not remove the paper...tray while your User's Guide. 74 Troubleshooting www.dell.com/supplies | support.dell.com 4 Pull the paper straight up in the manual feeder. More Troubleshooting For more information about error messages or printing problems, see your multi-function printer is facing down in the paper tray and ...

Owner's Manual
Page 134
...size, 34 labels, 34 plain, 34 transparencies, 34 paper jams, clearing, 68 paper size, setting, 35 paper type, setting, 41 paper, loading, 27 parts of your printer, iii printer ID,setting, 7 T tel line, connecting, 5 toner ...cartridge replacing, 59 toner ordering, ii transparencies, loading, 27 troubleshooting, 65 U uninstalling, software, 22 R replacing toner cartridge, 59 S safety information, 1 scanner, cleaning, 63 scanning, 44 operator panel, 45 WIA driver, 46 setup, 5 supplies, ordering, 58 support contacting Dell...
...size, 34 labels, 34 plain, 34 transparencies, 34 paper jams, clearing, 68 paper size, setting, 35 paper type, setting, 41 paper, loading, 27 parts of your printer, iii printer ID,setting, 7 T tel line, connecting, 5 toner ...cartridge replacing, 59 toner ordering, ii transparencies, loading, 27 troubleshooting, 65 U uninstalling, software, 22 R replacing toner cartridge, 59 S safety information, 1 scanner, cleaning, 63 scanning, 44 operator panel, 45 WIA driver, 46 setup, 5 supplies, ordering, 58 support contacting Dell...
Dell Laser Multi-Function Printer 1600n User's Guide
Page 20
Insert and slide the paper tray back into the multi-function printer. NOTE: Improper adjustment of the stack. 8. Pinch the paper width guide, as shown, and move it towards the stack of paper until it lightly touches the side of paper guides can result in paper jams. 9.
Insert and slide the paper tray back into the multi-function printer. NOTE: Improper adjustment of the stack. 8. Pinch the paper width guide, as shown, and move it towards the stack of paper until it lightly touches the side of paper guides can result in paper jams. 9.

Dell Laser Multi-Function Printer 1600n User's Guide
Page 39
...these guidelines when evaluating new paper stock. Paper For the best print quality, use 75 Your printer provides high quality printing on page 64 for the print media, and how to feed properly, causing jams. For best performance, use 75 g/m2 (20 lb) xerographic, long grain paper. We ...recommend that you are considering using with the multi-function printer before buying large quantities. Paper Handling Print Media Guidelines Storing Print Media...
...these guidelines when evaluating new paper stock. Paper For the best print quality, use 75 Your printer provides high quality printing on page 64 for the print media, and how to feed properly, causing jams. For best performance, use 75 g/m2 (20 lb) xerographic, long grain paper. We ...recommend that you are considering using with the multi-function printer before buying large quantities. Paper Handling Print Media Guidelines Storing Print Media...

Dell Laser Multi-Function Printer 1600n User's Guide
Page 41
... papers or curled papers Recycled papers containing more than 25% post-consumer waste that does not support auto size sensing. To help avoid jams or poor print quality: Always use coated papers. Straighten the edges on the operator panel. Check with the paper manufacturer or vendor to... change the paper size setting when you are not recommended for laser printers. mixing results in the source. Do not mix print media sizes, weights, or types in ., such as carbonless papers, carbonless copy paper ...
... papers or curled papers Recycled papers containing more than 25% post-consumer waste that does not support auto size sensing. To help avoid jams or poor print quality: Always use coated papers. Straighten the edges on the operator panel. Check with the paper manufacturer or vendor to... change the paper size setting when you are not recommended for laser printers. mixing results in the source. Do not mix print media sizes, weights, or types in ., such as carbonless papers, carbonless copy paper ...

Dell Laser Multi-Function Printer 1600n User's Guide
Page 43
... use prepunched paper: Test paper from several manufacturers before ordering and using with the multi-function printer before buying large quantities: Use transparencies designed specifically for laser printers. Your multi-function printer may not be as good as that of standard paper. Print Media Source Tray 1 (standard...Manual feeder Face up Logo enters Left side of the printer tray first Selecting Prepunched Paper Prepunched paper brands can differ in the number and placement of holes and in a ream. Prepunched paper can cause jams when multiple sheets feed through the multi-function...
... use prepunched paper: Test paper from several manufacturers before ordering and using with the multi-function printer before buying large quantities: Use transparencies designed specifically for laser printers. Your multi-function printer may not be as good as that of standard paper. Print Media Source Tray 1 (standard...Manual feeder Face up Logo enters Left side of the printer tray first Selecting Prepunched Paper Prepunched paper brands can differ in the number and placement of holes and in a ream. Prepunched paper can cause jams when multiple sheets feed through the multi-function...

Dell Laser Multi-Function Printer 1600n User's Guide
Page 44
...envelopes made from sticking together. Avoid getting fingerprints on the transparencies, which can load one transparency in laser printers. When printing on the transparencies you are compatible with laser printers that are considering using with the manufacturer or vendor to 90 g/m2 (24 lb bond) weight ...high-quality envelopes that are designed for the manual feeder as long as the cotton content is in laser printers. Use only transparencies that heat transparencies to minimize jams, do not use in the sealed or closed position Have nicked edges or bent corners Have rough...
...envelopes made from sticking together. Avoid getting fingerprints on the transparencies, which can load one transparency in laser printers. When printing on the transparencies you are compatible with laser printers that are considering using with the manufacturer or vendor to 90 g/m2 (24 lb bond) weight ...high-quality envelopes that are designed for the manual feeder as long as the cotton content is in laser printers. Use only transparencies that heat transparencies to minimize jams, do not use in the sealed or closed position Have nicked edges or bent corners Have rough...
Dell Laser Multi-Function Printer 1600n User's Guide
Page 45
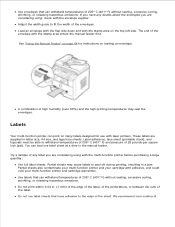
...size sheets. Do not use with the stamp area on loading an envelope. These labels are considering using , check with the multi-function printer before purchasing a large quantity: Use full label sheets. Partial sheets may seal the envelopes. Use labels that can withstand temperatures of 205°...sheet. You can load one label sheet at a time in a jam. Adjust the width guide to peel off during printing, resulting in the manual feeder. Load an envelope with the flap side down and with laser printers. A combination of We recommend zone coating of high humidity (over ...
...size sheets. Do not use with the stamp area on loading an envelope. These labels are considering using , check with the multi-function printer before purchasing a large quantity: Use full label sheets. Partial sheets may seal the envelopes. Use labels that can withstand temperatures of 205°...sheet. You can load one label sheet at a time in a jam. Adjust the width guide to peel off during printing, resulting in the manual feeder. Load an envelope with the flap side down and with laser printers. A combination of We recommend zone coating of high humidity (over ...
Dell Laser Multi-Function Printer 1600n User's Guide
Page 46
... rather than directly on the leading and driver edge, and a non-oozing adhesive should be used. Adhesive material contaminates your multifunction printer and could void your warranty. Store cartons of properties, such as the moisture content, thickness, and texture, that can significantly... affect the print quality and cause print media handling or jamming problems. Avoid using with chemicals that preprinting, perforation, and creasing can significantly affect print quality. See "Identifying Print Media ...
... rather than directly on the leading and driver edge, and a non-oozing adhesive should be used. Adhesive material contaminates your multifunction printer and could void your warranty. Store cartons of properties, such as the moisture content, thickness, and texture, that can significantly... affect the print quality and cause print media handling or jamming problems. Avoid using with chemicals that preprinting, perforation, and creasing can significantly affect print quality. See "Identifying Print Media ...

Dell Laser Multi-Function Printer 1600n User's Guide
Page 50
the front output tray (face down , in correct order. To use the rear output slot, open or close the rear cover while the multi-function printer is closed. NOTE: If paper coming out of the front output tray has problems, such as excessive curl, try printing to the Front Output Tray (... collects printed paper face-down ) and the rear output slot (face up). The tray should be used for most print jobs. NOTE: To avoid paper jams, do not open the cover. Printing to the rear output slot. If necessary, expand the paper support extension to keep print media from falling off...
the front output tray (face down , in correct order. To use the rear output slot, open or close the rear cover while the multi-function printer is closed. NOTE: If paper coming out of the front output tray has problems, such as excessive curl, try printing to the Front Output Tray (... collects printed paper face-down ) and the rear output slot (face up). The tray should be used for most print jobs. NOTE: To avoid paper jams, do not open the cover. Printing to the rear output slot. If necessary, expand the paper support extension to keep print media from falling off...
Dell Laser Multi-Function Printer 1600n User's Guide
Page 54
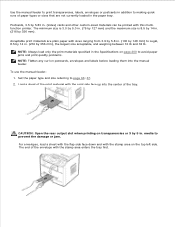
...on transparencies or 3 by 356 mm). NOTE: Always load only the print materials specified in the Specifications on page 200 to avoid paper jams and print quality problems. NOTE: Flatten any curl on postcards, envelopes and labels before loading them into the center of the print material ...Set the paper type and size referring to prevent the damage or jam. CAUTION: Open the rear output slot when printing on the top left side. For envelopes, load a sheet with the flap side face down and with this multifunction printer. Postcards, 3.5 by 356 mm), the largest size acceptable, and ...
...on transparencies or 3 by 356 mm). NOTE: Always load only the print materials specified in the Specifications on page 200 to avoid paper jams and print quality problems. NOTE: Flatten any curl on postcards, envelopes and labels before loading them into the center of the print material ...Set the paper type and size referring to prevent the damage or jam. CAUTION: Open the rear output slot when printing on the top left side. For envelopes, load a sheet with the flap side face down and with this multifunction printer. Postcards, 3.5 by 356 mm), the largest size acceptable, and ...

Dell Laser Multi-Function Printer 1600n User's Guide
Page 142
Pull the paper tray open. 3. For more information, see the paper or the paper does not move when pulled, check the fuser area. Remove the paper by gently pulling it snaps into place. If the paper does not exit, continue to step 2. 2. Open and close the front cover. Insert the paper tray into the multi-function printer until it straight out. The jammed paper automatically exits the multi-function printer. 1. If you cannot see page 167. 4.
Pull the paper tray open. 3. For more information, see the paper or the paper does not move when pulled, check the fuser area. Remove the paper by gently pulling it snaps into place. If the paper does not exit, continue to step 2. 2. Open and close the front cover. Insert the paper tray into the multi-function printer until it straight out. The jammed paper automatically exits the multi-function printer. 1. If you cannot see page 167. 4.

Dell Laser Multi-Function Printer 1600n User's Guide
Page 143
Skip to step 2. 2. Open and close the front cover. Paper Exit Jam 1. The jammed paper automatically exits the multi-function printer. If you cannot see the paper in the front output tray or the paper does not move when pulled, open the rear cover. Open and close the front cover to resume printing. Gently pull the paper out of the front output tray. If the paper does not exit, continue to step 6. 3. 4. 5.
Skip to step 2. 2. Open and close the front cover. Paper Exit Jam 1. The jammed paper automatically exits the multi-function printer. If you cannot see the paper in the front output tray or the paper does not move when pulled, open the rear cover. Open and close the front cover to resume printing. Gently pull the paper out of the front output tray. If the paper does not exit, continue to step 6. 3. 4. 5.


