Setup Guide
Page 5
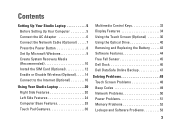
...Recommended 10 Install the SIM Card (Optional 12 Enable or Disable Wireless (Optional 14 Connect to the Internet (Optional 16 Using Your Studio Laptop 20 Right Side Features 20 Left Side Features 24 Computer Base Features 28 Touch Pad Gestures 30 Multimedia Control Keys 32 Display Features 34... Using the Touch Screen (Optional 36 Using the Optical Drive 40 Removing and Replacing the Battery 42 Software Features 44 Free Fall Sensor 45 Dell Dock 46 Dell DataSafe Online Backup 47 Solving Problems 48 Touch Screen Problems 48 Beep Codes 49 Network Problems 50 Power...
...Recommended 10 Install the SIM Card (Optional 12 Enable or Disable Wireless (Optional 14 Connect to the Internet (Optional 16 Using Your Studio Laptop 20 Right Side Features 20 Left Side Features 24 Computer Base Features 28 Touch Pad Gestures 30 Multimedia Control Keys 32 Display Features 34... Using the Touch Screen (Optional 36 Using the Optical Drive 40 Removing and Replacing the Battery 42 Software Features 44 Free Fall Sensor 45 Dell Dock 46 Dell DataSafe Online Backup 47 Solving Problems 48 Touch Screen Problems 48 Beep Codes 49 Network Problems 50 Power...
Setup Guide
Page 14
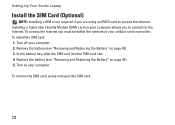
...Internet you are using an EVDO card to the Internet. Remove the battery (see "Removing and Replacing the Battery" on your computer allows you to connect to access the Internet. To install the SIM card: 1. In the battery bay, slide the SIM card into the SIM card slot. 4. ... SIM card, press and eject the SIM card. 12 Replace the battery (see "Removing and Replacing the Battery" on your computer. Installing a Subscriber Identity Module (SIM) card on page 42). 5. Turn off your computer. 2. Setting Up Your Studio Laptop Install the SIM Card (Optional) NOTE: Installing a SIM is not...
...Internet you are using an EVDO card to the Internet. Remove the battery (see "Removing and Replacing the Battery" on your computer allows you to connect to access the Internet. To install the SIM card: 1. In the battery bay, slide the SIM card into the SIM card slot. 4. ... SIM card, press and eject the SIM card. 12 Replace the battery (see "Removing and Replacing the Battery" on your computer. Installing a Subscriber Identity Module (SIM) card on page 42). 5. Turn off your computer. 2. Setting Up Your Studio Laptop Install the SIM Card (Optional) NOTE: Installing a SIM is not...
Setup Guide
Page 24
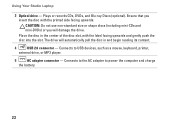
... drive, or MP3 player. 5 AC adapter connector - Plays or records CDs, DVDs, and Blu-ray Discs (optional). Connects to power the computer and charge the battery. 22 Place the disc in and begin reading its content. 4 USB 2.0 connector - Ensure that you will automatically pull the disc in the center of the...
... drive, or MP3 player. 5 AC adapter connector - Plays or records CDs, DVDs, and Blu-ray Discs (optional). Connects to power the computer and charge the battery. 22 Place the disc in and begin reading its content. 4 USB 2.0 connector - Ensure that you will automatically pull the disc in the center of the...
Setup Guide
Page 25
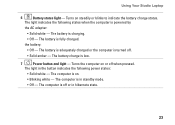
...is on steadily or blinks to indicate the battery charge status. The battery charge is charging. • Off - The computer is turned off. • Solid amber - The battery is adequately charged or the computer is in hibernate state. 23 The battery is off when pressed. The computer is fully...powered by the AC adapter: • Solid white - The light indicates the following power states: • Solid white - Using Your Studio Laptop 6 Battery status light - Turns on . • Blinking white - Turns the computer on or off or in standby mode. • Off -
...is on steadily or blinks to indicate the battery charge status. The battery charge is charging. • Off - The computer is turned off. • Solid amber - The battery is adequately charged or the computer is in hibernate state. 23 The battery is off when pressed. The computer is fully...powered by the AC adapter: • Solid white - The light indicates the following power states: • Solid white - Using Your Studio Laptop 6 Battery status light - Turns on . • Blinking white - Turns the computer on or off or in standby mode. • Off -

Setup Guide
Page 44
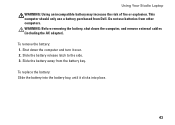
Using Your Studio Laptop Removing and Replacing the Battery 1 2 3 1 battery 2 battery bay 3 battery release latch 42
Using Your Studio Laptop Removing and Replacing the Battery 1 2 3 1 battery 2 battery bay 3 battery release latch 42
Setup Guide
Page 45
... Dell. To remove the battery: 1. To replace the battery: Slide the battery into the battery bay, until it over. 2. This computer should only use batteries from other computers. Do not use a battery purchased from the battery bay. Shut down the computer, and remove external cables (including the AC adapter). Slide the battery release latch to the side. 3. Using Your Studio Laptop...
... Dell. To remove the battery: 1. To replace the battery: Slide the battery into the battery bay, until it over. 2. This computer should only use batteries from other computers. Do not use a battery purchased from the battery bay. Shut down the computer, and remove external cables (including the AC adapter). Slide the battery release latch to the side. 3. Using Your Studio Laptop...


