Setup Guide
Page 5
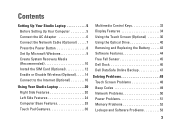
...Recommended 10 Install the SIM Card (Optional 12 Enable or Disable Wireless (Optional 14 Connect to the Internet (Optional 16 Using Your Studio Laptop 20 Right Side Features 20 Left Side Features 24 Computer Base Features 28 Touch Pad Gestures 30 Multimedia Control Keys 32 Display Features 34... Screen (Optional 36 Using the Optical Drive 40 Removing and Replacing the Battery 42 Software Features 44 Free Fall Sensor 45 Dell Dock 46 Dell DataSafe Online Backup 47 Solving Problems 48 Touch Screen Problems 48 Beep Codes 49 Network Problems 50 Power Problems 51 Memory Problems...
...Recommended 10 Install the SIM Card (Optional 12 Enable or Disable Wireless (Optional 14 Connect to the Internet (Optional 16 Using Your Studio Laptop 20 Right Side Features 20 Left Side Features 24 Computer Base Features 28 Touch Pad Gestures 30 Multimedia Control Keys 32 Display Features 34... Screen (Optional 36 Using the Optical Drive 40 Removing and Replacing the Battery 42 Software Features 44 Free Fall Sensor 45 Dell Dock 46 Dell DataSafe Online Backup 47 Solving Problems 48 Touch Screen Problems 48 Beep Codes 49 Network Problems 50 Power Problems 51 Memory Problems...
Setup Guide
Page 7
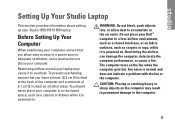
...performance, or cause a fire. The computer turns on all other sides. You should never place your computer. Setting Up Your Studio Laptop This section provides information about setting up your Dell™ computer in an enclosed space, such as a cabinet or drawer when it is powered on the computer may cause it... Do not block, push objects into, or allow easy access to a power source, adequate ventilation, and a level surface to overheat. Do not place your Studio 1555/1557/1558 laptop. CAUTION: Placing or stacking heavy or sharp objects on . Fan noise is powered on.
...performance, or cause a fire. The computer turns on all other sides. You should never place your computer. Setting Up Your Studio Laptop This section provides information about setting up your Dell™ computer in an enclosed space, such as a cabinet or drawer when it is powered on the computer may cause it... Do not block, push objects into, or allow easy access to a power source, adequate ventilation, and a level surface to overheat. Do not place your Studio 1555/1557/1558 laptop. CAUTION: Placing or stacking heavy or sharp objects on . Fan noise is powered on.
Setup Guide
Page 8
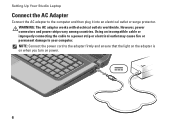
Using an incompatible cable or improperly connecting the cable to a power strip or electrical outlet may cause fire or permanent damage to the adapter firmly and ensure that the light on the adapter is on when you turn on power. 6 NOTE: Connect the power cord to your computer. Setting Up Your Studio Laptop Connect the AC Adapter Connect the AC adapter to the computer and then plug it into an electrical outlet or surge protector. WARNING: The AC adapter works with electrical outlets worldwide. However, power connectors and power strips vary among countries.
Using an incompatible cable or improperly connecting the cable to a power strip or electrical outlet may cause fire or permanent damage to the adapter firmly and ensure that the light on the adapter is on when you turn on power. 6 NOTE: Connect the power cord to your computer. Setting Up Your Studio Laptop Connect the AC Adapter Connect the AC adapter to the computer and then plug it into an electrical outlet or surge protector. WARNING: The AC adapter works with electrical outlets worldwide. However, power connectors and power strips vary among countries.
Setup Guide
Page 9
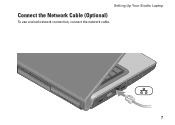
Setting Up Your Studio Laptop Connect the Network Cable (Optional) To use a wired network connection, connect the network cable. 7
Setting Up Your Studio Laptop Connect the Network Cable (Optional) To use a wired network connection, connect the network cable. 7

Setup Guide
Page 10
Setting Up Your Studio Laptop Press the Power Button 8
Setting Up Your Studio Laptop Press the Power Button 8
Setup Guide
Page 11
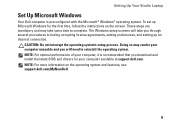
... will need to complete. To set up an Internet connection. NOTE: For optimal performance of your computer available at support.dell.com. Doing so may take you through several procedures including accepting license agreements, setting preferences, and setting up Microsoft Windows for...® Windows® operating system. CAUTION: Do not interrupt the operating system's setup process. Setting Up Your Studio Laptop Set Up Microsoft Windows Your Dell computer is recommended that you will take some time to reinstall the operating system. These steps are mandatory and may...
... will need to complete. To set up an Internet connection. NOTE: For optimal performance of your computer available at support.dell.com. Doing so may take you through several procedures including accepting license agreements, setting preferences, and setting up Microsoft Windows for...® Windows® operating system. CAUTION: Do not interrupt the operating system's setup process. Setting Up Your Studio Laptop Set Up Microsoft Windows Your Dell computer is recommended that you will take some time to reinstall the operating system. These steps are mandatory and may...
Setup Guide
Page 12
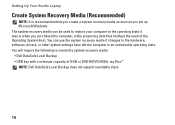
... recovery media can use the system recovery media if changes to create the system recovery media: • Dell DataSafe Local Backup • USB key with a minimum capacity of the Operating System disc). Setting Up Your Studio Laptop Create System Recovery Media (Recommended) NOTE: It is recommended that you create a system recovery media as...
... recovery media can use the system recovery media if changes to create the system recovery media: • Dell DataSafe Local Backup • USB key with a minimum capacity of the Operating System disc). Setting Up Your Studio Laptop Create System Recovery Media (Recommended) NOTE: It is recommended that you create a system recovery media as...
Setup Guide
Page 13
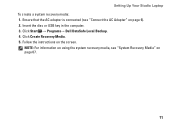
Setting Up Your Studio Laptop To create a system recovery media: 1. Ensure that the AC adapter is connected (see "System Recovery Media" on page 67. 11 Follow the instructions on page 6). 2. Click Start → Programs→ Dell DataSafe Local Backup. 4. Insert the disc or USB key in the computer. 3. NOTE: For information on using the system recovery media, see "Connect the AC Adapter" on the screen. Click Create Recovery Media. 5.
Setting Up Your Studio Laptop To create a system recovery media: 1. Ensure that the AC adapter is connected (see "System Recovery Media" on page 67. 11 Follow the instructions on page 6). 2. Click Start → Programs→ Dell DataSafe Local Backup. 4. Insert the disc or USB key in the computer. 3. NOTE: For information on using the system recovery media, see "Connect the AC Adapter" on the screen. Click Create Recovery Media. 5.
Setup Guide
Page 14
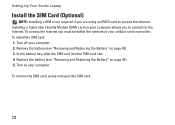
... the SIM card. 12 To install the SIM card: 1. In the battery bay, slide the SIM card into the SIM card slot. 4. Setting Up Your Studio Laptop Install the SIM Card (Optional) NOTE: Installing a SIM is not required if you to connect to access the Internet. To access the Internet you must...
... the SIM card. 12 To install the SIM card: 1. In the battery bay, slide the SIM card into the SIM card slot. 4. Setting Up Your Studio Laptop Install the SIM Card (Optional) NOTE: Installing a SIM is not required if you to connect to access the Internet. To access the Internet you must...
Setup Guide
Page 16
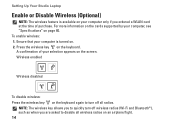
Setting Up Your Studio Laptop Enable or Disable Wireless (Optional) NOTE: The wireless feature is turned on. 2. Press the wireless key on page 80. To enable wireless: 1. Wireless enabled Wireless ...
Setting Up Your Studio Laptop Enable or Disable Wireless (Optional) NOTE: The wireless feature is turned on. 2. Press the wireless key on page 80. To enable wireless: 1. Wireless enabled Wireless ...
Setup Guide
Page 18
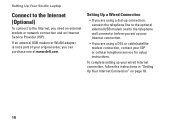
... Internet connection. • If you are using a DSL or cable/satellite modem connection, contact your original order, you can purchase one at www.dell.com. Setting Up Your Studio Laptop Connect to the Internet (Optional) To connect to the telephone wall connector before you set up your wired Internet connection, follow the instructions...
... Internet connection. • If you are using a DSL or cable/satellite modem connection, contact your original order, you can purchase one at www.dell.com. Setting Up Your Studio Laptop Connect to the Internet (Optional) To connect to the telephone wall connector before you set up your wired Internet connection, follow the instructions...
Setup Guide
Page 19
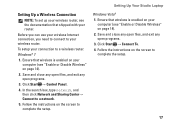
Save and close any open files, and exit any open programs. 3. Ensure that shipped with your router. Setting Up Your Studio Laptop Setting Up a Wireless Connection NOTE: To set up your wireless router, see "Enable or Disable Wireless" on page 14). 2. In the search box, type network, ...
Save and close any open files, and exit any open programs. 3. Ensure that shipped with your router. Setting Up Your Studio Laptop Setting Up a Wireless Connection NOTE: To set up your wireless router, see "Enable or Disable Wireless" on page 14). 2. In the search box, type network, ...

Setup Guide
Page 20
... contact your ISP. 4. Click Start → Control Panel. 3. Follow the instructions on the screen and use the setup information provided by country. Setting Up Your Studio Laptop Setting Up Your Internet Connection ISPs and ISP offerings vary by your ISP to complete the setup. 18
... contact your ISP. 4. Click Start → Control Panel. 3. Follow the instructions on the screen and use the setup information provided by country. Setting Up Your Studio Laptop Setting Up Your Internet Connection ISPs and ISP offerings vary by your ISP to complete the setup. 18
Setup Guide
Page 21
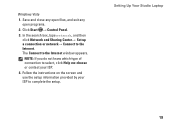
Follow the instructions on the screen and use the setup information provided by your ISP. 4. In the search box, type network, and then click Network and Sharing Center→ Set up a connection or network→ Connect to complete the setup. Setting Up Your Studio Laptop 19 The Connect to select, click Help me choose or contact your ISP to the Internet. Click Start → Control Panel. 3. NOTE: If you do not know which type of connection to the Internet window appears. Windows Vista 1. Save and close any open files, and exit any open programs. 2.
Follow the instructions on the screen and use the setup information provided by your ISP. 4. In the search box, type network, and then click Network and Sharing Center→ Set up a connection or network→ Connect to complete the setup. Setting Up Your Studio Laptop 19 The Connect to select, click Help me choose or contact your ISP to the Internet. Click Start → Control Panel. 3. NOTE: If you do not know which type of connection to the Internet window appears. Windows Vista 1. Save and close any open files, and exit any open programs. 2.
Setup Guide
Page 22
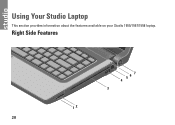
Right Side Features 56 7 4 3 12 20 Using Your Studio Laptop This section provides information about the features available on your Studio 1555/1557/1558 laptop.
Right Side Features 56 7 4 3 12 20 Using Your Studio Laptop This section provides information about the features available on your Studio 1555/1557/1558 laptop.

Setup Guide
Page 23
... ExpressCard slot is designed only for additional memory, wired and wireless communications, multimedia, and security features. Blanks protect unused slots from other particles. Using Your Studio Laptop 1 ExpressCard slot - NOTE: Your computer ships with a plastic blank installed in the ExpressCard slot. blanks from dust and other computers may not fit your computer...
... ExpressCard slot is designed only for additional memory, wired and wireless communications, multimedia, and security features. Blanks protect unused slots from other particles. Using Your Studio Laptop 1 ExpressCard slot - NOTE: Your computer ships with a plastic blank installed in the ExpressCard slot. blanks from dust and other computers may not fit your computer...
Setup Guide
Page 24
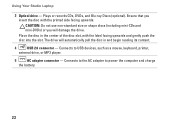
Connects to the AC adapter to USB devices, such as a mouse, keyboard, printer, external drive, or MP3 player. 5 AC adapter connector - Using Your Studio Laptop 3 Optical drive - Connects to power the computer and charge the battery. 22 Place the disc in and begin reading its content. 4 USB 2.0 connector - Ensure that ...
Connects to the AC adapter to USB devices, such as a mouse, keyboard, printer, external drive, or MP3 player. 5 AC adapter connector - Using Your Studio Laptop 3 Optical drive - Connects to power the computer and charge the battery. 22 Place the disc in and begin reading its content. 4 USB 2.0 connector - Ensure that ...
Setup Guide
Page 25
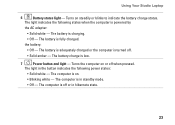
The battery is charging. • Off - Turns the computer on . • Blinking white - The computer is on or off when pressed. Using Your Studio Laptop 6 Battery status light - The battery is fully charged. the battery: • Off - The computer is off . • Solid amber - The computer is low. 7 Power button ...
The battery is charging. • Off - Turns the computer on . • Blinking white - The computer is on or off when pressed. Using Your Studio Laptop 6 Battery status light - The battery is fully charged. the battery: • Off - The computer is off . • Solid amber - The computer is low. 7 Power button ...
Setup Guide
Page 27
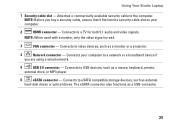
... both 5.1 audio and video signals. Connects to eSATA compatible storage devices, such as a mouse, keyboard, printer, external drive, or MP3 player. 6 eSATA connector - Using Your Studio Laptop 1 Security cable slot -
... both 5.1 audio and video signals. Connects to eSATA compatible storage devices, such as a mouse, keyboard, printer, external drive, or MP3 player. 6 eSATA connector - Using Your Studio Laptop 1 Security cable slot -

Setup Guide
Page 28
Connect to a pair of headphones or sends audio to a microphone or inputs signal for use with audio programs. 9 Audio out/Headphone connectors (2) - Connects to a powered speaker or sound system. 26 Using Your Studio Laptop 7 IEEE 1394a connector - Connects to high-speed serial multimedia devices, such as digital video cameras. 8 Audio in/Microphone connector -
Connect to a pair of headphones or sends audio to a microphone or inputs signal for use with audio programs. 9 Audio out/Headphone connectors (2) - Connects to a powered speaker or sound system. 26 Using Your Studio Laptop 7 IEEE 1394a connector - Connects to high-speed serial multimedia devices, such as digital video cameras. 8 Audio in/Microphone connector -


