Setup Guide
Page 16
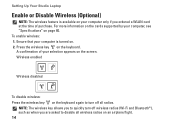
...;), such as when you ordered a WLAN card at the time of your computer, see "Specifications" on the screen. Setting Up Your Studio Laptop Enable or Disable Wireless (Optional) NOTE: The wireless feature is turned on. 2. Wireless enabled Wireless disabled To disable wireless: Press ...the wireless key on the keyboard. A confirmation of purchase. To enable wireless: 1. For more information on the cards supported by your selection appears on page 80. Press ...
...;), such as when you ordered a WLAN card at the time of your computer, see "Specifications" on the screen. Setting Up Your Studio Laptop Enable or Disable Wireless (Optional) NOTE: The wireless feature is turned on. 2. Wireless enabled Wireless disabled To disable wireless: Press ...the wireless key on the keyboard. A confirmation of purchase. To enable wireless: 1. For more information on the cards supported by your selection appears on page 80. Press ...
Setup Guide
Page 24
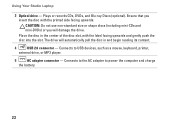
...CDs and mini‑DVDs) or you insert the disc with the label facing upwards and gently push the disc into the slot. Using Your Studio Laptop 3 Optical drive - Ensure that you will automatically pull the disc in the center of the disc slot, with the printed side facing ...upwards. Connects to the AC adapter to USB devices, such as a mouse, keyboard, printer, external drive, or MP3 player. 5 AC adapter connector - Place the disc in and begin reading its content. 4 USB 2.0 connector - Plays or records ...
...CDs and mini‑DVDs) or you insert the disc with the label facing upwards and gently push the disc into the slot. Using Your Studio Laptop 3 Optical drive - Ensure that you will automatically pull the disc in the center of the disc slot, with the printed side facing ...upwards. Connects to the AC adapter to USB devices, such as a mouse, keyboard, printer, external drive, or MP3 player. 5 AC adapter connector - Place the disc in and begin reading its content. 4 USB 2.0 connector - Plays or records ...
Setup Guide
Page 27
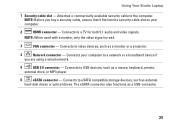
..., such as a USB connector. 25 Connects to video devices, such as external hard-disk drives or optical drives. The eSATA connector also functions as a mouse, keyboard, printer, external drive, or MP3 player. 6 eSATA connector - Connects your computer. 2 HDMI connector - Using Your Studio Laptop 1 Security cable slot - Connects to the computer.
..., such as a USB connector. 25 Connects to video devices, such as external hard-disk drives or optical drives. The eSATA connector also functions as a mouse, keyboard, printer, external drive, or MP3 player. 6 eSATA connector - Connects your computer. 2 HDMI connector - Using Your Studio Laptop 1 Security cable slot - Connects to the computer.
Setup Guide
Page 31
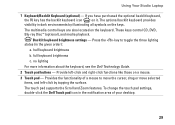
...- These keys control CD, DVD, Blu-ray Disc™ (optional), and media playback. Backlit keyboard brightness settings - no lighting For more information about the keyboard, see the Dell Technology Guide. 2 Touch pad buttons - Provides the functionality of your desktop. 29 If you have...-click the Dell Touch pad icon in the notification area of a mouse to toggle the three lighting states (in dark environments by tapping the surface. The optional backlit keyboard provides visibility in the given order): a. Using Your Studio Laptop 1 Keyboard/Backlit Keyboard (optional) ...
...- These keys control CD, DVD, Blu-ray Disc™ (optional), and media playback. Backlit keyboard brightness settings - no lighting For more information about the keyboard, see the Dell Technology Guide. 2 Touch pad buttons - Provides the functionality of your desktop. 29 If you have...-click the Dell Touch pad icon in the notification area of a mouse to toggle the three lighting states (in dark environments by tapping the surface. The optional backlit keyboard provides visibility in the given order): a. Using Your Studio Laptop 1 Keyboard/Backlit Keyboard (optional) ...
Setup Guide
Page 34
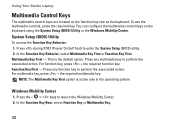
...the Windows Mobility Center. 2. Press the < > keys to perform the associated action. You can configure the multimedia control keys on the keyboard. Press any function key to enter the System Setup (BIOS) utility. 2. In the Function Key Behavior, select Multimedia Key First or ...For multimedia key, press + the required multimedia key. Windows Mobility Center 1. Using Your Studio Laptop Multimedia Control Keys The multimedia control keys are located on the function key row on the keyboard using the System Setup (BIOS) Utility or the Windows Mobility Center. NOTE: The Multimedia...
...the Windows Mobility Center. 2. Press the < > keys to perform the associated action. You can configure the multimedia control keys on the keyboard. Press any function key to enter the System Setup (BIOS) utility. 2. In the Function Key Behavior, select Multimedia Key First or ...For multimedia key, press + the required multimedia key. Windows Mobility Center 1. Using Your Studio Laptop Multimedia Control Keys The multimedia control keys are located on the function key row on the keyboard using the System Setup (BIOS) Utility or the Windows Mobility Center. NOTE: The Multimedia...
Setup Guide
Page 43
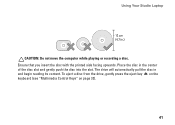
Ensure that you insert the disc with the printed side facing upwards. To eject a disc from the drive, gently press the eject key on the keyboard (see "Multimedia Control Keys" on page 32). 41 The drive will automatically pull the disc in the center of the disc slot and gently push the disc into the slot. Place the disc in and begin reading its content. Using Your Studio Laptop CAUTION: Do not move the computer while playing or recording a disc.
Ensure that you insert the disc with the printed side facing upwards. To eject a disc from the drive, gently press the eject key on the keyboard (see "Multimedia Control Keys" on page 32). 41 The drive will automatically pull the disc in the center of the disc slot and gently push the disc into the slot. Place the disc in and begin reading its content. Using Your Studio Laptop CAUTION: Do not move the computer while playing or recording a disc.


