Setup Guide
Page 5
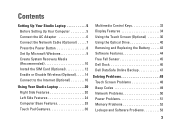
...Recommended 10 Install the SIM Card (Optional 12 Enable or Disable Wireless (Optional 14 Connect to the Internet (Optional 16 Using Your Studio Laptop 20 Right Side Features 20 Left Side Features 24 Computer Base Features 28 Touch Pad Gestures 30 Multimedia Control Keys 32 Display ...Features 34 Using the Touch Screen (Optional 36 Using the Optical Drive 40 Removing and Replacing the Battery 42 Software Features 44 Free Fall Sensor 45 Dell Dock 46 Dell DataSafe Online Backup 47 Solving Problems 48 Touch Screen Problems 48 Beep Codes 49 Network Problems ...
...Recommended 10 Install the SIM Card (Optional 12 Enable or Disable Wireless (Optional 14 Connect to the Internet (Optional 16 Using Your Studio Laptop 20 Right Side Features 20 Left Side Features 24 Computer Base Features 28 Touch Pad Gestures 30 Multimedia Control Keys 32 Display ...Features 34 Using the Touch Screen (Optional 36 Using the Optical Drive 40 Removing and Replacing the Battery 42 Software Features 44 Free Fall Sensor 45 Dell Dock 46 Dell DataSafe Online Backup 47 Solving Problems 48 Touch Screen Problems 48 Beep Codes 49 Network Problems ...
Setup Guide
Page 11
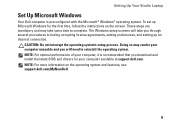
.... To set up an Internet connection. NOTE: For optimal performance of your computer available at support.dell.com. The Windows setup screens will need to complete. Setting Up Your Studio Laptop Set Up Microsoft Windows Your Dell computer is recommended that you download and install the latest BIOS and drivers for the first time...
.... To set up an Internet connection. NOTE: For optimal performance of your computer available at support.dell.com. The Windows setup screens will need to complete. Setting Up Your Studio Laptop Set Up Microsoft Windows Your Dell computer is recommended that you download and install the latest BIOS and drivers for the first time...
Setup Guide
Page 13
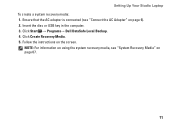
Insert the disc or USB key in the computer. 3. Click Start → Programs→ Dell DataSafe Local Backup. 4. Follow the instructions on page 67. 11 Setting Up Your Studio Laptop To create a system recovery media: 1. Click Create Recovery Media. 5. NOTE: For information on using the system recovery media, see "Connect the AC Adapter" on page 6). 2. Ensure that the AC adapter is connected (see "System Recovery Media" on the screen.
Insert the disc or USB key in the computer. 3. Click Start → Programs→ Dell DataSafe Local Backup. 4. Follow the instructions on page 67. 11 Setting Up Your Studio Laptop To create a system recovery media: 1. Click Create Recovery Media. 5. NOTE: For information on using the system recovery media, see "Connect the AC Adapter" on page 6). 2. Ensure that the AC adapter is connected (see "System Recovery Media" on the screen.
Setup Guide
Page 16
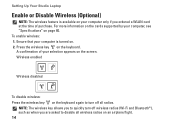
... turn off wireless radios (Wi-Fi and Bluetooth®), such as when you ordered a WLAN card at the time of your selection appears on the screen. Setting Up Your Studio Laptop Enable or Disable Wireless (Optional) NOTE: The wireless feature is turned on. 2.
... turn off wireless radios (Wi-Fi and Bluetooth®), such as when you ordered a WLAN card at the time of your selection appears on the screen. Setting Up Your Studio Laptop Enable or Disable Wireless (Optional) NOTE: The wireless feature is turned on. 2.
Setup Guide
Page 19
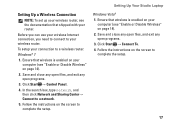
... router. Click Start → Control Panel. 4. Click Start → Connect To. 4. Follow the instructions on the screen to complete the setup. Follow the instructions on the screen to complete the setup. 17 Setting Up Your Studio Laptop Setting Up a Wireless Connection NOTE: To set up your wireless router, see the documentation that shipped...
... router. Click Start → Control Panel. 4. Click Start → Connect To. 4. Follow the instructions on the screen to complete the setup. Follow the instructions on the screen to complete the setup. 17 Setting Up Your Studio Laptop Setting Up a Wireless Connection NOTE: To set up your wireless router, see the documentation that shipped...

Setup Guide
Page 20
Setting Up Your Studio Laptop Setting Up Your Internet Connection ISPs and ISP offerings vary by your ISP to check the service status, or try connecting again later. If ... connection: Windows 7 1. Click Start → Control Panel. 3. NOTE: If you do not know which type of connection to the Internet. Follow the instructions on the screen and use the setup information provided by country. If you do not have a service outage. Save and close any open files, and exit any open...
Setting Up Your Studio Laptop Setting Up Your Internet Connection ISPs and ISP offerings vary by your ISP to check the service status, or try connecting again later. If ... connection: Windows 7 1. Click Start → Control Panel. 3. NOTE: If you do not know which type of connection to the Internet. Follow the instructions on the screen and use the setup information provided by country. If you do not have a service outage. Save and close any open files, and exit any open...
Setup Guide
Page 21
In the search box, type network, and then click Network and Sharing Center→ Set up a connection or network→ Connect to the Internet window appears. Save and close any open files, and exit any open programs. 2. Click Start → Control Panel. 3. The Connect to the Internet. NOTE: If you do not know which type of connection to select, click Help me choose or contact your ISP to complete the setup. Setting Up Your Studio Laptop 19 Follow the instructions on the screen and use the setup information provided by your ISP. 4. Windows Vista 1.
In the search box, type network, and then click Network and Sharing Center→ Set up a connection or network→ Connect to the Internet window appears. Save and close any open files, and exit any open programs. 2. Click Start → Control Panel. 3. The Connect to the Internet. NOTE: If you do not know which type of connection to select, click Help me choose or contact your ISP to complete the setup. Setting Up Your Studio Laptop 19 Follow the instructions on the screen and use the setup information provided by your ISP. 4. Windows Vista 1.
Setup Guide
Page 32
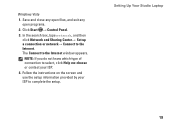
...feature includes: One finger zoom - To zoom in: Move two fingers apart to zoom in or zoom out by double-clicking the Dell Touch pad icon in the zoom zone (extreme left of the touch pad). To zoom out: Move a finger down in or ... view of your desktop. Allows you to zoom in the zoom zone (extreme left of the touch pad). Using Your Studio Laptop Touch Pad Gestures NOTE: The touch pad gestures can be enabled or disabled by moving two fingers apart or bringing them... window. 30 To zoom out: Move two fingers close together to reduce the view of the screen content.
...feature includes: One finger zoom - To zoom in: Move two fingers apart to zoom in or zoom out by double-clicking the Dell Touch pad icon in the zoom zone (extreme left of the touch pad). To zoom out: Move a finger down in or ... view of your desktop. Allows you to zoom in the zoom zone (extreme left of the touch pad). Using Your Studio Laptop Touch Pad Gestures NOTE: The touch pad gestures can be enabled or disabled by moving two fingers apart or bringing them... window. 30 To zoom out: Move two fingers close together to reduce the view of the screen content.
Setup Guide
Page 38
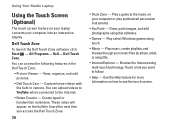
... to the Internet. • Notes Creator - Dell Touch Zone To launch the Dell Touch Zone software click Start → All Programs→ Dell→ Dell Touch Zone. Draw, paint images, and edit photographs using this software. • Games - Using Your Studio Laptop Using the Touch Screen (Optional) The touch screen feature on your music files by album...
... to the Internet. • Notes Creator - Dell Touch Zone To launch the Dell Touch Zone software click Start → All Programs→ Dell→ Dell Touch Zone. Draw, paint images, and edit photographs using this software. • Games - Using Your Studio Laptop Using the Touch Screen (Optional) The touch screen feature on your music files by album...
Setup Guide
Page 39
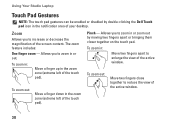
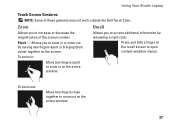
Using Your Studio Laptop Touch Screen Gestures NOTE: Some of the screen content. Zoom Dwell Allows you to open context-sensitive menus. To zoom out: Move two fingers close together to zoom out on the touch screen to access additional information by moving two fingers apart or bringing them closer together on the active ... a right-click. Pinch - Press and hold a finger on the active window. 37 Allows you to zoom in : Allows you to zoom in on the screen. Move two fingers apart to increase or decrease the magnification of these gestures may not work outside the...
Using Your Studio Laptop Touch Screen Gestures NOTE: Some of the screen content. Zoom Dwell Allows you to open context-sensitive menus. To zoom out: Move two fingers close together to zoom out on the touch screen to access additional information by moving two fingers apart or bringing them closer together on the active ... a right-click. Pinch - Press and hold a finger on the active window. 37 Allows you to zoom in : Allows you to zoom in on the screen. Move two fingers apart to increase or decrease the magnification of these gestures may not work outside the...

Setup Guide
Page 41
... in a circular motion. 39 Allows you to rotate the active content on the direction of the flick. Using Your Studio Laptop Flick Allows you to flip content forward or backward based on the screen. Keeping a finger or thumb in place, move the other finger in an arced direction to flip through content...
... in a circular motion. 39 Allows you to rotate the active content on the direction of the flick. Using Your Studio Laptop Flick Allows you to flip content forward or backward based on the screen. Keeping a finger or thumb in place, move the other finger in an arced direction to flip through content...
Setup Guide
Page 48
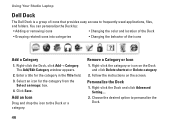
Click Save. Right-click the category or icon on the screen. Personalize the Dock 1. Enter a title for the category from the Select an image: box. 4. Select an icon for the category in the Title field. 3. Add ... the desired option to the Dock or a category. The Add/Edit Category window appears. 2. Right-click the Dock, click Add→ Category. Using Your Studio Laptop Dell Dock The Dell Dock is a group of the icons Add a Category 1. You can personalize the Dock by: • Adding or removing icons • Changing the color...
Click Save. Right-click the category or icon on the screen. Personalize the Dock 1. Enter a title for the category from the Select an image: box. 4. Select an icon for the category in the Title field. 3. Add ... the desired option to the Dock or a category. The Add/Edit Category window appears. 2. Right-click the Dock, click Add→ Category. Using Your Studio Laptop Dell Dock The Dell Dock is a group of the icons Add a Category 1. You can personalize the Dock by: • Adding or removing icons • Changing the color...
Setup Guide
Page 49
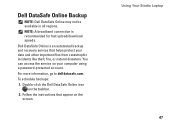
... service on the screen. Follow the instructions that helps protect your computer using a password‑protected account. For more information, go to delldatasafe.com. Double-click the Dell DataSafe Online icon on the taskbar. 2. Using Your Studio Laptop 47 Dell DataSafe Online is ...recommended for fast upload/download speeds. Dell DataSafe Online Backup NOTE: Dell DataSafe Online may not be available in all regions. ...
... service on the screen. Follow the instructions that helps protect your computer using a password‑protected account. For more information, go to delldatasafe.com. Double-click the Dell DataSafe Online icon on the taskbar. 2. Using Your Studio Laptop 47 Dell DataSafe Online is ...recommended for fast upload/download speeds. Dell DataSafe Online Backup NOTE: Dell DataSafe Online may not be available in all regions. ...
Setup Guide
Page 50
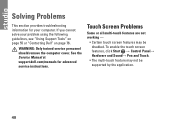
...screen features, click Start → Control Panel→ Hardware and Sound→ Pen and Touch. • The multi-touch feature may be supported by the application. 48 WARNING: Only trained service personnel should remove the computer cover. See the Service Manual at support.dell....com/manuals for your problem using the following guidelines, see "Using Support Tools" on page 55 or "Contacting Dell" on page 76. Solving Problems This section provides troubleshooting information for advanced...
...screen features, click Start → Control Panel→ Hardware and Sound→ Pen and Touch. • The multi-touch feature may be supported by the application. 48 WARNING: Only trained service personnel should remove the computer cover. See the Service Manual at support.dell....com/manuals for your problem using the following guidelines, see "Using Support Tools" on page 55 or "Contacting Dell" on page 76. Solving Problems This section provides troubleshooting information for advanced...

Setup Guide
Page 55
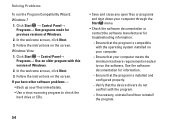
... at least 8 to an earlier version of Microsoft Windows operating system environments. 53 Click Applications. 3. Solving Problems If the computer stops responding or a solid blue screen appears - If a program is no longer responding 4. Run the Program Compatibility Wizard. CAUTION: You might lose data if you are unable to the electrical outlet...
... at least 8 to an earlier version of Microsoft Windows operating system environments. 53 Click Applications. 3. Solving Problems If the computer stops responding or a solid blue screen appears - If a program is no longer responding 4. Run the Program Compatibility Wizard. CAUTION: You might lose data if you are unable to the electrical outlet...
Setup Guide
Page 56
... requirements needed to run the Program Compatibility Wizard: Windows 7 1. Solving Problems To run the software. Follow the instructions on the screen. In the welcome screen, click Next. 3. Follow the instructions on the screen. Click Start → Control Panel→ Programs→ Run programs made for information. --Ensure that the program is installed and...
... requirements needed to run the Program Compatibility Wizard: Windows 7 1. Solving Problems To run the software. Follow the instructions on the screen. In the welcome screen, click Next. 3. Follow the instructions on the screen. Click Start → Control Panel→ Programs→ Run programs made for information. --Ensure that the program is installed and...
Setup Guide
Page 58
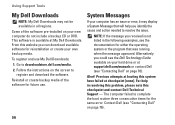
... not listed in resolving this problem, please note this system have failed at support.dell.com/manuals or contact Dell (see "Contacting Dell" on page 76). 56 Alert! For help you could see the Dell Technology Guide available on your hard drive or at checkpoint [nnnn]. The computer failed... to resolve the issue. Reinstall or create backup media of the software pre-installed on the screen to downloadstore.dell.com/media. 2. Alternatively you identify the cause and action needed to complete the boot routine three consecutive times for future use ...
... not listed in resolving this problem, please note this system have failed at support.dell.com/manuals or contact Dell (see "Contacting Dell" on page 76). 56 Alert! For help you could see the Dell Technology Guide available on your hard drive or at checkpoint [nnnn]. The computer failed... to resolve the issue. Reinstall or create backup media of the software pre-installed on the screen to downloadstore.dell.com/media. 2. Alternatively you identify the cause and action needed to complete the boot routine three consecutive times for future use ...
Setup Guide
Page 61
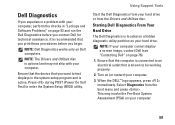
... Turn on your hard drive. Using Support Tools Start the Dell Diagnostics from the boot menu and press . NOTE: If your computer cannot display a screen image, contact Dell (see "Contacting Dell" on page 53 and run the Dell Diagnostics before you want to enter the System Setup (BIOS)... utility. Select Diagnostics from your computer. 3. Dell Diagnostics If you experience a problem with your computer....
... Turn on your hard drive. Using Support Tools Start the Dell Diagnostics from the boot menu and press . NOTE: If your computer cannot display a screen image, contact Dell (see "Contacting Dell" on page 53 and run the Dell Diagnostics before you want to enter the System Setup (BIOS)... utility. Select Diagnostics from your computer. 3. Dell Diagnostics If you experience a problem with your computer....
Setup Guide
Page 63
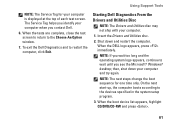
...helps you identify your computer is displayed at the top of each test screen. Insert the Drivers and Utilities disc. 2. then, shut down and restart the computer. When the DELL logo appears, press immediately. To exit the Dell Diagnostics and to the Choose An Option window. 7. NOTE: The ...computer when you see the Microsoft® Windows® desktop; When the tests are complete, close the test screen to return to restart the computer, click Exit. Starting Dell Diagnostics From the Drivers and Utilities Disc NOTE: The Drivers and Utilities disc may not ship with your computer...
...helps you identify your computer is displayed at the top of each test screen. Insert the Drivers and Utilities disc. 2. then, shut down and restart the computer. When the DELL logo appears, press immediately. To exit the Dell Diagnostics and to the Choose An Option window. 7. NOTE: The ...computer when you see the Microsoft® Windows® desktop; When the tests are complete, close the test screen to return to restart the computer, click Exit. Starting Dell Diagnostics From the Drivers and Utilities Disc NOTE: The Drivers and Utilities disc may not ship with your computer...
Setup Guide
Page 64
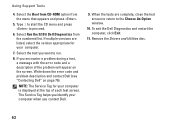
...helps you identify your computer when you encounter a problem during a test, a message with the error code and a description of each test screen. If you contact Dell. 9. NOTE: The Service Tag for your computer is displayed at the top of the problem will appear on page 76). Select the ... 6. Select the Boot from CD-ROM option from the numbered list. Write down the error code and problem description and contact Dell (see "Contacting Dell" on the screen. To exit the Dell Diagnostics and restart the computer, click Exit. 11. Type 1 to start the CD menu and press to run. 8. Select...
...helps you identify your computer when you encounter a problem during a test, a message with the error code and a description of each test screen. If you contact Dell. 9. NOTE: The Service Tag for your computer is displayed at the top of the problem will appear on page 76). Select the ... 6. Select the Boot from CD-ROM option from the numbered list. Write down the error code and problem description and contact Dell (see "Contacting Dell" on the screen. To exit the Dell Diagnostics and restart the computer, click Exit. 11. Type 1 to start the CD menu and press to run. 8. Select...


