
Setup Guide
Page 12
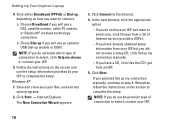
...your ISP. 5. Save and close any open files, and exit any open programs. 2. Click either Broadband (PPPoE) or Dial-up my connection manually. --If you do not know which type of connection to the Internet. 4. Otherwise, follow the instructions on how you do not know which type...the next window, click the appropriate option: --If you want to complete the setup. Setting Up Your Inspiron Laptop 4. Click Next. NOTE: If you will use an optional USB dial-up my connection manually, continue to select, contact your ISP but you did not receive a setup CD, click Set up ...
...your ISP. 5. Save and close any open files, and exit any open programs. 2. Click either Broadband (PPPoE) or Dial-up my connection manually. --If you do not know which type of connection to the Internet. 4. Otherwise, follow the instructions on how you do not know which type...the next window, click the appropriate option: --If you want to complete the setup. Setting Up Your Inspiron Laptop 4. Click Next. NOTE: If you will use an optional USB dial-up my connection manually, continue to select, contact your ISP but you did not receive a setup CD, click Set up ...

Setup Guide
Page 28
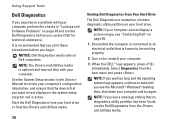
See the Service Manual on the Dell Support website at support.dell.com for your problem using the following guidelines, see "Using Support Tools" on page 33 or "Contacting Dell" on the wireless switch, slide it from the rear to the front of the computer until it clicks into place. - Off - On - ... should remove the computer cover. Momentary 26 To turn on page 50. Network Problems Wireless Connections If the network connection is lost - INSPIRON Solving Problems This section provides troubleshooting information for advanced service and troubleshooting instructions.
See the Service Manual on the Dell Support website at support.dell.com for your problem using the following guidelines, see "Using Support Tools" on page 33 or "Contacting Dell" on the wireless switch, slide it from the rear to the front of the computer until it clicks into place. - Off - On - ... should remove the computer cover. Momentary 26 To turn on page 50. Network Problems Wireless Connections If the network connection is lost - INSPIRON Solving Problems This section provides troubleshooting information for advanced service and troubleshooting instructions.

Setup Guide
Page 30
... and then turn it with another device, such as a lamp. • Check the AC adapter cable connections. For assistance contact Dell, see the Service Manual on page 50. You may not be malfunctioning or incorrectly installed. The computer is either turned off - If the AC adapter has... power button to remove and then reinstall the memory modules (for information on removing and replacing memory modules, see "Contacting Dell" on the Dell Support website at support.dell.com). 28 Press a key on the keyboard, move the pointer on . The computer has a power problem or an...
... and then turn it with another device, such as a lamp. • Check the AC adapter cable connections. For assistance contact Dell, see the Service Manual on page 50. You may not be malfunctioning or incorrectly installed. The computer is either turned off - If the AC adapter has... power button to remove and then reinstall the memory modules (for information on removing and replacing memory modules, see "Contacting Dell" on the Dell Support website at support.dell.com). 28 Press a key on the keyboard, move the pointer on . The computer has a power problem or an...
Setup Guide
Page 31
If necessary, install additional memory (See the Service Manual on the Dell Support website at support.dell.com). • Reseat the memory modules (See the Service Manual on the Dell Support website at support.dell.com). • Check if the memory module is compatible with the memory. For more ...supported by interrupting or blocking other memory problems - • Ensure that you are following the memory installation guidelines (see the Service Manual on page 36). 29 If you experience other signals. Memory Problems If you receive an insufficient memory message- • Save and...
If necessary, install additional memory (See the Service Manual on the Dell Support website at support.dell.com). • Reseat the memory modules (See the Service Manual on the Dell Support website at support.dell.com). • Check if the memory module is compatible with the memory. For more ...supported by interrupting or blocking other memory problems - • Ensure that you are following the memory installation guidelines (see the Service Manual on page 36). 29 If you experience other signals. Memory Problems If you receive an insufficient memory message- • Save and...
Setup Guide
Page 32
... computer and to 10 seconds until the computer turns off . Then restart your mouse, press and hold the power button for at support.dell.com) to perform an operating system shutdown. Solving Problems • Reseat the memory modules (see the Service Manual on the Dell Support website at least 8 to the electrical outlet.
... computer and to 10 seconds until the computer turns off . Then restart your mouse, press and hold the power button for at support.dell.com) to perform an operating system shutdown. Solving Problems • Reseat the memory modules (see the Service Manual on the Dell Support website at least 8 to the electrical outlet.

Setup Guide
Page 36
... you received is correct 34 Alert! Replace the battery. For help in the following examples, see "Contacting Dell" on page 50 for assistance. See the Service Manual on the Dell Support website at checkpoint [nnnn]. Replace the CPU fan. Hard-disk drive read failure - Keyboard failure -... Using Support Tools NOTE: If the message you could see the Service Manual on the Dell Support website at support.dell.com or see "Contacting Dell" on page 50 for assistance. Possible hard disk drive failure during HDD boot test see "Contacting...
... you received is correct 34 Alert! Replace the battery. For help in the following examples, see "Contacting Dell" on page 50 for assistance. See the Service Manual on the Dell Support website at checkpoint [nnnn]. Replace the CPU fan. Hard-disk drive read failure - Keyboard failure -... Using Support Tools NOTE: If the message you could see the Service Manual on the Dell Support website at support.dell.com or see "Contacting Dell" on page 50 for assistance. Possible hard disk drive failure during HDD boot test see "Contacting...
Setup Guide
Page 37
... and Support. 2. In the search results, select the option that you can be malfunctioning or motherboard failure (see the Service Manual on the Dell Support website at support.dell.com). NOTICE - No timer tick interrupt - S.M.A.R.T error, possible hard disk drive failure. This feature can use the Hardware ... data regularly. A parameter out of them. To start the search. 3. Type hardware troubleshooter in the BIOS setup (see "Contacting Dell" on page 50 for it to resolve the incompatibility. Disconnect the USB device. Your USB device needs more power for assistance...
... and Support. 2. In the search results, select the option that you can be malfunctioning or motherboard failure (see the Service Manual on the Dell Support website at support.dell.com). NOTICE - No timer tick interrupt - S.M.A.R.T error, possible hard disk drive failure. This feature can use the Hardware ... data regularly. A parameter out of them. To start the search. 3. Type hardware troubleshooter in the BIOS setup (see "Contacting Dell" on page 50 for it to resolve the incompatibility. Disconnect the USB device. Your USB device needs more power for assistance...
Setup Guide
Page 38
...diagnostic utility partition on page 30 and run the Dell Diagnostics from the boot menu and press . See the System Setup section in the Service Manual to be working properly. 2. Turn on (or restart) your computer and try again. When the DELL™ logo appears, press immediately. then, ...shut down your computer. 3. Start the Dell Diagnostics from your hard drive or from the Drivers ...
...diagnostic utility partition on page 30 and run the Dell Diagnostics from the boot menu and press . See the System Setup section in the Service Manual to be working properly. 2. Turn on (or restart) your computer and try again. When the DELL™ logo appears, press immediately. then, ...shut down your computer. 3. Start the Dell Diagnostics from your hard drive or from the Drivers ...
Setup Guide
Page 43
...let the computer finish starting, and then restart the computer again. Click Finish and let the computer completely reboot. 5. Click Next. NOTE: Do not manually shut down the computer. After the computer restarts, click OK. 41 The restore process takes approximately 6 to 10 minutes to proceed with www....dell.com appears at the top of the screen. 2. If possible, back up all data before using PC Restore. The computer restarts. Immediately upon...
...let the computer finish starting, and then restart the computer again. Click Finish and let the computer completely reboot. 5. Click Next. NOTE: Do not manually shut down the computer. After the computer restarts, click OK. 41 The restore process takes approximately 6 to 10 minutes to proceed with www....dell.com appears at the top of the screen. 2. If possible, back up all data before using PC Restore. The computer restarts. Immediately upon...
Setup Guide
Page 54
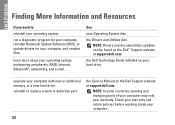
... 52 the Dell Technology Guide installed on the Dell™ Support website at support.dell.com. NOTE: In some countries, opening and replacing parts of your computer may void your operating system. INSPIRON Finding More ...Information and Resources If you need to: reinstall your warranty. learn more about your hard drive. NOTE: Drivers and documentation updates can be found on your operating system, maintaining peripherals, RAID, Internet, Bluetooth®, networking, and e-mail. reinstall or replace a worn or defective part. the Service Manual on the Dell...
... 52 the Dell Technology Guide installed on the Dell™ Support website at support.dell.com. NOTE: In some countries, opening and replacing parts of your computer may void your operating system. INSPIRON Finding More ...Information and Resources If you need to: reinstall your warranty. learn more about your hard drive. NOTE: Drivers and documentation updates can be found on your operating system, maintaining peripherals, RAID, Internet, Bluetooth®, networking, and e-mail. reinstall or replace a worn or defective part. the Service Manual on the Dell...
Setup Guide
Page 56
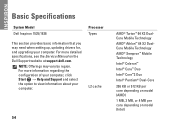
For more detailed specifications, see the Service Manual on model (Intel) NOTE: Offerings may need when setting up, updating drivers for, and upgrading your computer. INSPIRON Basic Specifications System Model Dell Inspiron 1525/1526 Processor Types This section provides basic information that you may vary ...Celeron™ Intel® Core™ Duo Intel® Core™2 Duo Intel® Pentium® Dual-Core 256 KB or 512 KB per core depending on model (AMD) 1 MB, 2 MB, or 4 MB per core depending on the Dell Support website at support.dell.com. For more information ...
For more detailed specifications, see the Service Manual on model (Intel) NOTE: Offerings may need when setting up, updating drivers for, and upgrading your computer. INSPIRON Basic Specifications System Model Dell Inspiron 1525/1526 Processor Types This section provides basic information that you may vary ...Celeron™ Intel® Core™ Duo Intel® Core™2 Duo Intel® Pentium® Dual-Core 256 KB or 512 KB per core depending on model (AMD) 1 MB, 2 MB, or 4 MB per core depending on the Dell Support website at support.dell.com. For more information ...

Setup Guide
Page 57
... 667 MHz DDR2 SODIMM 1 GB, 1.5 GB, 2 GB, 3 GB, 4 GB 4 GB NOTE: For instructions on upgrading your memory, see the Service Manual on the Dell Support website at support.dell.com. NOTE: In order to take advantage of the dual channel bandwidth capability, both memory slots must be populated and must match in size. 55
... 667 MHz DDR2 SODIMM 1 GB, 1.5 GB, 2 GB, 3 GB, 4 GB 4 GB NOTE: For instructions on upgrading your memory, see the Service Manual on the Dell Support website at support.dell.com. NOTE: In order to take advantage of the dual channel bandwidth capability, both memory slots must be populated and must match in size. 55
Service Manual
Page 1
Microsoft, Windows, and Windows Vista are trademarks of Dell Inc. Dell Inc. A00 CAUTION: A CAUTION indicates potential for I/O Connectors Notes, Notices, and Cautions NOTE: A NOTE indicates important information that helps ...products. Model PP29L January 2008 Rev. Reproduction in any proprietary interest in this text: Dell, the DELL logo, and Inspiron are either trademarks or registered trademarks of your computer. Dell™ Inspiron™ 1525/1526 Service Manual Before You Begin Subscriber Identity Module (Optional) ExpressCards Using the Memory Card Reader Optical Drive...
Microsoft, Windows, and Windows Vista are trademarks of Dell Inc. Dell Inc. A00 CAUTION: A CAUTION indicates potential for I/O Connectors Notes, Notices, and Cautions NOTE: A NOTE indicates important information that helps ...products. Model PP29L January 2008 Rev. Reproduction in any proprietary interest in this text: Dell, the DELL logo, and Inspiron are either trademarks or registered trademarks of your computer. Dell™ Inspiron™ 1525/1526 Service Manual Before You Begin Subscriber Identity Module (Optional) ExpressCards Using the Memory Card Reader Optical Drive...
Service Manual
Page 2
... damage to release the connector. If you begin any telephone or network cables from being scratched. 2. Back to Contents Page Before You Begin Dell™ Inspiron™ 1525/1526 Service Manual Recommended Tools Before Working Inside Your Computer This document provides procedures for 4 seconds. 3. Hold a component such as a connector on its metal mounting bracket...
... damage to release the connector. If you begin any telephone or network cables from being scratched. 2. Back to Contents Page Before You Begin Dell™ Inspiron™ 1525/1526 Service Manual Recommended Tools Before Working Inside Your Computer This document provides procedures for 4 seconds. 3. Hold a component such as a connector on its metal mounting bracket...
Service Manual
Page 4
...NOTE: If you use a BIOS update program CD to flash the BIOS, press before inserting the CD so that appear on your computer at support.dell.com. 4. Doing so may cause system damage. 1. Press during POST to boot from the hard drive. Flashing the BIOS From the Hard Drive ...is complete, the computer will automatically reboot. 3. Failure to boot and updates the new BIOS. Back to Contents Page Flashing the BIOS Dell™ Inspiron™ 1525/1526 Service Manual Flashing the BIOS From a CD Flashing the BIOS From the Hard Drive If a BIOS-update program CD is provided with a new system...
...NOTE: If you use a BIOS update program CD to flash the BIOS, press before inserting the CD so that appear on your computer at support.dell.com. 4. Doing so may cause system damage. 1. Press during POST to boot from the hard drive. Flashing the BIOS From the Hard Drive ...is complete, the computer will automatically reboot. 3. Failure to boot and updates the new BIOS. Back to Contents Page Flashing the BIOS Dell™ Inspiron™ 1525/1526 Service Manual Flashing the BIOS From a CD Flashing the BIOS From the Hard Drive If a BIOS-update program CD is provided with a new system...
Service Manual
Page 6
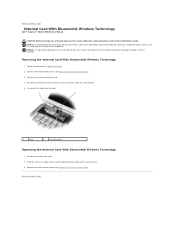
... touching an unpainted metal surface (such as a connector on the back of the computer). Back to Contents Page Internal Card With Bluetooth® Wireless Technology Dell™ Inspiron™ 1525/1526 Service Manual CAUTION: Before you begin any of the procedures in this section, follow the safety instructions in Before You Begin. 2.
... touching an unpainted metal surface (such as a connector on the back of the computer). Back to Contents Page Internal Card With Bluetooth® Wireless Technology Dell™ Inspiron™ 1525/1526 Service Manual CAUTION: Before you begin any of the procedures in this section, follow the safety instructions in Before You Begin. 2.
Service Manual
Page 7
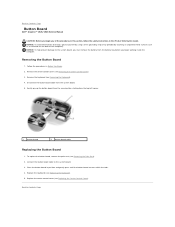
... Button Board 1. Replace the keyboard (see Removing the Keyboard). 4. Removing the Button Board 1. Connect the button board cable to Contents Page Button Board Dell™ Inspiron™ 1525/1526 Service Manual CAUTION: Before you begin any of the computer). NOTICE: To help prevent damage to Contents Page Remove the keyboard (see Replacing the Keyboard...
... Button Board 1. Replace the keyboard (see Removing the Keyboard). 4. Removing the Button Board 1. Connect the button board cable to Contents Page Button Board Dell™ Inspiron™ 1525/1526 Service Manual CAUTION: Before you begin any of the computer). NOTICE: To help prevent damage to Contents Page Remove the keyboard (see Replacing the Keyboard...

Service Manual
Page 8
... side of the procedures in this section, follow the safety instructions in the notification area) to Contents Page Using the Memory Card Reader Dell™ Inspiron™ 1525/1526 Service Manual Removing a Memory Card or Blank CAUTION: Before you begin any of the card facing up. 2. The computer automatically detects the card. The cards...
... side of the procedures in this section, follow the safety instructions in the notification area) to Contents Page Using the Memory Card Reader Dell™ Inspiron™ 1525/1526 Service Manual Removing a Memory Card or Blank CAUTION: Before you begin any of the card facing up. 2. The computer automatically detects the card. The cards...

Service Manual
Page 9
... connected to lift the center control cover on the back of the keyboard. NOTICE: To avoid damage to Contents Page Center Control Cover Dell™ Inspiron™ 1525/1526 Service Manual CAUTION: Before you begin working inside the computer. Back to the center control cover, do not pull hard when you are raising the...
... connected to lift the center control cover on the back of the keyboard. NOTICE: To avoid damage to Contents Page Center Control Cover Dell™ Inspiron™ 1525/1526 Service Manual CAUTION: Before you begin working inside the computer. Back to the center control cover, do not pull hard when you are raising the...
Service Manual
Page 11
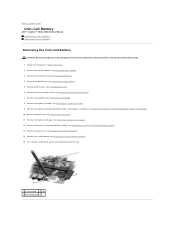
... the optical drive (see Removing the Internal Card With Bluetooth® Wireless Technology). 10. Use a plastic scribe to Contents Page Coin-Cell Battery Dell™ Inspiron™ 1525/1526 Service Manual Removing the Coin-Cell Battery Replacing the Coin-Cell Battery Removing the Coin-Cell Battery CAUTION: Before you begin any of the procedures...
... the optical drive (see Removing the Internal Card With Bluetooth® Wireless Technology). 10. Use a plastic scribe to Contents Page Coin-Cell Battery Dell™ Inspiron™ 1525/1526 Service Manual Removing the Coin-Cell Battery Replacing the Coin-Cell Battery Removing the Coin-Cell Battery CAUTION: Before you begin any of the procedures...


