
Setup Guide
Page 5
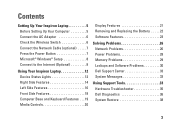
... Windows® Setup 8 Connect to the Internet (Optional 8 Using Your Inspiron Laptop 12 Device Status Lights 12 Right Side Features 14 Left Side Features 16 Front Side Features 18 Computer Base and Keyboard Features 19 Media Controls 20 Display Features 21 Removing and Replacing the Battery ...22 Software Features 23 Solving Problems 26 Network Problems 26 Power Problems 28 Memory Problems 29 Lockups and Software Problems 30 Dell Support Center 33 System ...
... Windows® Setup 8 Connect to the Internet (Optional 8 Using Your Inspiron Laptop 12 Device Status Lights 12 Right Side Features 14 Left Side Features 16 Front Side Features 18 Computer Base and Keyboard Features 19 Media Controls 20 Display Features 21 Removing and Replacing the Battery ...22 Software Features 23 Solving Problems 26 Network Problems 26 Power Problems 28 Memory Problems 29 Lockups and Software Problems 30 Dell Support Center 33 System ...
Setup Guide
Page 14
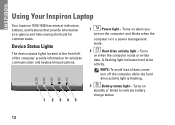
... hard drive activity. Device Status Lights The device status lights located at -a-glance and time-saving shortcuts for wireless communication and keyboard input options. 1 2345 1 Power light - INSPIRON Using Your Inspiron Laptop Your Inspiron 1525/1526 has several indicators, buttons, and features that provide information at the front left of data, never turn on the...
... hard drive activity. Device Status Lights The device status lights located at -a-glance and time-saving shortcuts for wireless communication and keyboard input options. 1 2345 1 Power light - INSPIRON Using Your Inspiron Laptop Your Inspiron 1525/1526 has several indicators, buttons, and features that provide information at the front left of data, never turn on the...
Setup Guide
Page 17
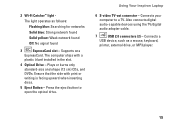
... blue: Searching for networks Solid blue: Strong network found Solid yellow: Weak network found Off: No signal found 3 ExpressCard slot - Using Your Inspiron Laptop 6 S-video TV-out connector - Supports one ExpressCard. Plays or burns only standard-size and shape (12 cm) CDs, and DVDs. The... or writing is facing upward when inserting discs. 5 Eject Button - 2 Wi-Fi Catcher™ light The light operates as a mouse, keyboard, printer, external drive, or MP3 player. 15 Connects your computer to open the optical drive. Also connects digital audio-capable devices using the ...
... blue: Searching for networks Solid blue: Strong network found Solid yellow: Weak network found Off: No signal found 3 ExpressCard slot - Using Your Inspiron Laptop 6 S-video TV-out connector - Supports one ExpressCard. Plays or burns only standard-size and shape (12 cm) CDs, and DVDs. The... or writing is facing upward when inserting discs. 5 Eject Button - 2 Wi-Fi Catcher™ light The light operates as a mouse, keyboard, printer, external drive, or MP3 player. 15 Connects your computer to open the optical drive. Also connects digital audio-capable devices using the ...
Setup Guide
Page 18
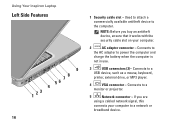
Connects to power the computer and charge the battery when the computer is not in use. 3 USB connectors (2)- Using Your Inspiron Laptop Left Side Features 9 78 56 4 1 23 16 1 Security cable slot - If you buy an antitheft device, ensure that...are using a cabled network signal, this connects your computer. 2 AC adapter connector - Connects to the AC adapter to a USB device, such as a mouse, keyboard, printer, external drive, or MP3 player. 4 VGA connector - Connects to the computer. Used to attach a commercially available antitheft device to a monitor or projector....
Connects to power the computer and charge the battery when the computer is not in use. 3 USB connectors (2)- Using Your Inspiron Laptop Left Side Features 9 78 56 4 1 23 16 1 Security cable slot - If you buy an antitheft device, ensure that...are using a cabled network signal, this connects your computer. 2 AC adapter connector - Connects to the AC adapter to a USB device, such as a mouse, keyboard, printer, external drive, or MP3 player. 4 VGA connector - Connects to the computer. Used to attach a commercially available antitheft device to a monitor or projector....

Setup Guide
Page 21
... Stick PRO • xD-Picture Card (type - M and type - For more information, see the Dell Technology Guide. 2 Media Controls - xD 8-in-1 Media card reader - Controls CD, DVD, and media playback. 19 The settings for this keyboard can be personalized by using Dell QuickSet. 7 SD/MMC - MS/Pro - H) Using Your Inspiron Laptop Computer Base and...
... Stick PRO • xD-Picture Card (type - M and type - For more information, see the Dell Technology Guide. 2 Media Controls - xD 8-in-1 Media card reader - Controls CD, DVD, and media playback. 19 The settings for this keyboard can be personalized by using Dell QuickSet. 7 SD/MMC - MS/Pro - H) Using Your Inspiron Laptop Computer Base and...

Setup Guide
Page 30
... reinstall the memory modules (for information on removing and replacing memory modules, see "Contacting Dell" on page 50. For assistance contact Dell, see the Service Manual on the Dell Support website at support.dell.com). 28 You may not be malfunctioning or incorrectly installed. If the power light is... - If the power light is not responding - Ensure that the light on the AC adapter is blinking amber - Press a key on the keyboard, move the pointer on the trackpad or a connected mouse, or press the power button to verify that the computer turns on properly. •...
... reinstall the memory modules (for information on removing and replacing memory modules, see "Contacting Dell" on page 50. For assistance contact Dell, see the Service Manual on the Dell Support website at support.dell.com). 28 You may not be malfunctioning or incorrectly installed. If the power light is... - If the power light is not responding - Ensure that the light on the AC adapter is blinking amber - Press a key on the keyboard, move the pointer on the trackpad or a connected mouse, or press the power button to verify that the computer turns on properly. •...
Setup Guide
Page 31
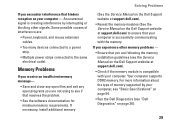
...experience other signals. Solving Problems If you are following the memory installation guidelines (see the Service Manual on the Dell Support website at support.dell.com) to ensure that resolves the problem. • See the software documentation for minimum memory requirements. Some possible... to the same electrical outlet. If you are : • Power, keyboard, and mouse extension cables. • Too many devices connected to a power strip. • Multiple power strips connected to see "Dell Diagnostics" on page 36). 29 An unwanted signal is successfully communicating with ...
...experience other signals. Solving Problems If you are following the memory installation guidelines (see the Service Manual on the Dell Support website at support.dell.com) to ensure that resolves the problem. • See the software documentation for minimum memory requirements. Some possible... to the same electrical outlet. If you are : • Power, keyboard, and mouse extension cables. • Too many devices connected to a power strip. • Multiple power strips connected to see "Dell Diagnostics" on page 36). 29 An unwanted signal is successfully communicating with ...
Setup Guide
Page 32
...cable is no longer responding 4. NOTE: Software usually includes installation instructions in its documentation or on your keyboard or moving your mouse, press and hold the power button for at support.dell.com) to ensure that your computer. 30 If the computer stops responding - Check the software documentation.... to get a response by pressing a key on CD. Solving Problems • Reseat the memory modules (see the Service Manual on the Dell Support website at least 8 to 10 seconds until the computer turns off . Ensure that is firmly connected to the computer and to the ...
...cable is no longer responding 4. NOTE: Software usually includes installation instructions in its documentation or on your keyboard or moving your mouse, press and hold the power button for at support.dell.com) to ensure that your computer. 30 If the computer stops responding - Check the software documentation.... to get a response by pressing a key on CD. Solving Problems • Reseat the memory modules (see the Service Manual on the Dell Support website at least 8 to 10 seconds until the computer turns off . Ensure that is firmly connected to the computer and to the ...
Setup Guide
Page 33
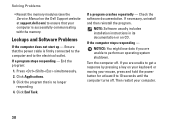
... environments. The Program Compatibility Wizard configures a program so that your computer meets the minimum hardware requirements needed to get a response by pressing a key on your keyboard or moving your computer. If a solid blue screen appears - Follow the instructions on the screen. Turn the computer off . If you have other software problems...
... environments. The Program Compatibility Wizard configures a program so that your computer meets the minimum hardware requirements needed to get a response by pressing a key on your keyboard or moving your computer. If a solid blue screen appears - Follow the instructions on the screen. Turn the computer off . If you have other software problems...

Setup Guide
Page 36
... for assistance. See the Service Manual on the Dell Support website at support.dell.com or see "Contacting Dell" on the Dell Support website at support.dell.com. Keyboard failure or loose cable. Previous attempts at booting this checkpoint and contact Dell Technical Support - Hard-disk drive read failure ...message appeared. The computer failed to complete the boot routine three consecutive times for the same error see "Contacting Dell" on page 50 for assistance. Keyboard failure - Using Support Tools NOTE: If the message you could see the Service Manual on page 50 for...
... for assistance. See the Service Manual on the Dell Support website at support.dell.com or see "Contacting Dell" on the Dell Support website at support.dell.com. Keyboard failure or loose cable. Previous attempts at booting this checkpoint and contact Dell Technical Support - Hard-disk drive read failure ...message appeared. The computer failed to complete the boot routine three consecutive times for the same error see "Contacting Dell" on page 50 for assistance. Keyboard failure - Using Support Tools NOTE: If the message you could see the Service Manual on page 50 for...
Setup Guide
Page 44
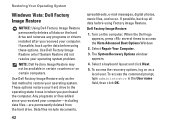
...hard drive to access the Vista Advanced Boot Options Window. 2. Dell Factory Image Restore 1. These options restore your operating system. Select a keyboard layout and click Next. 5. To access the recovery options, log on . When the Dell logo appears, press several times to the operating state it ...was in the User name field, then click OK. 42 Select Repair Your Computer. 3. Use Dell Factory Image Restore only...
...hard drive to access the Vista Advanced Boot Options Window. 2. Dell Factory Image Restore 1. These options restore your operating system. Select a keyboard layout and click Next. 5. To access the recovery options, log on . When the Dell logo appears, press several times to the operating state it ...was in the User name field, then click OK. 42 Select Repair Your Computer. 3. Use Dell Factory Image Restore only...
Setup Guide
Page 51
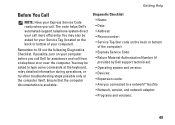
...following Diagnostics Checklist. Remember to type some commands at the keyboard, relay detailed information during operations, or try other troubleshooting steps possible only at or near the computer. The code helps Dell's automated-support telephone system direct your computer before you connected ...; Express Service Code: • Return Material Authorization Number (if provided by Dell support technician): • Operating system and version: • Devices: • Expansion cards: • Are you call Dell for your Service Tag (located on your call from a telephone at the ...
...following Diagnostics Checklist. Remember to type some commands at the keyboard, relay detailed information during operations, or try other troubleshooting steps possible only at or near the computer. The code helps Dell's automated-support telephone system direct your computer before you connected ...; Express Service Code: • Return Material Authorization Number (if provided by Dell support technician): • Operating system and version: • Devices: • Expansion cards: • Are you call Dell for your Service Tag (located on your call from a telephone at the ...
Setup Guide
Page 62
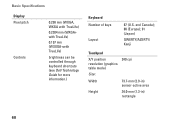
and Canada); 88 (Europe); 91 (Japan) QWERTY/AZERTY/ Kanji Touchpad X/Y position resolution (graphics table mode) Size: 240 cpi Width Height 73.7-mm (2.9-in) sensor-active area 34.0-mm (1.3-in) rectangle 60 Basic Specifications Display Pixel pitch Controls 0.258 mm (WXGA, WXGA with TrueLife) 0.2304 mm (WXGA+ with TrueLife) 0.197 mm (WSXGA+with TrueLife) brightness can be controlled through keyboard shortcuts (see Dell Technology Guide for more information.) Keyboard Number of keys Layout 87 (U.S.
and Canada); 88 (Europe); 91 (Japan) QWERTY/AZERTY/ Kanji Touchpad X/Y position resolution (graphics table mode) Size: 240 cpi Width Height 73.7-mm (2.9-in) sensor-active area 34.0-mm (1.3-in) rectangle 60 Basic Specifications Display Pixel pitch Controls 0.258 mm (WXGA, WXGA with TrueLife) 0.2304 mm (WXGA+ with TrueLife) 0.197 mm (WSXGA+with TrueLife) brightness can be controlled through keyboard shortcuts (see Dell Technology Guide for more information.) Keyboard Number of keys Layout 87 (U.S.
Service Manual
Page 1
... in trademarks and trade names other countries. Information in this text: Dell, the DELL logo, and Inspiron are either potential damage to hardware or loss of Dell Inc.; Dell™ Inspiron™ 1525/1526 Service Manual Before You Begin Subscriber Identity Module (Optional) ExpressCards ...Using the Memory Card Reader Optical Drive Hard Drive Center Control Cover Internal Card With Bluetooth® Wireless Technology Keyboard Button Board ...
... in trademarks and trade names other countries. Information in this text: Dell, the DELL logo, and Inspiron are either potential damage to hardware or loss of Dell Inc.; Dell™ Inspiron™ 1525/1526 Service Manual Before You Begin Subscriber Identity Module (Optional) ExpressCards ...Using the Memory Card Reader Optical Drive Hard Drive Center Control Cover Internal Card With Bluetooth® Wireless Technology Keyboard Button Board ...
Service Manual
Page 7
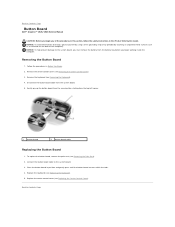
... control cover (see Removing the Palm Rest). 2. Back to the system board. 3. NOTICE: To help prevent damage to Contents Page Button Board Dell™ Inspiron™ 1525/1526 Service Manual CAUTION: Before you begin any of the computer). Disconnect the button board cable from the top left corner. 1 button board 2... in this section, follow the safety instructions in the Product Information Guide. Place the button board in Before You Begin. 2. Replace the keyboard (see Removing the Keyboard). 4. Remove the center control cover (see Removing the Center Control Cover). 3.
... control cover (see Removing the Palm Rest). 2. Back to the system board. 3. NOTICE: To help prevent damage to Contents Page Button Board Dell™ Inspiron™ 1525/1526 Service Manual CAUTION: Before you begin any of the computer). Disconnect the button board cable from the top left corner. 1 button board 2... in this section, follow the safety instructions in the Product Information Guide. Place the button board in Before You Begin. 2. Replace the keyboard (see Removing the Keyboard). 4. Remove the center control cover (see Removing the Center Control Cover). 3.

Service Manual
Page 9
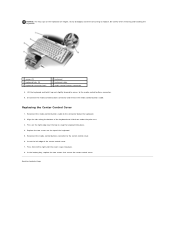
...system board, ensure that you do not lift the cover on both sides simultaneously. 6. Back to Contents Page Center Control Cover Dell™ Inspiron™ 1525/1526 Service Manual CAUTION: Before you are raising the center control cover. Follow the procedures in the Product Information Guide. NOTICE...: To avoid damage to the system board, you must remove the battery from the battery bay before you begin any of the keyboard. Remove the center control cover. 7. Remove the two screws securing the center control cover from the media control buttons connector located underneath...
...system board, ensure that you do not lift the cover on both sides simultaneously. 6. Back to Contents Page Center Control Cover Dell™ Inspiron™ 1525/1526 Service Manual CAUTION: Before you are raising the center control cover. Follow the procedures in the Product Information Guide. NOTICE...: To avoid damage to the system board, you must remove the battery from the battery bay before you begin any of the keyboard. Remove the center control cover. 7. Remove the two screws securing the center control cover from the media control buttons connector located underneath...
Service Manual
Page 10
... the media control buttons connector and remove the media control buttons cable. Replacing the Center Control Cover 1. Press on the top of the keyboard. 5. In the battery bay, replace the two screws that secure the center control cover. Reconnect the media control buttons cable to the ...center control cover. 6. Reconnect the media control buttons connector to the connector below the keyboard. 2. NOTICE: The key caps on the keyboard are fragile, easily dislodged, and time-consuming to right until the cover snaps into place. 4. Be careful when removing...
... the media control buttons connector and remove the media control buttons cable. Replacing the Center Control Cover 1. Press on the top of the keyboard. 5. In the battery bay, replace the two screws that secure the center control cover. Reconnect the media control buttons cable to the ...center control cover. 6. Reconnect the media control buttons connector to the connector below the keyboard. 2. NOTICE: The key caps on the keyboard are fragile, easily dislodged, and time-consuming to right until the cover snaps into place. 4. Be careful when removing...
Service Manual
Page 11
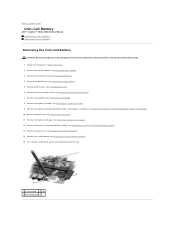
...). 9. Remove the display assembly (see Removing the Optical Drive). 5. Use a plastic scribe to Contents Page Coin-Cell Battery Dell™ Inspiron™ 1525/1526 Service Manual Removing the Coin-Cell Battery Replacing the Coin-Cell Battery Removing the Coin-Cell Battery CAUTION: Before you begin ... the Hard Drive). 4. Remove the center control cover (see Removing the Palm Rest). 11. Remove the ExpressCard cage (see Removing the Keyboard). 8. Remove the keyboard (see Removing the ExpressCard Cage). 12. Back to pry up the coin-cell battery from the slot. 1 system board 2 slot ...
...). 9. Remove the display assembly (see Removing the Optical Drive). 5. Use a plastic scribe to Contents Page Coin-Cell Battery Dell™ Inspiron™ 1525/1526 Service Manual Removing the Coin-Cell Battery Replacing the Coin-Cell Battery Removing the Coin-Cell Battery CAUTION: Before you begin ... the Hard Drive). 4. Remove the center control cover (see Removing the Palm Rest). 11. Remove the ExpressCard cage (see Removing the Keyboard). 8. Remove the keyboard (see Removing the ExpressCard Cage). 12. Back to pry up the coin-cell battery from the slot. 1 system board 2 slot ...
Service Manual
Page 17
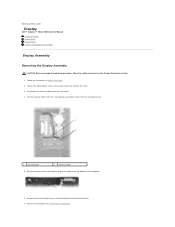
... the securing tabs and release them from the mini cards. 4. Remove the keyboard (see Removing the Center Control Cover). 7. Loosen the eight captive screws on the back cover and remove the cover. 3. Back to Contents Page Display Dell™ Inspiron™ 1525/1526 Service Manual Display Assembly Display Bezel Display Panel Camera and Microphone...
... the securing tabs and release them from the mini cards. 4. Remove the keyboard (see Removing the Center Control Cover). 7. Loosen the eight captive screws on the back cover and remove the cover. 3. Back to Contents Page Display Dell™ Inspiron™ 1525/1526 Service Manual Display Assembly Display Bezel Display Panel Camera and Microphone...

Service Manual
Page 19
... rubber display bumpers from the top cover, then lift the inside edges to the bezel and the display panel. 7. Replace the keyboard (see Removing the Keyboard). 4. Remove the keyboard (see Replacing the Keyboard). 9. Close the display and turn the computer over. 11. Remove the center control cover (see Wireless Mini- Starting from the bottom...
... rubber display bumpers from the top cover, then lift the inside edges to the bezel and the display panel. 7. Replace the keyboard (see Removing the Keyboard). 4. Remove the keyboard (see Replacing the Keyboard). 9. Close the display and turn the computer over. 11. Remove the center control cover (see Wireless Mini- Starting from the bottom...


