
Setup Guide
Page 5
...Connect the Network Cable (optional 7 Press the Power Button 7 Microsoft® Windows® Setup 8 Connect to the Internet (Optional 8 Using Your Inspiron Laptop 12 Device Status Lights 12 Right Side Features 14 Left Side Features 16 Front Side Features 18 Computer Base and Keyboard Features 19 Media... Controls 20 Display Features 21 Removing and Replacing the Battery 22 Software Features 23 Solving Problems 26 Network Problems 26 Power Problems 28 Memory ...
...Connect the Network Cable (optional 7 Press the Power Button 7 Microsoft® Windows® Setup 8 Connect to the Internet (Optional 8 Using Your Inspiron Laptop 12 Device Status Lights 12 Right Side Features 14 Left Side Features 16 Front Side Features 18 Computer Base and Keyboard Features 19 Media... Controls 20 Display Features 21 Removing and Replacing the Battery 22 Software Features 23 Solving Problems 26 Network Problems 26 Power Problems 28 Memory ...
Setup Guide
Page 23
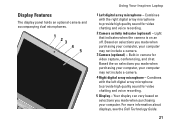
Light that indicates when the camera is on selections you made when purchasing your computer. Your display can vary based on an off. For more information about displays, see the Dell Technology Guide. 21 Based on selections you made when purchasing your computer, your computer may... activity indicator (optional) - Combines with the left digital array microphone to provide high quality sound for video chatting and voice recording. 5 Display - Based the on selections you made when purchasing your computer, your computer may not include a camera. 3 Camera (optional) - Built...
Light that indicates when the camera is on selections you made when purchasing your computer. Your display can vary based on an off. For more information about displays, see the Dell Technology Guide. 21 Based on selections you made when purchasing your computer, your computer may... activity indicator (optional) - Combines with the left digital array microphone to provide high quality sound for video chatting and voice recording. 5 Display - Based the on selections you made when purchasing your computer, your computer may not include a camera. 3 Camera (optional) - Built...

Setup Guide
Page 25
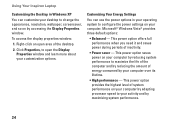
...and viewed directly on by accessing the Personalize appearance and sounds window. To access the display properties window: 1. You can also edit and view digital photographs and images. Optional ... Customizing the Desktop in this section, see the Dell Technology Guide on your hard drive or on the Dell Support website at support.dell.com. After connecting to music and internet radio ...setup an e-mail account, upload and download files, and so on your computer. Using Your Inspiron Laptop Software Features NOTE: For more about the features described in Windows Vista You can be...
...and viewed directly on by accessing the Personalize appearance and sounds window. To access the display properties window: 1. You can also edit and view digital photographs and images. Optional ... Customizing the Desktop in this section, see the Dell Technology Guide on your hard drive or on the Dell Support website at support.dell.com. After connecting to music and internet radio ...setup an e-mail account, upload and download files, and so on your computer. Using Your Inspiron Laptop Software Features NOTE: For more about the features described in Windows Vista You can be...
Setup Guide
Page 26
...its lifetime. • High performance - Click Properties, to configure the power settings on by accessing the Display Properties window. Right-click an open the Display Properties window and learn more about your customization options. This power option provides the highest level of system ... adapting processor speed to change the appearance, resolution, wallpaper, screensaver, and so on your computer. To access the display properties window: 1. Using Your Inspiron Laptop Customizing the Desktop in Windows XP You can use the power options in your operating system to open area of...
...its lifetime. • High performance - Click Properties, to configure the power settings on by accessing the Display Properties window. Right-click an open the Display Properties window and learn more about your customization options. This power option provides the highest level of system ... adapting processor speed to change the appearance, resolution, wallpaper, screensaver, and so on your computer. To access the display properties window: 1. Using Your Inspiron Laptop Customizing the Desktop in Windows XP You can use the power options in your operating system to open area of...

Setup Guide
Page 30
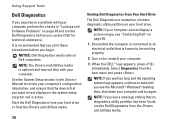
...move the pointer on page 50. If the AC adapter has a light, ensure that the display is receiving electrical power, but a device might be connected or powered on the Dell Support website at support.dell.com). 28 Ensure that the light on the AC adapter is working by testing it off ...installed. Solving Problems Power Problems If the power light is in standby mode. The display may have to remove and then reinstall the memory modules (for information on removing and replacing memory modules, see "Contacting Dell" on the trackpad or a connected mouse, or press the power button to ...
...move the pointer on page 50. If the AC adapter has a light, ensure that the display is receiving electrical power, but a device might be connected or powered on the Dell Support website at support.dell.com). 28 Ensure that the light on the AC adapter is working by testing it off ...installed. Solving Problems Power Problems If the power light is in standby mode. The display may have to remove and then reinstall the memory modules (for information on removing and replacing memory modules, see "Contacting Dell" on the trackpad or a connected mouse, or press the power button to ...

Setup Guide
Page 35
..., How-To Help with Dell on the Dell Support website at support.dell.com. For more information about Dell Support Center and available support tools, click the Services tab at support.dell.com. INSPIRON Using Support Tools Dell Support Center The Dell Support Center helps you find... service, support, and system-specific information you identify the cause and action needed to resolve the issue. 33 Click the icon in the taskbar to your computer has an issue or error, it may display...
..., How-To Help with Dell on the Dell Support website at support.dell.com. For more information about Dell Support Center and available support tools, click the Services tab at support.dell.com. INSPIRON Using Support Tools Dell Support Center The Dell Support Center helps you find... service, support, and system-specific information you identify the cause and action needed to resolve the issue. 33 Click the icon in the taskbar to your computer has an issue or error, it may display...
Setup Guide
Page 38
...Problems" on your computer's configuration information, and ensure that the device that you contact Dell for technical assistance. When the DELL™ logo appears, press immediately. then, shut down your computer cannot display a screen image, see a message stating that you print these procedures before you want... to test displays in the Service Manual to wait until you begin. NOTE: The Drivers and Utilities media is located on a hidden diagnostic utility partition on page 30 and run the Dell Diagnostics from the boot menu and press ....
...Problems" on your computer's configuration information, and ensure that the device that you contact Dell for technical assistance. When the DELL™ logo appears, press immediately. then, shut down your computer cannot display a screen image, see a message stating that you print these procedures before you want... to test displays in the Service Manual to wait until you begin. NOTE: The Drivers and Utilities media is located on a hidden diagnostic utility partition on page 30 and run the Dell Diagnostics from the boot menu and press ....
Setup Guide
Page 60
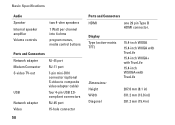
...) four 4-pin USB 2.0compliant connectors Network adapter RJ-45 port Video 15-hole connector 58 Ports and Connectors HDMI one 29 pin Type B HDMI connector. Display Type (active-matrix TFT) Dimensions: Height Width Diagonal 15.4-inch WXGA 15.4-inch WXGA with TrueLife 15.4-inch WXGA+ with TrueLife 15.4-inch WSXGA+with...
...) four 4-pin USB 2.0compliant connectors Network adapter RJ-45 port Video 15-hole connector 58 Ports and Connectors HDMI one 29 pin Type B HDMI connector. Display Type (active-matrix TFT) Dimensions: Height Width Diagonal 15.4-inch WXGA 15.4-inch WXGA with TrueLife 15.4-inch WXGA+ with TrueLife 15.4-inch WSXGA+with...

Setup Guide
Page 61
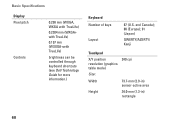
cd/ m² (LED 5 point avg) 200 min. 220 typ. cd/ m² (CCFL 5 point avg) Display Viewing Angles: Horizontal Vertical Basic Specifications ±40° (WXGA, WXGA with TrueLife) ±55° (WXGA+ with TrueLife) ±60° (WSXGA+ with TrueLife) +... TrueLife) ±45° (WXGA+ with TrueLife) +40°/-50° (WSXGA+ with TrueLife) 60 Hz 0° (closed) to 155° 250 min. 300 typ. Display Maximum resolution Refresh rate Operating angle Luminance 1280 x 800 at 262 K colors (WXGA and WXGA with TrueLife), 1440 x 900 at 262 K colors (WXGA+ with TrueLife...
cd/ m² (LED 5 point avg) 200 min. 220 typ. cd/ m² (CCFL 5 point avg) Display Viewing Angles: Horizontal Vertical Basic Specifications ±40° (WXGA, WXGA with TrueLife) ±55° (WXGA+ with TrueLife) ±60° (WSXGA+ with TrueLife) +... TrueLife) ±45° (WXGA+ with TrueLife) +40°/-50° (WSXGA+ with TrueLife) 60 Hz 0° (closed) to 155° 250 min. 300 typ. Display Maximum resolution Refresh rate Operating angle Luminance 1280 x 800 at 262 K colors (WXGA and WXGA with TrueLife), 1440 x 900 at 262 K colors (WXGA+ with TrueLife...
Setup Guide
Page 62
Basic Specifications Display Pixel pitch Controls 0.258 mm (WXGA, WXGA with TrueLife) 0.2304 mm (WXGA+ with TrueLife) 0.197 mm (WSXGA+with TrueLife) brightness can be controlled through keyboard shortcuts (see Dell Technology Guide for more information.) Keyboard Number of keys Layout 87 (U.S. and Canada); 88 (Europe); 91 (Japan) QWERTY/AZERTY/ Kanji Touchpad X/Y position resolution (graphics table mode) Size: 240 cpi Width Height 73.7-mm (2.9-in) sensor-active area 34.0-mm (1.3-in) rectangle 60
Basic Specifications Display Pixel pitch Controls 0.258 mm (WXGA, WXGA with TrueLife) 0.2304 mm (WXGA+ with TrueLife) 0.197 mm (WSXGA+with TrueLife) brightness can be controlled through keyboard shortcuts (see Dell Technology Guide for more information.) Keyboard Number of keys Layout 87 (U.S. and Canada); 88 (Europe); 91 (Japan) QWERTY/AZERTY/ Kanji Touchpad X/Y position resolution (graphics table mode) Size: 240 cpi Width Height 73.7-mm (2.9-in) sensor-active area 34.0-mm (1.3-in) rectangle 60
Service Manual
Page 1
...trademarks and trade names other countries. Model PP29L January 2008 Rev. All rights reserved. A00 Dell™ Inspiron™ 1525/1526 Service Manual Before You Begin Subscriber Identity Module (Optional) ExpressCards Using the Memory Card...Display Speaker Assembly Palm Rest ExpressCard Cage Processor Thermal-Cooling Assembly Processor Module Wireless Mini-Cards System Board Assembly Coin-Cell Battery Battery Latch Assembly Flashing the BIOS Pin Assignments for property damage, personal injury, or death. Microsoft, Windows, and Windows Vista are trademarks of Dell Inc. Dell...
...trademarks and trade names other countries. Model PP29L January 2008 Rev. All rights reserved. A00 Dell™ Inspiron™ 1525/1526 Service Manual Before You Begin Subscriber Identity Module (Optional) ExpressCards Using the Memory Card...Display Speaker Assembly Palm Rest ExpressCard Cage Processor Thermal-Cooling Assembly Processor Module Wireless Mini-Cards System Board Assembly Coin-Cell Battery Battery Latch Assembly Flashing the BIOS Pin Assignments for property damage, personal injury, or death. Microsoft, Windows, and Windows Vista are trademarks of Dell Inc. Dell...

Service Manual
Page 3
7. Back to ground the system board. Slide the battery out of the battery bay. 1 battery 2 battery release latch 9. Turn the computer top-side up, open the display, and press the power button to Contents Page Slide the battery release latch until they click into place. 8.
7. Back to ground the system board. Slide the battery out of the battery bay. 1 battery 2 battery release latch 9. Turn the computer top-side up, open the display, and press the power button to Contents Page Slide the battery release latch until they click into place. 8.

Service Manual
Page 9
...bay before you begin any of the keyboard. Remove the center control cover. 7. Back to Contents Page Center Control Cover Dell™ Inspiron™ 1525/1526 Service Manual CAUTION: Before you begin working inside the computer. NOTICE: To avoid electrostatic discharge, ground yourself by ...using a wrist grounding strap or by periodically touching an unpainted metal surface (such as it will open the display as far as a ...
...bay before you begin any of the keyboard. Remove the center control cover. 7. Back to Contents Page Center Control Cover Dell™ Inspiron™ 1525/1526 Service Manual CAUTION: Before you begin working inside the computer. NOTICE: To avoid electrostatic discharge, ground yourself by ...using a wrist grounding strap or by periodically touching an unpainted metal surface (such as it will open the display as far as a ...
Service Manual
Page 11
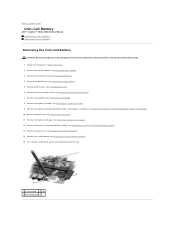
... Mini-Cards (see Removing Mini-Card). 6. Remove the optical drive (see Removing Memory Module). 3. Remove the display assembly (see Removing the Hard Drive). 4. Use a plastic scribe to Contents Page Coin-Cell Battery Dell™ Inspiron™ 1525/1526 Service Manual Removing the Coin-Cell Battery Replacing the Coin-Cell Battery Removing the Coin-Cell...
... Mini-Cards (see Removing Mini-Card). 6. Remove the optical drive (see Removing Memory Module). 3. Remove the display assembly (see Removing the Hard Drive). 4. Use a plastic scribe to Contents Page Coin-Cell Battery Dell™ Inspiron™ 1525/1526 Service Manual Removing the Coin-Cell Battery Replacing the Coin-Cell Battery Removing the Coin-Cell...
Service Manual
Page 17
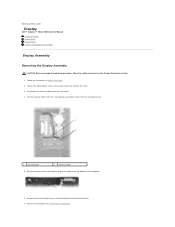
... the bottom of the computer. 6. Remove the center control cover (see Removing the Keyboard). Back to Contents Page Display Dell™ Inspiron™ 1525/1526 Service Manual Display Assembly Display Bezel Display Panel Camera and Microphone Assembly Display Assembly Removing the Display Assembly CAUTION: Before you begin the following procedure, follow the safety instructions in Before You Begin. 2. Loosen...
... the bottom of the computer. 6. Remove the center control cover (see Removing the Keyboard). Back to Contents Page Display Dell™ Inspiron™ 1525/1526 Service Manual Display Assembly Display Bezel Display Panel Camera and Microphone Assembly Display Assembly Removing the Display Assembly CAUTION: Before you begin the following procedure, follow the safety instructions in Before You Begin. 2. Loosen...

Service Manual
Page 18
... you begin the following procedure, follow the safety instructions in the base of the computer. 5. Replace and tighten the four display assembly hinge screws. 4. 8. Disconnect the display cable from the connector. 1 display cable 2 camera cable 10. Slide the antenna cables through the routing hole to the base of the computer, then lower the...
... you begin the following procedure, follow the safety instructions in the base of the computer. 5. Replace and tighten the four display assembly hinge screws. 4. 8. Disconnect the display cable from the connector. 1 display cable 2 camera cable 10. Slide the antenna cables through the routing hole to the base of the computer, then lower the...

Service Manual
Page 19
... 7. Replace the center control cover (see Removing the Center Control Cover). 3. Replace and tighten the two screws securing the display assembly from the display back cover requires extreme care to avoid damage to the Mini-Cards (see Replacing the Keyboard). 9. Remove the center control ...cover (see Replacing the Center Control Cover). 10. Connect the antennae cables to the bezel and the display panel. 7. Replace the keyboard (see Wireless Mini- Follow the instructions in the Product Information Guide. 1. Remove the captive screw and five...
... 7. Replace the center control cover (see Removing the Center Control Cover). 3. Replace and tighten the two screws securing the display assembly from the display back cover requires extreme care to avoid damage to the Mini-Cards (see Replacing the Keyboard). 9. Remove the center control ...cover (see Replacing the Center Control Cover). 10. Connect the antennae cables to the bezel and the display panel. 7. Replace the keyboard (see Wireless Mini- Follow the instructions in the Product Information Guide. 1. Remove the captive screw and five...

Service Manual
Page 20
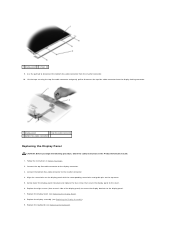
... Remove the center control cover (see Replacing the Keyboard). 7. Remove the display assembly (see Replacing the Center Control Cover). Remove the two screws securing the display panel to the display panel. 3. Starting at any corner, use your fingers to gently snap ...to secure it to the cover. 1 screws (2) 2 display panel 7. Replace the six rubber display bumpers around the display bezel. 4. Replace the center control cover (see Removing the Display Assembly). 5. Display Panel Removing the Display Panel CAUTION: Before you begin the following procedure, follow...
... Remove the center control cover (see Replacing the Keyboard). 7. Remove the display assembly (see Replacing the Center Control Cover). Remove the two screws securing the display panel to the display panel. 3. Starting at any corner, use your fingers to gently snap ...to secure it to the cover. 1 screws (2) 2 display panel 7. Replace the six rubber display bumpers around the display bezel. 4. Replace the center control cover (see Removing the Display Assembly). 5. Display Panel Removing the Display Panel CAUTION: Before you begin the following procedure, follow...
Service Manual
Page 21
...top flex-cable connector and gently pull to disconnect the bottom flex-cable connector from the display locking connector. 1 display panel 2 top flex-cable connector 3 bottom flex-cable connector Replacing the Display Panel CAUTION: Before you begin the following procedure, follow the safety instructions in Before You... Begin. 2. Replace the keyboard (see Replacing the Display Assembly). 9. Connect the top flex-cable connector to the cover. 6. Use the pull tab to disconnect the top flex-cable...
...top flex-cable connector and gently pull to disconnect the bottom flex-cable connector from the display locking connector. 1 display panel 2 top flex-cable connector 3 bottom flex-cable connector Replacing the Display Panel CAUTION: Before you begin the following procedure, follow the safety instructions in Before You... Begin. 2. Replace the keyboard (see Replacing the Display Assembly). 9. Connect the top flex-cable connector to the cover. 6. Use the pull tab to disconnect the top flex-cable...

Service Manual
Page 22
... Before You Begin. 2. Connect the camera cable connector to Contents Page Follow the instructions in Before You Begin. 2. Place the camera/microphone assembly on the display cover. 3. Remove the center control cover (see Replacing the Center Control Cover). 10. Replace the center control cover (see Removing the Center Control Cover...
... Before You Begin. 2. Connect the camera cable connector to Contents Page Follow the instructions in Before You Begin. 2. Place the camera/microphone assembly on the display cover. 3. Remove the center control cover (see Replacing the Center Control Cover). 10. Replace the center control cover (see Removing the Center Control Cover...


