
Service Manual
Page 7
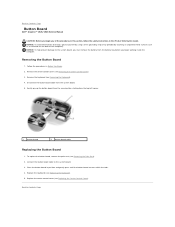
... the tabs. 4. To replace the button board, remove the palm rest (see Removing the Keyboard). 4. Disconnect the button board cable from the top left corner. 1 button board 2 button board cable Replacing the Button Board 1. Place the button board in Before You Begin. 2. Back to Contents Page Button Board Dell™ Inspiron™ 1525/1526 Service Manual CAUTION...
... the tabs. 4. To replace the button board, remove the palm rest (see Removing the Keyboard). 4. Disconnect the button board cable from the top left corner. 1 button board 2 button board cable Replacing the Button Board 1. Place the button board in Before You Begin. 2. Back to Contents Page Button Board Dell™ Inspiron™ 1525/1526 Service Manual CAUTION...
Service Manual
Page 10
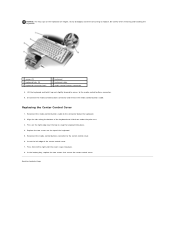
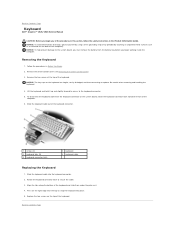
...screws (2) 3 keyboard tabs (5) 5 keyboard connector latch 2 keyboard 4 keyboard cable 6 media control buttons connector 8. Replacing the Center Control Cover 1. Press from left edge of the keyboard and slide them under the palm rest. 3. Align the tabs along the bottom of the center control cover. 7. In the battery bay..., replace the two screws that secure the center control cover. NOTICE: The key caps on...
...screws (2) 3 keyboard tabs (5) 5 keyboard connector latch 2 keyboard 4 keyboard cable 6 media control buttons connector 8. Replacing the Center Control Cover 1. Press from left edge of the keyboard and slide them under the palm rest. 3. Align the tabs along the bottom of the center control cover. 7. In the battery bay..., replace the two screws that secure the center control cover. NOTICE: The key caps on...
Service Manual
Page 11
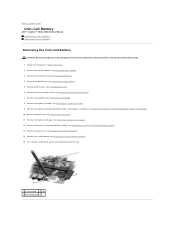
... ExpressCard Cage). 12. Remove the ExpressCard cage (see Removing the Palm Rest). 11. Remove the system board (see Removing the Center Control Cover). 7. Use a plastic scribe to Contents Page Coin-Cell Battery Dell™ Inspiron™ 1525/1526 Service Manual Removing the Coin-Cell Battery Replacing the Coin-Cell Battery Removing the Coin-Cell Battery CAUTION...
... ExpressCard Cage). 12. Remove the ExpressCard cage (see Removing the Palm Rest). 11. Remove the system board (see Removing the Center Control Cover). 7. Use a plastic scribe to Contents Page Coin-Cell Battery Dell™ Inspiron™ 1525/1526 Service Manual Removing the Coin-Cell Battery Replacing the Coin-Cell Battery Removing the Coin-Cell Battery CAUTION...
Service Manual
Page 23
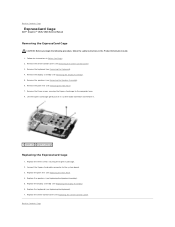
...Dell™ Inspiron™ 1525/1526 Service Manual Removing the ExpressCard Cage CAUTION: Before you begin the following procedure, follow the safety instructions in Before You Begin. 2. Remove the three screws securing the ExpressCard cage to the system board. 3. Replace... screws (3) 2 ExpressCard cage Replacing the ExpressCard Cage 1. Replace the speakers (see Removing the Center Control Cover). 3. Remove the center control cover (see Replacing the Speaker Assembly). 5. Remove the keyboard (see Replacing the Palm Rest). 4. Replace the palm rest (see Removing the Keyboard). ...
...Dell™ Inspiron™ 1525/1526 Service Manual Removing the ExpressCard Cage CAUTION: Before you begin the following procedure, follow the safety instructions in Before You Begin. 2. Remove the three screws securing the ExpressCard cage to the system board. 3. Replace... screws (3) 2 ExpressCard cage Replacing the ExpressCard Cage 1. Replace the speakers (see Removing the Center Control Cover). 3. Remove the center control cover (see Replacing the Speaker Assembly). 5. Remove the keyboard (see Replacing the Palm Rest). 4. Replace the palm rest (see Removing the Keyboard). ...
Service Manual
Page 27
...the keyboard and slide them under the palm rest. 4. Back to the keyboard connector. 5. Remove the center control cover (see Removing the Center Control Cover). 3. Slide the keyboard cable out of the computer). Back to Contents Page Keyboard Dell™ Inspiron™ 1525/1526 Service Manual CAUTION: Before you ... latch toward the front of the keyboard. Be careful when removing and handling the keyboard. 4. Rotate the keyboard connector latch to replace. Press on the right edge near the top to the system board, you must remove the battery from the keyboard connector on the...
...the keyboard and slide them under the palm rest. 4. Back to the keyboard connector. 5. Remove the center control cover (see Removing the Center Control Cover). 3. Slide the keyboard cable out of the computer). Back to Contents Page Keyboard Dell™ Inspiron™ 1525/1526 Service Manual CAUTION: Before you ... latch toward the front of the keyboard. Be careful when removing and handling the keyboard. 4. Rotate the keyboard connector latch to replace. Press on the right edge near the top to the system board, you must remove the battery from the keyboard connector on the...
Service Manual
Page 29
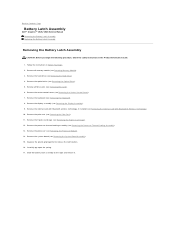
...-Card). 6. Remove all memory module (see Removing the Center Control Cover). 7. Remove the palm rest (see Removing the System Board Assembly). 15. Back to Contents Page Battery Latch Assembly Dell™ Inspiron™ 1525/1526 Service Manual Removing the Battery Latch Assembly Replacing the Battery Latch Assembly Removing the Battery Latch Assembly CAUTION: Before you begin...
...-Card). 6. Remove all memory module (see Removing the Center Control Cover). 7. Remove the palm rest (see Removing the System Board Assembly). 15. Back to Contents Page Battery Latch Assembly Dell™ Inspiron™ 1525/1526 Service Manual Removing the Battery Latch Assembly Replacing the Battery Latch Assembly Removing the Battery Latch Assembly CAUTION: Before you begin...

Service Manual
Page 38
... system board. 3. Moving from left to right, carefully lift the palm rest along the rear edge, near the hinge brackets, then gently lift the palm rest to secure the palm rest. Connect the touch pad connector and the device status lights LED connector to Contents Page Replace the two screws on the bottom of the computer to...
... system board. 3. Moving from left to right, carefully lift the palm rest along the rear edge, near the hinge brackets, then gently lift the palm rest to secure the palm rest. Connect the touch pad connector and the device status lights LED connector to Contents Page Replace the two screws on the bottom of the computer to...
Service Manual
Page 46
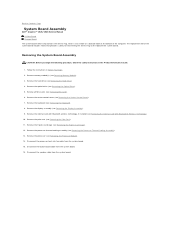
...Page System Board Assembly Dell™ Inspiron™ 1525/1526 Service Manual S-Video Board Charger Board The system board's BIOS chip contains the Service Tag, which is also visible on a barcode label on the bottom of the computer. Remove the hard drive (see Removing the Palm Rest). 11. Remove the palm rest (see Removing the Hard..., follow the safety instructions in Before You Begin. 2. Disconnect the processor heat sink fan cable from the system board. 15. Back to the replacement system board. Remove the processor thermal-cooling assembly (see Removing the Keyboard). 8.
...Page System Board Assembly Dell™ Inspiron™ 1525/1526 Service Manual S-Video Board Charger Board The system board's BIOS chip contains the Service Tag, which is also visible on a barcode label on the bottom of the computer. Remove the hard drive (see Removing the Palm Rest). 11. Remove the palm rest (see Removing the Hard..., follow the safety instructions in Before You Begin. 2. Disconnect the processor heat sink fan cable from the system board. 15. Back to the replacement system board. Remove the processor thermal-cooling assembly (see Removing the Keyboard). 8.
Service Manual
Page 48
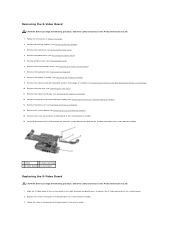
.... Remove the system board (see Removing the Palm Rest). 11. Carefully disconnect the S-Video connector from the system board and seperate the S-Video board from the system board assembly. 1 screw 2 S-Video connector 3 S-Video board 4 system board Replacing the S-Video Board CAUTION: Before you begin...the Optical Drive). 5. Remove the processor thermal-cooling assembly (see Removing the Internal Card With Bluetooth® Wireless Technology). 10. Replace the screw securing the S-Video board to the system board. 2. Remove the internal card with Bluetooth wireless technology, if installed (...
.... Remove the system board (see Removing the Palm Rest). 11. Carefully disconnect the S-Video connector from the system board and seperate the S-Video board from the system board assembly. 1 screw 2 S-Video connector 3 S-Video board 4 system board Replacing the S-Video Board CAUTION: Before you begin...the Optical Drive). 5. Remove the processor thermal-cooling assembly (see Removing the Internal Card With Bluetooth® Wireless Technology). 10. Replace the screw securing the S-Video board to the system board. 2. Remove the internal card with Bluetooth wireless technology, if installed (...


