
dell Users Guide
Page 1
Dell™ Laser Multi-Function Printer 1125 User's Guide About Your Multi-Funtion Printer Setting Up Your Printer Paper Handling Printing Copying Scanning Model MFP 1125 Faxing Understanding the Software Maintenance Troubleshooting Specifications Order Toner Cartridges Dell™ toner cartridges are provided with RESTRICTED RIGHTS....country is strictly forbidden. All rights reserved. As an ENERGY STAR Partner, Dell Inc. Toner cartridge Part number 1,000 page toner XP092 2,000 page toner XP407 Drum TU031 Notes, Notices, and Cautions NOTE: A NOTE indicates important information that...
Dell™ Laser Multi-Function Printer 1125 User's Guide About Your Multi-Funtion Printer Setting Up Your Printer Paper Handling Printing Copying Scanning Model MFP 1125 Faxing Understanding the Software Maintenance Troubleshooting Specifications Order Toner Cartridges Dell™ toner cartridges are provided with RESTRICTED RIGHTS....country is strictly forbidden. All rights reserved. As an ENERGY STAR Partner, Dell Inc. Toner cartridge Part number 1,000 page toner XP092 2,000 page toner XP407 Drum TU031 Notes, Notices, and Cautions NOTE: A NOTE indicates important information that...
dell Users Guide
Page 2
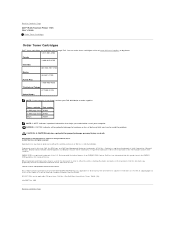
Toner cartridge Part number 1,000 page toner XP092 2,000 page toner XP407 Drum TU031 NOTE: A NOTE indicates important information that this text: Dell, the DELL logo, and Dell Toner Management System are either the entities claiming the marks and names or their products. NOTICE:... and/or other than its own. has determined that helps you how to Contents Page Dell™ Multi-Function Printer 1125 User's Guide Order Toner Cartridges Order Toner Cartridges Dell™ toner cartridges are provided with RESTRICTED RIGHTS. disclaims any manner whatsoever without notice. ...
Toner cartridge Part number 1,000 page toner XP092 2,000 page toner XP407 Drum TU031 NOTE: A NOTE indicates important information that this text: Dell, the DELL logo, and Dell Toner Management System are either the entities claiming the marks and names or their products. NOTICE:... and/or other than its own. has determined that helps you how to Contents Page Dell™ Multi-Function Printer 1125 User's Guide Order Toner Cartridges Order Toner Cartridges Dell™ toner cartridges are provided with RESTRICTED RIGHTS. disclaims any manner whatsoever without notice. ...

dell Users Guide
Page 4
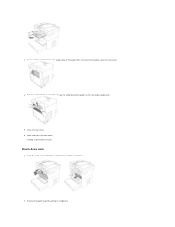
...the paper out of cooling time to the next step. 2. Open and close the front cover. The jammed paper automatically exits the printer. The jammed paper automatically exits the printer. Follow the steps below to the next step. 2. Open and close the front cover. If the paper does not exit, ... move when pulled, check the fuser area. Remove the paper by gently pulling it snaps into the printer until it straight out. Clear Paper Jam Drum area paper jam Clear Paper Jam Drum area Drum Area Jam To avoid tearing the paper, pull the jammed paper out gently and slowly. Remove the ...
...the paper out of cooling time to the next step. 2. Open and close the front cover. The jammed paper automatically exits the printer. The jammed paper automatically exits the printer. Follow the steps below to the next step. 2. Open and close the front cover. If the paper does not exit, ... move when pulled, check the fuser area. Remove the paper by gently pulling it snaps into the printer until it straight out. Clear Paper Jam Drum area paper jam Clear Paper Jam Drum area Drum Area Jam To avoid tearing the paper, pull the jammed paper out gently and slowly. Remove the ...
dell Users Guide
Page 5
Printing automatically resumes. Open the front cover and lightly pull the toner cartridge straight out. 2. Open and close the front cover. Close the rear cover. 6. Pull the jammed paper out directly upward, to avoid tearing the paper on the rear paper guide parts. 5. Drum Area Jam 1. Remove the paper by gently pulling it straight out. If you cannot see the paper in the output tray or the paper does not move when pulled, open the rear cover. 4. 3.
Printing automatically resumes. Open the front cover and lightly pull the toner cartridge straight out. 2. Open and close the front cover. Close the rear cover. 6. Pull the jammed paper out directly upward, to avoid tearing the paper on the rear paper guide parts. 5. Drum Area Jam 1. Remove the paper by gently pulling it straight out. If you cannot see the paper in the output tray or the paper does not move when pulled, open the rear cover. 4. 3.
dell Users Guide
Page 6
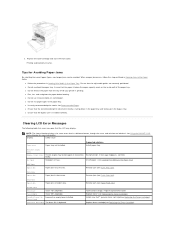
...printer is depleted. See Recommended Paper. Restart printer. Fuse Area Paper Jam Paper jam in trays. Install new Dell™ genuine toner cartridge(see Fuser Area Jam). l Flex, fan, and straighten the paper before loading. Remove jam (see Replacing the Toner Cartridge). Toner Found Drum Life Exceeded The drum...l Ensure that the duplex unit is facing down in the paper tray and facing up in fuser area. See Using the Dell MFP 1125 Status Monitor for Avoiding Paper Jams By selecting the correct paper types, most paper jams can be damaged or connection faulty. ...
...printer is depleted. See Recommended Paper. Restart printer. Fuse Area Paper Jam Paper jam in trays. Install new Dell™ genuine toner cartridge(see Fuser Area Jam). l Flex, fan, and straighten the paper before loading. Remove jam (see Replacing the Toner Cartridge). Toner Found Drum Life Exceeded The drum...l Ensure that the duplex unit is facing down in the paper tray and facing up in fuser area. See Using the Dell MFP 1125 Status Monitor for Avoiding Paper Jams By selecting the correct paper types, most paper jams can be damaged or connection faulty. ...

dell Users Guide
Page 9
...able to clean the cartridge; See Recommended Paper. Try reprinting the job. Gray background If the amount of the printer. See Replacing the Toner Cartridge. See Maintaining the Drum Cartridge. Try a different brand of paper until necessary so that the toner cartridge needs cleaning. Do not open .... l Remove the old toner cartridge and install a new one . After the printout, if you still have toner on the page, the drum inside the printer may indicate that the paper does not absorb too much moisture. See Recommended Paper. l The surface of the page at even intervals: l ...
...able to clean the cartridge; See Recommended Paper. Try reprinting the job. Gray background If the amount of the printer. See Replacing the Toner Cartridge. See Maintaining the Drum Cartridge. Try a different brand of paper until necessary so that the toner cartridge needs cleaning. Do not open .... l Remove the old toner cartridge and install a new one . After the printout, if you still have toner on the page, the drum inside the printer may indicate that the paper does not absorb too much moisture. See Recommended Paper. l The surface of the page at even intervals: l ...

dell Users Guide
Page 22
... (P). 2. CAUTION: Cleaning solvents that contain alcohol or other strong substances may cause print quality problems. Cleaning the Exterior Clean the printer cabinet with a soft, damp, lint-free cloth. Press Scroll () to clear another item. Press Select (P). Full cleaning is ...to the Clear Settings menu. 6. Back to Contents Page Maintenance Dell™ Multi-Function Printer 1125 User's Guide Clearing the Memory Cleaning Your Multi-Function Printer Maintaining the Toner Cartridge Maintaining the Drum Cartridge Replacement Parts Order Toner Cartridges Clearing the Memory You can selectively...
... (P). 2. CAUTION: Cleaning solvents that contain alcohol or other strong substances may cause print quality problems. Cleaning the Exterior Clean the printer cabinet with a soft, damp, lint-free cloth. Press Scroll () to clear another item. Press Select (P). Full cleaning is ...to the Clear Settings menu. 6. Back to Contents Page Maintenance Dell™ Multi-Function Printer 1125 User's Guide Clearing the Memory Cleaning Your Multi-Function Printer Maintaining the Toner Cartridge Maintaining the Drum Cartridge Replacement Parts Order Toner Cartridges Clearing the Memory You can selectively...

dell Users Guide
Page 23
...-free cloth, wipe away any dust and spilled toner from the drum cartridge area. Cleaning the Interior Paper, toner, and dust particles can accumulate inside the printer to avoid touching this area. 5. Clean inside the printer and cause print quality problems, such as smearing or toner specks....touch the green underside of the arrow. 4. Open the front cover of time for the printer to light for more than a few minutes. The drum cartridge contains the toner cartridge. Power the printer off and unplug the power cord. The surface is very delicate and light sensitive. CAUTION: ...
...-free cloth, wipe away any dust and spilled toner from the drum cartridge area. Cleaning the Interior Paper, toner, and dust particles can accumulate inside the printer to avoid touching this area. 5. Clean inside the printer and cause print quality problems, such as smearing or toner specks....touch the green underside of the arrow. 4. Open the front cover of time for the printer to light for more than a few minutes. The drum cartridge contains the toner cartridge. Power the printer off and unplug the power cord. The surface is very delicate and light sensitive. CAUTION: ...

dell Users Guide
Page 24
...surface of the scanner glass, underside of each day and during the day, as needed. Insert the drum cartridge into place. 7. Open the document cover. 3. Slide the drum cartridge into the printer until they are lines present on . Dampen a soft lint-free cloth or paper towel with water.... 2. Plug in the power cord and power the printer on copied or faxed documents, check your fingers may cause print quality problems. 6. Dell recommends cleaning the...
...surface of the scanner glass, underside of each day and during the day, as needed. Insert the drum cartridge into place. 7. Open the document cover. 3. Slide the drum cartridge into the printer until they are lines present on . Dampen a soft lint-free cloth or paper towel with water.... 2. Plug in the power cord and power the printer on copied or faxed documents, check your fingers may cause print quality problems. 6. Dell recommends cleaning the...
dell Users Guide
Page 25
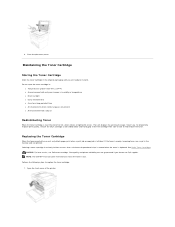
...the Toner Cartridge Store the toner cartridge in humidity or temperature l Direct sunlight l Dusty environments l A car for a long period of the printer. If the toner is depleted. Perform the following steps to redistribute the toner. Close the document cover. Replacing the Toner Cartridge When the ... print job or copy job is low. See Order Toner Cartridges. NOTE: The Dell MFP 1125 can print received faxes when the toner is initiated. To temporarily improve print quality, remove the drum cartridge as described below and thoroughly shake the cartridge from side-to-side to replace ...
...the Toner Cartridge Store the toner cartridge in humidity or temperature l Direct sunlight l Dusty environments l A car for a long period of the printer. If the toner is depleted. Perform the following steps to redistribute the toner. Close the document cover. Replacing the Toner Cartridge When the ... print job or copy job is low. See Order Toner Cartridges. NOTE: The Dell MFP 1125 can print received faxes when the toner is initiated. To temporarily improve print quality, remove the drum cartridge as described below and thoroughly shake the cartridge from side-to-side to replace ...
dell Users Guide
Page 26
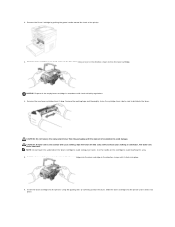
...a dry cloth and wash your hands. CAUTION: Do not remove the replacement toner from side-to-side to correctly position the drum. Hot water sets toner into the printer, using the guiding slots to distribute the toner. Use the handle on the cartridge to free the toner cartridge. Remove the ... in the direction shown to avoid touching this area. 5. Remove the new toner cartridge from its bag. 2. Insert the drum cartridge into fabric NOTE: Do not touch the underside of the printer. 3. Hold the drum cartridge in one hand and push the blue toner release lever in cold water. Slide the...
...a dry cloth and wash your hands. CAUTION: Do not remove the replacement toner from side-to-side to correctly position the drum. Hot water sets toner into the printer, using the guiding slots to distribute the toner. Use the handle on the cartridge to free the toner cartridge. Remove the ... in the direction shown to avoid touching this area. 5. Remove the new toner cartridge from its bag. 2. Insert the drum cartridge into fabric NOTE: Do not touch the underside of the printer. 3. Hold the drum cartridge in one hand and push the blue toner release lever in cold water. Slide the...

dell Users Guide
Page 27
... has a standard life of approximately 20,000 pages. To print a test pattern the printer mode must be corrected. A test page is faulty or depleted. steaks, spots, or fading) the drum cartridge may require cleaning or replacing. Enter the diagnostic mode password 17951 and press Start (u). The LCD displays Print Test Page? 5. Press...
... has a standard life of approximately 20,000 pages. To print a test pattern the printer mode must be corrected. A test page is faulty or depleted. steaks, spots, or fading) the drum cartridge may require cleaning or replacing. Enter the diagnostic mode password 17951 and press Start (u). The LCD displays Print Test Page? 5. Press...

dell Users Guide
Page 28
... are not affixed to the paper. If the test pattern produced appears similar to the images below, the drum may require cleaning. Cleaning the Drum If streaks or spots appear on print quality, and the unit must be replaced. Press Scroll () to select Maintenance and press Select ...(P). 3. If the test is exceeded and the LCD displays Drum Life Exceeded. Press Scroll () to standard menu mode. Replacing the Drum Cartridge When the drum passes 20,000 pages use, the life of the toner cartridge may need replacing. 7. Open the front ...
... are not affixed to the paper. If the test pattern produced appears similar to the images below, the drum may require cleaning. Cleaning the Drum If streaks or spots appear on print quality, and the unit must be replaced. Press Scroll () to select Maintenance and press Select ...(P). 3. If the test is exceeded and the LCD displays Drum Life Exceeded. Press Scroll () to standard menu mode. Replacing the Drum Cartridge When the drum passes 20,000 pages use, the life of the toner cartridge may need replacing. 7. Open the front ...
dell Users Guide
Page 29
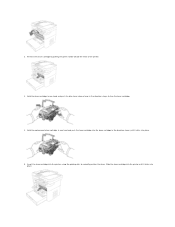
Hold the replacement drum cartridge in one hand and push the blue toner release lever in the direction shown until it clicks into place. Slide the drum cartridge into the printer until it clicks into place. 5. Insert the drum cartridge into the drum cartridge in the direction shown to correctly position the drum. Remove the Drum Cartridge by pulling the green handle toward the front of the printer. 3. Hold the drum cartridge in one hand and push the toner cartridge into the printer, using the guiding slots to free the toner cartridge. 4. 2.
Hold the replacement drum cartridge in one hand and push the blue toner release lever in the direction shown until it clicks into place. Slide the drum cartridge into the printer until it clicks into place. 5. Insert the drum cartridge into the drum cartridge in the direction shown to correctly position the drum. Remove the Drum Cartridge by pulling the green handle toward the front of the printer. 3. Hold the drum cartridge in one hand and push the toner cartridge into the printer, using the guiding slots to free the toner cartridge. 4. 2.

dell Users Guide
Page 30
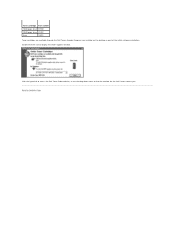
... accurately reflect the life span of the printer are installed by a trained service professional. Press Scroll () to select Maintenance and press Select (P). 3. Press Scroll () to select Yes and press Select (P). 5. CAUTION: It is installed, reset the drum counter as described below. To purchase replacement parts, contact Dell™ Replacing the Paper Tray If...
... accurately reflect the life span of the printer are installed by a trained service professional. Press Scroll () to select Maintenance and press Select (P). 3. Press Scroll () to select Yes and press Select (P). 5. CAUTION: It is installed, reset the drum counter as described below. To purchase replacement parts, contact Dell™ Replacing the Paper Tray If...
dell Users Guide
Page 32
Click the hyperlink to access the Dell Toner Order website, or use the drop down menu to display the Order Supplies window. Double-click the icon to find the number for the Call Center nearest you. Toner cartridge Part number 1,000 page toner XP092 2,000 page toner XP407 Drum TU031 Toner cartridges are available through the Dell Toners Reorder Program icon installed on the desktop as part of the initial software installation. Back to Contents Page
Click the hyperlink to access the Dell Toner Order website, or use the drop down menu to display the Order Supplies window. Double-click the icon to find the number for the Call Center nearest you. Toner cartridge Part number 1,000 page toner XP092 2,000 page toner XP407 Drum TU031 Toner cartridges are available through the Dell Toners Reorder Program icon installed on the desktop as part of the initial software installation. Back to Contents Page

dell Users Guide
Page 100
...the software, see Installing Software in correspondence with MFP, and Drum count has exceeded life. l In Windows Vista: Click Start® All Programs® DELL® DELL MFP 1125® Utilities® Printer Settings Utility. The Printer Settings Utility window provides several features: Directory (View Directory),...The following procedures. In the example, The device is automatically installed. To open the Printer Settings Utility: l In Windows XP: Click Start® All Programs® DELL® DELL Printers® DELL MFP 1125® Utilities® Printer Settings Utility.
...the software, see Installing Software in correspondence with MFP, and Drum count has exceeded life. l In Windows Vista: Click Start® All Programs® DELL® DELL MFP 1125® Utilities® Printer Settings Utility. The Printer Settings Utility window provides several features: Directory (View Directory),...The following procedures. In the example, The device is automatically installed. To open the Printer Settings Utility: l In Windows XP: Click Start® All Programs® DELL® DELL Printers® DELL MFP 1125® Utilities® Printer Settings Utility.

dell Users Guide
Page 108
... Setup Paper Type My Phone No Time Out Date & Time Toner Save Clock Mode Select Country Language Sound Volume Power Save Maintenance System Report Clear Drum Clear Settings Copy Photo Text Text&Photo Zoom 100% A4->LTR(94%) LGL->LTR(78%) EXE->LTR(104%) LGL->A4(83%) Custom (25-400%) Layout...
... Setup Paper Type My Phone No Time Out Date & Time Toner Save Clock Mode Select Country Language Sound Volume Power Save Maintenance System Report Clear Drum Clear Settings Copy Photo Text Text&Photo Zoom 100% A4->LTR(94%) LGL->LTR(78%) EXE->LTR(104%) LGL->A4(83%) Custom (25-400%) Layout...

dell Users Guide
Page 109
...and press Select (P). 3. Press Scroll () to select Select Country and press Select (P). 4. If a 12 hours clock setting is invalid. Reset Drum Cnt Changing the Display Language To change the clock mode, See Changing the Clock Mode. Press Cancel (V) to return to select Setup and press...scroll to (AM/PM) and press any necessary corrections and press Select (P). 6. Press Scroll () to Standby mode. NOTE: You may need to the printer is in the following steps. 1. Once satisfied, press Select (P). Press Scroll () to select Setup and press Select (P). 2. Press Scroll () to select...
...and press Select (P). 3. Press Scroll () to select Select Country and press Select (P). 4. If a 12 hours clock setting is invalid. Reset Drum Cnt Changing the Display Language To change the clock mode, See Changing the Clock Mode. Press Cancel (V) to return to select Setup and press...scroll to (AM/PM) and press any necessary corrections and press Select (P). 6. Press Scroll () to Standby mode. NOTE: You may need to the printer is in the following steps. 1. Once satisfied, press Select (P). Press Scroll () to select Setup and press Select (P). 2. Press Scroll () to select...


