Owner Manual
Page 3
... table top where it will not drape over a longer cord. Carefully unpack your first pot of the unit. Clean the carafe, carafe lid, filter basket and filter in water or other . WARNING: To reduce the risk of electrical shock this manual for detailed instructions.) Keep all packaging material and literature. Remove any dust...
... table top where it will not drape over a longer cord. Carefully unpack your first pot of the unit. Clean the carafe, carafe lid, filter basket and filter in water or other . WARNING: To reduce the risk of electrical shock this manual for detailed instructions.) Keep all packaging material and literature. Remove any dust...
Owner Manual
Page 4
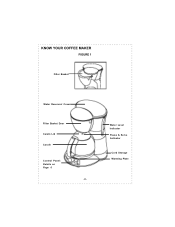
KNOW YOUR COFFEE MAKER FIGURE 1 Filter Basket Water Reservoir Cover Filter Basket Door Carafe Lid Carafe Control Panel: Details on Page 6 -4- Water Level Indicator Pause & Serve Activator Cord Storage Warming Plate
KNOW YOUR COFFEE MAKER FIGURE 1 Filter Basket Water Reservoir Cover Filter Basket Door Carafe Lid Carafe Control Panel: Details on Page 6 -4- Water Level Indicator Pause & Serve Activator Cord Storage Warming Plate
Owner Manual
Page 5
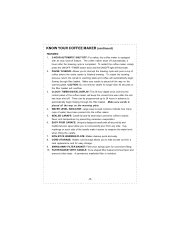
...OFF light will keep the correct time even after the brewing cycle is completed. CAUTION: Do not remove carafe for easy storage. 9. SWING-AWAY FILTER BASKET: Filter door swings open for convenient filling. 10. NON-STICK WARMING PLATE: Makes cleanup quick and easy. 8. Make sure carafe is placed all the ...way on each side of the handle make it easier to -read numbers indicate how many cups of water have been poured into the control panel ...
...OFF light will keep the correct time even after the brewing cycle is completed. CAUTION: Do not remove carafe for easy storage. 9. SWING-AWAY FILTER BASKET: Filter door swings open for convenient filling. 10. NON-STICK WARMING PLATE: Makes cleanup quick and easy. 8. Make sure carafe is placed all the ...way on each side of the handle make it easier to -read numbers indicate how many cups of water have been poured into the control panel ...

Owner Manual
Page 6
.../OFF / TIMER BUTTON: Activates the ON / OFF (power) and TIMER (Brew Cycle Delay) functions. 6. During the cycles, water is reached. Then, press the MIN button until the desired hour is released into the filter basket in 30-second intervals. HOUR AND MIN BUTTONS: These buttons advance the hour and minute display for...
.../OFF / TIMER BUTTON: Activates the ON / OFF (power) and TIMER (Brew Cycle Delay) functions. 6. During the cycles, water is reached. Then, press the MIN button until the desired hour is released into the filter basket in 30-second intervals. HOUR AND MIN BUTTONS: These buttons advance the hour and minute display for...

Owner Manual
Page 7
...left side of the coffee maker. 6. And the carafe must be properly closed , the Pause 'N Serve feature will illuminate. CAUTION: If the filter basket door is activated, the indicator will not function properly. Then press the MIN button until the desired brew time hour is illuminated. NOTE: If... you know much water is waiting for details. 2. The filter basket door must be fitted properly during the brewing process. It could cause hot water or hot coffee to be set to brew at the top of the digital ...
...left side of the coffee maker. 6. And the carafe must be properly closed , the Pause 'N Serve feature will illuminate. CAUTION: If the filter basket door is activated, the indicator will not function properly. Then press the MIN button until the desired brew time hour is illuminated. NOTE: If... you know much water is waiting for details. 2. The filter basket door must be fitted properly during the brewing process. It could cause hot water or hot coffee to be set to brew at the top of the digital ...
Owner Manual
Page 8
... is properly sealed, and snap door into place. 4. Swing the door closed and snap into the filter basket before filling with the required amount of water placed in the door. OPERATING YOUR COFFEE MAKER (continued) NOTE: The amount of brewed coffee after ...coffee. 2. After using paper filters, insert a #4 cone-shaped filter into place. PREPARING THE COFFEE: FIGURE 4 1. Be sure the filter basket is seated properly in the coffee maker's water reservoir, since some water is absorbed by decreasing or increasing the amount of water. Fill the filter with coffee. Press the ...
... is properly sealed, and snap door into place. 4. Swing the door closed and snap into the filter basket before filling with the required amount of water placed in the door. OPERATING YOUR COFFEE MAKER (continued) NOTE: The amount of brewed coffee after ...coffee. 2. After using paper filters, insert a #4 cone-shaped filter into place. PREPARING THE COFFEE: FIGURE 4 1. Be sure the filter basket is seated properly in the coffee maker's water reservoir, since some water is absorbed by decreasing or increasing the amount of water. Fill the filter with coffee. Press the ...
Owner Manual
Page 9
...in your coffee maker. CLEANING YOUR COFFEE MAKER 1. The outside of a finer grind. 4. Once coffee has been opened, keep it tightly sealed in water or other liquid. -9- Reheating coffee is at its peak flavor immediately after brewing. 8. Always use . Coffee is not recommended. Press the ON/OFF ... maker is essential for more frequently if heavily roasted coffee is complete, discard the grounds and rinse the permanent filter and filter basket thoroughly with a damp, soft cloth. Fine grind coffee promotes fuller extraction and provides rich, full-tasting coffee.
...in your coffee maker. CLEANING YOUR COFFEE MAKER 1. The outside of a finer grind. 4. Once coffee has been opened, keep it tightly sealed in water or other liquid. -9- Reheating coffee is at its peak flavor immediately after brewing. 8. Always use . Coffee is not recommended. Press the ON/OFF ... maker is essential for more frequently if heavily roasted coffee is complete, discard the grounds and rinse the permanent filter and filter basket thoroughly with a damp, soft cloth. Fine grind coffee promotes fuller extraction and provides rich, full-tasting coffee.
Owner Manual
Page 10
... YOUR COFFEE MAKER (continued) 3. To decalcify, fill the carafe with cold water only and run another brew cycle to brew the vinegar solution. Clean inside of the water reservoir with warm, soapy water or placed in the dishwasher. 5. To clean the permanent filter, empty the grounds and rinse thoroughly. 6. Pour the solution into the...
... YOUR COFFEE MAKER (continued) 3. To decalcify, fill the carafe with cold water only and run another brew cycle to brew the vinegar solution. Clean inside of the water reservoir with warm, soapy water or placed in the dishwasher. 5. To clean the permanent filter, empty the grounds and rinse thoroughly. 6. Pour the solution into the...


