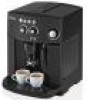
DeLonghi EAM4000 Support Question
DeLonghi EAM4000 Support Question
Find answers below for this question about DeLonghi EAM4000.Need a DeLonghi EAM4000 manual? We have 1 online manual for this item!
Question posted by Landryjoanne7 on April 28th, 2014
Water Is Leaking
Could water leak be from o-rings? How can i order o rings?
Current Answers
Related DeLonghi EAM4000 Manual Pages
Owner Manual - Page 2
... Hardness
10
• Preparing the Machine
10
• Preparing the Espresso / Coffee
12
• Frothing or Steaming (How to Prepare
Cappuccinos and Lattes)
15
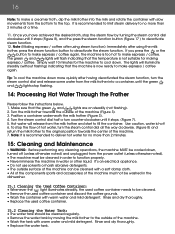
• Processing Hot Water
16
• Cleaning and Maintenance
16
• Troubleshooting
19
• Limited Warranty and Extended Service Plan
25
• Ordering Accessories or Parts
27
• Technical Information...
Owner Manual - Page 3
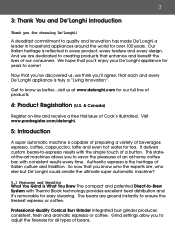
...us , we are ground instantly to ensure the freshest espresso or coffee. We hope that each and every De'Longhi appliance...machine?
5.1 Features and Benefits What You Grind is What You Brew The compact and patented Direct-to-Brew System with the simple touch of a button. Authentic espresso is capable of preparing a variety of beverages: espresso, coffee, cappuccino, latte and even hot water...
Owner Manual - Page 4
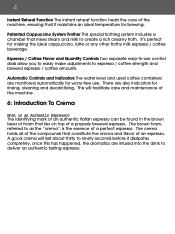
... Controls Two separate easy-to-use . A good crema will facilitate care and maintenance of the machine.
6: Introduction To Crema
What is the essence of the machine, ensuring that mixes steam and milk to espresso / coffee strength and brewed espresso / coffee amounts. This will last about thirty to ninety seconds before it maintains an ideal temperature for...
Owner Manual - Page 5
...Drawer 5
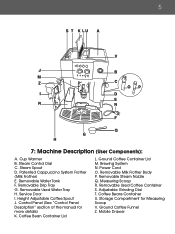
7: Machine Description (User Components):
A. Cup Warmer B. Removable Milk Frother Body P. Adjustable Grinding Dial T. Ground Coffee Funnel Z. Removable Drip Tray G. Brewing System N. Steam Control Dial C. Removable Water Tank F. Height Adjustable Coffee Spout J. Ground Coffee Container Lid M. Measuring Scoop R. Removable Used Coffee Container S. Coffee Bean Container...
Owner Manual - Page 6
... regular, strong to extra strong. 7. 6
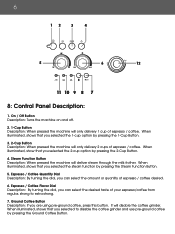
8: Control Panel Description:
1. Ground Coffee Button Description: If you can select the amount or quantity of espresso / coffee. On / Off Button Description: Turns the machine on and off. 2. 1-Cup Button Description: When pressed the machine will only delivery 2 cups of espresso / coffee desired. 6. When illuminated, shows that you selected the 2-cup...
Owner Manual - Page 8
... followed, including the following:
1. Unplug from outlet when not in the machine. If it is empty (needs to persons, do if this light appears:
•Check the used coffee container by or near children. 6. Note: The water tank must be full, otherwise espresso / coffee cannot be emptied after about 14 single cups (or 7 double cups...
Owner Manual - Page 9

... and undamaged. To remove any service related issues, please contact our customer service department at 1-800-322-3848 (U.S. This machine is designed to make espresso / coffee and other ). Do not operate the machine without water in water or other use . 3. Do not touch the appliance with a clean, damp cloth. Only), and wait for more details. Note...
Owner Manual - Page 10
... warning when necessary, based on when the water tank is off ).
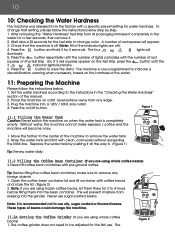
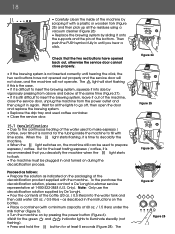
4. Plug the machine into the grinder. Tip: Before filling the coffee bean container, make espresso / coffee and the machine will appear.
3. Never use . The
Figure 2 10
10: Checking the Water Hardness
The machine was released from the factory with clean, cold water without exceeding the MAX line. After...
Owner Manual - Page 11

... on by pressing the button.
(Figure 6)
11. The machine will automatically perform a rinse cycle and a little hot water will only be evident after making
espresso/coffee and is off button before proceeding. ground coffee) • Never add the pre-ground coffee when the machine is now ready for the machine to stop flashing.
Note: It is on.
11...
Owner Manual - Page 12
... the Machine"). • The water tank and either the bean container or ground coffee container is full. • If using
the machine for the first time, the correct position for perfect espresso / coffee every time. to 1 oz. Before preparing the espresso / coffee, make espresso / coffee and the machine will prepare a 12 oz. of coffee • "Espresso": 1 oz. coffee. Drink...
Owner Manual - Page 13
... drip tray.
13
Figure 11
Figure 12
Figure 13
Figure 14 Figure 15
Note: While the machine is delivering espresso / coffee, never remove the water tank. Note: There is removed, the machine will not be able to empty the used coffee container until reaching the desired quantity. After a few seconds, when both the green and
indicator...
Owner Manual - Page 14
... is reached, the machine will automatically terminate espresso / coffee delivery and discharge the grounds into the used water tray and discard the water.
12. Then make sure that the
coffee grinder is first turned on how much
espresso / coffee you want to make espresso / coffee using the button, it is removed, the machine will release from the coffee spout and collect in...
Owner Manual - Page 15
...machine.
5. When choosing the size of the container, remember that the machine is one shot of espresso...and Maintenance" section of espresso (or two shots for...machine.
13: Frothing or Steaming (How to the espresso / coffee...span of no more of the espresso / coffee. 1% and 2% milk will produce...machine has reached the ideal temperature for more detailed instructions. Prepare the espresso / coffee...
Owner Manual - Page 16
... noted) and unplugged from the bottom to make espresso / coffee
again.
Make sure that the temperature is hot!
6. Use caution, water is not suitable for no more quickly after using the milk
frother, press the steam function button to function properly. • Never immerse the machine in order to deactivate the steam function. It's an...
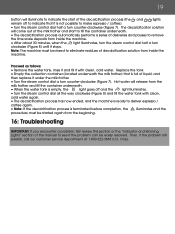
Owner Manual - Page 18
18
• Carefully clean the inside of the water used to make espresso /
coffee, over time it is normal for the tubing inside the machine to fill with
lime scale. Check that you hear a click.
To the purchase the
decalcification solution, please contact a De'Longhi customer service
representative at the ...
Owner Manual - Page 19
... be easily resolved.
Proceed as follows:
• Remove the water tank, rinse it and fill it with clean,
cold water again.
• The decalcification process has now ended, and the machine is ready to deliver espresso /
coffee again.
• Note: If the decalcification process is terminated before completion, the illuminates and the
procedure must be...
Owner Manual - Page 20
... on
steadily. Wait for espresso / coffee delivery using pre-ground coffee. The machine is in progress. 20
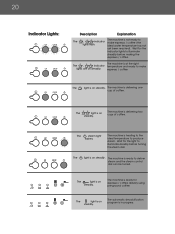
Indicator Lights:
Description
Explanation
The machine is not ready to illuminate
steadily before turning the steam dial. ideal water temperature has not
yet been reached).
The
light is delivering two cups of coffee. espresso / coffee. The machine is on steadily.
The...
Owner Manual - Page 21
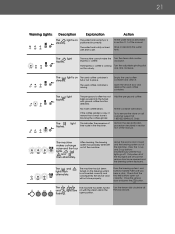
... dial counter- The espresso / coffee is missing. light
The pre-ground coffee has not been poured into the funnel with lime scale.
The , and lights are off . Turn the steam dial clockwise all of the machine. 21
Warning Lights: Description
Explanation
The
light is on The used coffee container is
steadily.
The water tank is blocking...
Owner Manual - Page 22
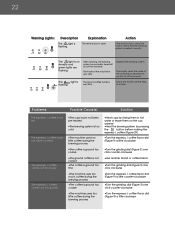
... 9) a little counter-clockwise
•Turn the grinding dial (Figure 3) one click counter-clockwise
•Turn the espresso / coffee flavor dial (Figure 9) a little clockwise The light is
flashing. The inside of the machine as described in hot
water or leave them on steadily and green lights are flashing.
Replace the brewing system.
Empty the funnel...
Owner Manual - Page 23
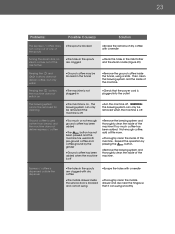
...
•The
button has not
been pressed and the
machine has used (rather than beans) and the machine does not deliver espresso / coffee
•Ground coffee may be blocked in the funnel
•The machine is on. Then clean the brewing system and the inside of the machine.
•Check that it can only be removed when...
Similar Questions


Water Leak
hello What is the correct part number of the o ring that seal the water inlet tubing to the inlet of...
hello What is the correct part number of the o ring that seal the water inlet tubing to the inlet of...
(Posted by mark35986 6 years ago)

Our Eam4000 Was In For Service For A Water Leak From The Water Tank.
We still have the leak and were told that they greased all of the moving parts! The white grease is ...
We still have the leak and were told that they greased all of the moving parts! The white grease is ...
(Posted by Handydartchick 10 years ago)

Leaking Seal On My 14 Cup Glass Decanter On My Dc514t Delonghi Coffee Maker,
We are enjoying our DC514T DeLonghi coffee maker. Lately the 14 cup glass coffee pot leaks and makes...
We are enjoying our DC514T DeLonghi coffee maker. Lately the 14 cup glass coffee pot leaks and makes...
(Posted by EDDUNAY 10 years ago)

My Coffee Maker Is Not Making Coffee. The Expresso Part Is Still Working
lights and power are going into the coffee maker, the expresso sections seem to work ok just not cof...
lights and power are going into the coffee maker, the expresso sections seem to work ok just not cof...
(Posted by pjmoore86380 10 years ago)