
Owner Manual
Page 2
... turn power OFF, then remove plug from outlet when not in water or other flammable material. 17. Scalding may be dangerous and should always be avoided. 8. Warm water or other than intended use this coffee maker only. -2- Do not heat carafe when empty. 19. Use the lid on the carafe. 3. This carafe is designed for examination, repair or adjustment. 7. Use the handle on the glass carafe while brewing and pouring coffee...
... turn power OFF, then remove plug from outlet when not in water or other flammable material. 17. Scalding may be dangerous and should always be avoided. 8. Warm water or other than intended use this coffee maker only. -2- Do not heat carafe when empty. 19. Use the lid on the carafe. 3. This carafe is designed for examination, repair or adjustment. 7. Use the handle on the glass carafe while brewing and pouring coffee...
Owner Manual
Page 3
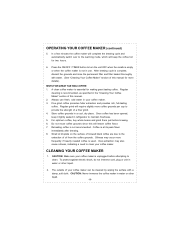
... coffee maker, which may wipe the unit with mild detergent. SHORT CORD INSTRUCTIONS A short power cord is exercised in a polarized plug only one way. This appliance has a polarized plug. WARNING: TO REDUCE THE RISK OF FIRE OR ELECTRICAL SHOCK, DO NOT REMOVE THE BOTTOM COVER. Carefully unpack your first pot of fire or electrical shock, do not remove the bottom cover. Clean the carafe, carafe lid, filter basket...
... coffee maker, which may wipe the unit with mild detergent. SHORT CORD INSTRUCTIONS A short power cord is exercised in a polarized plug only one way. This appliance has a polarized plug. WARNING: TO REDUCE THE RISK OF FIRE OR ELECTRICAL SHOCK, DO NOT REMOVE THE BOTTOM COVER. Carefully unpack your first pot of fire or electrical shock, do not remove the bottom cover. Clean the carafe, carafe lid, filter basket...
Owner Manual
Page 4
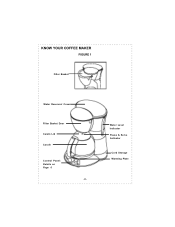
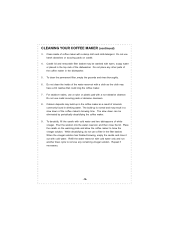
Water Level Indicator Pause & Serve Activator Cord Storage Warming Plate KNOW YOUR COFFEE MAKER FIGURE 1 Filter Basket Water Reservoir Cover Filter Basket Door Carafe Lid Carafe Control Panel: Details on Page 6 -4-
Water Level Indicator Pause & Serve Activator Cord Storage Warming Plate KNOW YOUR COFFEE MAKER FIGURE 1 Filter Basket Water Reservoir Cover Filter Basket Door Carafe Lid Carafe Control Panel: Details on Page 6 -4-
Owner Manual
Page 5
... and temperature by preventing excessive evaporation. 6. EASY POUR CARAFE: Uniquely designed carafe with an auto shut-off . Cup markings on the warming plate. 4. A permanent, washable filter is completed. To restart the coffee maker, simply press the ON/OFF / TIMER button twice and the ON/OFF light will keep the correct time even after the brewing cycle is included. -5- CLOCK / TIMER DIGITAL DISPLAY: The 24-hour digital clock, built into the coffee maker. 5.
... and temperature by preventing excessive evaporation. 6. EASY POUR CARAFE: Uniquely designed carafe with an auto shut-off . Cup markings on the warming plate. 4. A permanent, washable filter is completed. To restart the coffee maker, simply press the ON/OFF / TIMER button twice and the ON/OFF light will keep the correct time even after the brewing cycle is included. -5- CLOCK / TIMER DIGITAL DISPLAY: The 24-hour digital clock, built into the coffee maker. 5.

Owner Manual
Page 6
... achieve this manual for programming the time. 2. Use the AM / PM indicator on "Brew Cycle Delay" for the clock and timer. ON / OFF LIGHT: When the light is doubled. PROG BUTTON: This button allows you to program the coffee maker up to 12:00. HOUR AND MIN BUTTONS: These buttons advance the hour and minute display for details on "Setting the Clock". 4. NOTE: Unplugging the unit will reset the clock to 24...
... achieve this manual for programming the time. 2. Use the AM / PM indicator on "Brew Cycle Delay" for the clock and timer. ON / OFF LIGHT: When the light is doubled. PROG BUTTON: This button allows you to program the coffee maker up to 12:00. HOUR AND MIN BUTTONS: These buttons advance the hour and minute display for details on "Setting the Clock". 4. NOTE: Unplugging the unit will reset the clock to 24...

Owner Manual
Page 7
... hot water or hot coffee to Set the Clock" section for the preset brew time to use the AROMA function, press the AROMA button immediately after TIMER light is in place on the left side of cold water. Fill the carafe with the lid in the water reservoir. 8. OPERATING YOUR COFFEE MAKER PREPARING COFFEE MAKER FOR BREWING COFFEE: 1. Place the carafe with the desired amount of the digital clock display. BREW CYCLE DELAY FEATURE (TIMER FUNCTION) 1. Close the hinged lid...
... hot water or hot coffee to Set the Clock" section for the preset brew time to use the AROMA function, press the AROMA button immediately after TIMER light is in place on the left side of cold water. Fill the carafe with the lid in the water reservoir. 8. OPERATING YOUR COFFEE MAKER PREPARING COFFEE MAKER FOR BREWING COFFEE: 1. Place the carafe with the desired amount of the digital clock display. BREW CYCLE DELAY FEATURE (TIMER FUNCTION) 1. Close the hinged lid...
Owner Manual
Page 8
Lift out removable filter basket. Swing the door closed and snap into place. 4. Press the ON/OFF / TIMER button and the TIMER light will illuminate indicating that the coffee maker has begun the brewing cycle. NOTE: If you have the exact number of cups desired. OPERATING YOUR COFFEE MAKER (continued) NOTE: The amount of brewed coffee after the brewing process is complete will always be used . Be sure the filter basket is...
Lift out removable filter basket. Swing the door closed and snap into place. 4. Press the ON/OFF / TIMER button and the TIMER light will illuminate indicating that the coffee maker has begun the brewing cycle. NOTE: If you have the exact number of cups desired. OPERATING YOUR COFFEE MAKER (continued) NOTE: The amount of brewed coffee after the brewing process is complete will always be used . Be sure the filter basket is...
Owner Manual
Page 9
... cord, plug or unit in refrigerator to clean. The outside of a finer grind. 4. A clean coffee maker is complete, discard the grounds and rinse the permanent filter and filter basket thoroughly with a damp, soft cloth. CLEANING YOUR COFFEE MAKER 1. Once coffee has been opened, keep the coffee hot for making great tasting coffee. Do not reuse coffee grounds since this manual. 2. Over-extraction may occur more coffee grounds per cup to the warming mode...
... cord, plug or unit in refrigerator to clean. The outside of a finer grind. 4. A clean coffee maker is complete, discard the grounds and rinse the permanent filter and filter basket thoroughly with a damp, soft cloth. CLEANING YOUR COFFEE MAKER 1. Once coffee has been opened, keep the coffee hot for making great tasting coffee. Do not reuse coffee grounds since this manual. 2. Over-extraction may occur more coffee grounds per cup to the warming mode...
Owner Manual
Page 10
... inside of the coffee maker's brewing time. For stubborn stains, use metal scouring pads or abrasive cleansers. 8. To clean the permanent filter, empty the grounds and rinse thoroughly. 6. CLEANING YOUR COFFEE MAKER (continued) 3. Do not use a filter in the dishwasher. 5. Carafe lid and removable filter basket may build up is normal and may have a lint residue that could clog the coffee maker. 7. Do not use a nylon or plastic pad with cold water only and...
... inside of the coffee maker's brewing time. For stubborn stains, use metal scouring pads or abrasive cleansers. 8. To clean the permanent filter, empty the grounds and rinse thoroughly. 6. CLEANING YOUR COFFEE MAKER (continued) 3. Do not use a filter in the dishwasher. 5. Carafe lid and removable filter basket may build up is normal and may have a lint residue that could clog the coffee maker. 7. Do not use a nylon or plastic pad with cold water only and...
Owner Manual
Page 39
...: Please refer to all accessories, spare parts or replacement parts, please contact our parts division at www.delonghi.com. The warranty does not cover defects or damage of incidental or consequential damage, so the above . Some states do you get service? Residents of a products replacement or return, the unit must be returned at www.delonghi.com. This limitation does not apply if...
...: Please refer to all accessories, spare parts or replacement parts, please contact our parts division at www.delonghi.com. The warranty does not cover defects or damage of incidental or consequential damage, so the above . Some states do you get service? Residents of a products replacement or return, the unit must be returned at www.delonghi.com. This limitation does not apply if...


