
Product Manual
Page 2
... to Share 18 Using the D-Link® Media Server Software 22 Accessing the Media on your PCs 22 Sharing Media Content in Folders 23 Refreshing Folder Contents 23 Naming the Media Server 24 Upgrading the Media Server 25 Stopping the D-Link Media Server 26 Using Windows® Media Connect Software 27 Configuring Windows® Media Connect 27 Connecting the DSM-320...32 Video Connections...32 Audio...
... to Share 18 Using the D-Link® Media Server Software 22 Accessing the Media on your PCs 22 Sharing Media Content in Folders 23 Refreshing Folder Contents 23 Naming the Media Server 24 Upgrading the Media Server 25 Stopping the D-Link Media Server 26 Using Windows® Media Connect Software 27 Configuring Windows® Media Connect 27 Connecting the DSM-320...32 Video Connections...32 Audio...

Product Manual
Page 7
... with composite, coaxial digital or optical digital audio inputs. A wireless (802.11g or 802.11b) or Ethernet network. Package Contents D-Link DSM-320 Wireless Media Player Printed Quick Installation Guide CD-ROM with Manual (Contains D-Link Media Server Software, Quick Installation Guide, and Manual) 2dBi Wireless Antenna Ethernet (CAT5-UTP/Straight-Through) Cable Standard...
... with composite, coaxial digital or optical digital audio inputs. A wireless (802.11g or 802.11b) or Ethernet network. Package Contents D-Link DSM-320 Wireless Media Player Printed Quick Installation Guide CD-ROM with Manual (Contains D-Link Media Server Software, Quick Installation Guide, and Manual) 2dBi Wireless Antenna Ethernet (CAT5-UTP/Straight-Through) Cable Standard...

Product Manual
Page 10
... control usage is required. Getting Started To begin using the remote control. The remote is activated by using the DSM-320 Wireless Media Player, you will collect music, photo and video content from local sources (a digital camera for the Setup Wizard is ... Ethernet port). The DSM-320 Media Server software installed on -screen keyboard. Information for example) and from the Internet (downloaded MP3 music, digital photos, or video files). The DSM-320 Wireless Media Player connected to configure and control the DSM-320. The following page details the remote...
... control usage is required. Getting Started To begin using the remote control. The remote is activated by using the DSM-320 Wireless Media Player, you will collect music, photo and video content from local sources (a digital camera for the Setup Wizard is ... Ethernet port). The DSM-320 Media Server software installed on -screen keyboard. Information for example) and from the Internet (downloaded MP3 music, digital photos, or video files). The DSM-320 Wireless Media Player connected to configure and control the DSM-320. The following page details the remote...
Product Manual
Page 13
... to install the D-Link® Media Server software on your system, please uninstall the software and restart your system before installing a newer version of the software. 13 Map network drives from the computer with the D-Link® Media Server software to additional computers that contains the files you want to your DSM-320 via your wired/wireless network connection.
... to install the D-Link® Media Server software on your system, please uninstall the software and restart your system before installing a newer version of the software. 13 Map network drives from the computer with the D-Link® Media Server software to additional computers that contains the files you want to your DSM-320 via your wired/wireless network connection.

Product Manual
Page 14
Installing the D-Link® Media Server Software (continued) Click on Install D-Link Media Server If the screen on the right does not appear, go to My Computer and double-click on the CD-ROM drive. Click Next 14 The screen at right will appear. The D-Link Media Server Setup Wizard will appear.
Installing the D-Link® Media Server Software (continued) Click on Install D-Link Media Server If the screen on the right does not appear, go to My Computer and double-click on the CD-ROM drive. Click Next 14 The screen at right will appear. The D-Link Media Server Setup Wizard will appear.

Product Manual
Page 15
This is where the D-Link Media Server software will be copied to on your system. Click Next Choose a Destination location or accept the default location. Installing the D-Link® Media Server Software (continued) The D-Link license agreement screen appears. Click Next 15 Click Next Choose a Start Menu folder or accept the default location.
This is where the D-Link Media Server software will be copied to on your system. Click Next Choose a Destination location or accept the default location. Installing the D-Link® Media Server Software (continued) The D-Link license agreement screen appears. Click Next 15 Click Next Choose a Start Menu folder or accept the default location.

Product Manual
Page 16
Installing the D-Link® Media Server Software (continued) Select the icons you want created. Select Create a desktop icon to access the program from your taskbar. Select Create a startup icon so the program launches on your desktop. Click Next The necessary software will be copied to access the program from your computer. Click Install Check Launch D-Link Media Server Click Finish The D-Link® Media Server software installation has been completed! 16 Select Create a Quick Launch icon to the specified locations on startup.
Installing the D-Link® Media Server Software (continued) Select the icons you want created. Select Create a desktop icon to access the program from your taskbar. Select Create a startup icon so the program launches on your desktop. Click Next The necessary software will be copied to access the program from your computer. Click Install Check Launch D-Link Media Server Click Finish The D-Link® Media Server software installation has been completed! 16 Select Create a Quick Launch icon to the specified locations on startup.
Product Manual
Page 17
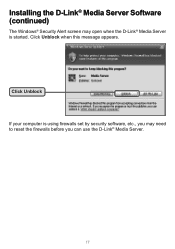
Click Unblock when this message appears. Installing the D-Link® Media Server Software (continued) The Windows® Security Alert screen may need to reset the firewalls before you can use the D-Link® Media Server. 17 Click Unblock If your computer is using firewalls set by security software, etc., you may open when the D-Link® Media Server is started.
Click Unblock when this message appears. Installing the D-Link® Media Server Software (continued) The Windows® Security Alert screen may need to reset the firewalls before you can use the D-Link® Media Server. 17 Click Unblock If your computer is using firewalls set by security software, etc., you may open when the D-Link® Media Server is started.

Product Manual
Page 18
... then you can play. By sharing the files, there is streamed directly from your computer with the DSM-320. icon to launch the D-Link Media Server software D-Link Media Server desktop icon D-Link Media Server Quick Launch icon If you to share the files from the files on your computer over the network ...files from your computer to the unit before they can launch the application by going to your DSM-320. Choosing Music, Photo, and Video Files to Share The D-Link® Media Server software enables you chose not to create a desktop or Quick Launch icon during the software installation...
... then you can play. By sharing the files, there is streamed directly from your computer with the DSM-320. icon to launch the D-Link Media Server software D-Link Media Server desktop icon D-Link Media Server Quick Launch icon If you to share the files from the files on your computer over the network ...files from your computer to the unit before they can launch the application by going to your DSM-320. Choosing Music, Photo, and Video Files to Share The D-Link® Media Server software enables you chose not to create a desktop or Quick Launch icon during the software installation...

Product Manual
Page 21
The Media Files tab will show all of the folders containing audio, video, and photos you want to share have been added. This is what your audio, video, and photo files as well as display important file information. 21 Choosing Music, Photo, and Video Files to Share (continued) Repeat the steps until all your PC should look like when the D-Link® Media Server software configuration is complete!
The Media Files tab will show all of the folders containing audio, video, and photos you want to share have been added. This is what your audio, video, and photo files as well as display important file information. 21 Choosing Music, Photo, and Video Files to Share (continued) Repeat the steps until all your PC should look like when the D-Link® Media Server software configuration is complete!

Product Manual
Page 22
... a PC, you can return to Create a startup icon during the Media Server software installation (See Page 16), the D-Link® Media Server software will automatically start whenever you power on your system tray. Simply install the included software on the Media Server icon in your PC. DSM-320 System Tray Icon 22 If you selected the option to the...
... a PC, you can return to Create a startup icon during the Media Server software installation (See Page 16), the D-Link® Media Server software will automatically start whenever you power on your system tray. Simply install the included software on the Media Server icon in your PC. DSM-320 System Tray Icon 22 If you selected the option to the...

Product Manual
Page 23
... clicking on the Refresh all folders: All folders can be a slight delay before the path appears in Folders The D-Link Media Server will be selected if you no longer wish to share. Scheduler: You can be seen by clicking on it and ...Link Media Server software to refresh. Click on the Refresh a folder button after you refresh the folder contents. Add folders where your folders. 23 Refresh a folder: To refresh a folder's contents, select a folder by the DSM-320 when you 've selected all of shared folders. Using the D-Link Media Server Software (continued) Sharing Media...
... clicking on the Refresh all folders: All folders can be a slight delay before the path appears in Folders The D-Link Media Server will be selected if you no longer wish to share. Scheduler: You can be seen by clicking on it and ...Link Media Server software to refresh. Click on the Refresh a folder button after you refresh the folder contents. Add folders where your folders. 23 Refresh a folder: To refresh a folder's contents, select a folder by the DSM-320 when you 've selected all of shared folders. Using the D-Link Media Server Software (continued) Sharing Media...
Product Manual
Page 24
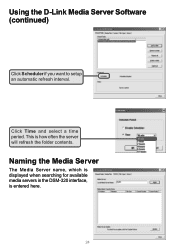
This is entered here. 24 Naming the Media Server The Media Server name, which is displayed when searching for available media servers in the DSM-320 interface, is how often the server will refresh the folder contents. Using the D-Link Media Server Software (continued) Click Scheduler if you want to setup an automatic refresh interval. Click Time and select a time period.
This is entered here. 24 Naming the Media Server The Media Server name, which is displayed when searching for available media servers in the DSM-320 interface, is how often the server will refresh the folder contents. Using the D-Link Media Server Software (continued) Click Scheduler if you want to setup an automatic refresh interval. Click Time and select a time period.

Product Manual
Page 25
This screen will appear only if a newer version is in progress. Click Yes. Click OK. 25 The Media Server Update pop-up screen will appear to update the Media Server. You have completed the process for updating the Media Server. Using the D-Link Media Server Software (continued) Upgrading the Media Server Click Update, near the lower right corner of this screen, to indicate that the update is available.
This screen will appear only if a newer version is in progress. Click Yes. Click OK. 25 The Media Server Update pop-up screen will appear to update the Media Server. You have completed the process for updating the Media Server. Using the D-Link Media Server Software (continued) Upgrading the Media Server Click Update, near the lower right corner of this screen, to indicate that the update is available.

Product Manual
Page 26
... the DSM-320 without running . Online media content that does not require PC-based software can still be accessed from the server menu. Using the D-Link Media Server Software (continued) Stopping the D-Link Media Server To stop the D-Link® Media Server (and stop sharing your photos, video and music on your DSM-320 only if the D-Link® Media Server is running the D-Link® Media Server software. The server menu...
... the DSM-320 without running . Online media content that does not require PC-based software can still be accessed from the server menu. Using the D-Link Media Server Software (continued) Stopping the D-Link Media Server To stop the D-Link® Media Server (and stop sharing your photos, video and music on your DSM-320 only if the D-Link® Media Server is running the D-Link® Media Server software. The server menu...

Product Manual
Page 27
...; Update if you add the DSM-320 to playback DRM (Digital Rights Management) protected files. The Windows® Media Connect software is where you are using the D-Link Media Server software. The Windows® Media Connect software allows the DSM-320 to the list of devices that... interact with Service Pack 2 can utilize the Windows® Media Connect software in addition to or instead of using Windows® XP with Service Pack 2. Click Add Select your Media Player...
...; Update if you add the DSM-320 to playback DRM (Digital Rights Management) protected files. The Windows® Media Connect software is where you are using the D-Link Media Server software. The Windows® Media Connect software allows the DSM-320 to the list of devices that... interact with Service Pack 2 can utilize the Windows® Media Connect software in addition to or instead of using Windows® XP with Service Pack 2. Click Add Select your Media Player...

Product Manual
Page 41
...available Media Servers. A Media Server is any PC running the D-Link Media Server software or UPnP AV compliant device on the remote control with the DSM-320. If you do not require a Media Server. 41 This allows you are still able to the Next button. Rescan will refresh the list of servers. ...down arrow to navigate to complete the Setup Wizard. Setup is now ready to complete the setup. The DSM-320 Setup Wizard (continued) Select a Media Server Select a Media Server from the list by pressing the ENTER button on your home entertainment center. Your MediaLounge™ DSM320 ...
...available Media Servers. A Media Server is any PC running the D-Link Media Server software or UPnP AV compliant device on the remote control with the DSM-320. If you do not require a Media Server. 41 This allows you are still able to the Next button. Rescan will refresh the list of servers. ...down arrow to navigate to complete the Setup Wizard. Setup is now ready to complete the setup. The DSM-320 Setup Wizard (continued) Select a Media Server Select a Media Server from the list by pressing the ENTER button on your home entertainment center. Your MediaLounge™ DSM320 ...

Product Manual
Page 42
...that more items are available if you are using third party server software. To move through the menus, you press the selection arrows. To jump directly to the next menu screen, use the right arrow. DSM-320 Menu Menu Basics The DSM-320 uses an on the upper right corner of the remote ... remote control to the previous screen. Once you may take. Menu Home The menu home screen is not detected, this home screen, you have the D-Link Media Server software up , down . To jump directly to the home screen, press the HOME button on -screen menu interface. These arrow "hints" help you ...
...that more items are available if you are using third party server software. To move through the menus, you press the selection arrows. To jump directly to the next menu screen, use the right arrow. DSM-320 Menu Menu Basics The DSM-320 uses an on the upper right corner of the remote ... remote control to the previous screen. Once you may take. Menu Home The menu home screen is not detected, this home screen, you have the D-Link Media Server software up , down . To jump directly to the home screen, press the HOME button on -screen menu interface. These arrow "hints" help you ...

Product Manual
Page 49
Use the down arrow and up arrow on the remote control to navigate to edit. 5. Select Playlists. 3. Select Editable Playlists. 4. When the Editable Playlist screen appears, click MENU to Create. It is a file that only works with MediaLoungeTM products. Music (continued) Creating an Editable Playlist An Editable Playlist is stored in your PC media server. 1. Click ENTER or the right arrow on the remote control. 2. Select the MUSIC category from the Home page or click on the MUSIC button on the remote control to select. 49
Use the down arrow and up arrow on the remote control to navigate to edit. 5. Select Playlists. 3. Select Editable Playlists. 4. When the Editable Playlist screen appears, click MENU to Create. It is a file that only works with MediaLoungeTM products. Music (continued) Creating an Editable Playlist An Editable Playlist is stored in your PC media server. 1. Click ENTER or the right arrow on the remote control. 2. Select the MUSIC category from the Home page or click on the MUSIC button on the remote control to select. 49

Product Manual
Page 66
These files can be played on configuring Windows® Media Connect, please refer to over 2.5 million songs and thousand of copy protection. Visit http://aol.musicnow.com/ for more info. This is a type of videos. Files downloaded with AOL Music Now use a UPnP™ AV media server software (such as Windows® Media Connect or Windows® Media Player 11). For details on the DSM-320 if you use Windows® Media DRM. Online Media (continued) AOL Music Now AOL Music Now provides access to page 27 of the manual. 66
These files can be played on configuring Windows® Media Connect, please refer to over 2.5 million songs and thousand of copy protection. Visit http://aol.musicnow.com/ for more info. This is a type of videos. Files downloaded with AOL Music Now use a UPnP™ AV media server software (such as Windows® Media Connect or Windows® Media Player 11). For details on the DSM-320 if you use Windows® Media DRM. Online Media (continued) AOL Music Now AOL Music Now provides access to page 27 of the manual. 66

