Product Manual
Page 1
D-Link DP-G321 AirPlus G Wireless Print Server Manual Building Networks for People
D-Link DP-G321 AirPlus G Wireless Print Server Manual Building Networks for People

Product Manual
Page 3
... the above , with JavaScript enabled „ The printer must support the required Operating System 3 Package Contents Contents of Package: „ D-Link DP-G321 Wireless Multi-port Print Server „ Manual and Warranty on CD „ Printed Quick Installation Guide If any of computers with wireless capability „ Internet Explorer 6.0, or Netscape Navigator version 6.0 or above items...
... the above , with JavaScript enabled „ The printer must support the required Operating System 3 Package Contents Contents of Package: „ D-Link DP-G321 Wireless Multi-port Print Server „ Manual and Warranty on CD „ Printed Quick Installation Guide If any of computers with wireless capability „ Internet Explorer 6.0, or Netscape Navigator version 6.0 or above items...
Product Manual
Page 4
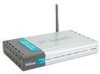
...-to-use a standard parallel printer with the DP-G321. „ Because the DP-G321 is very portable and inexpensive compared to a PC-based print server, and the Print Server connects to your home or office. Introduction The D-Link DP-G321 Print Server is an ideal wireless high-speed Print Server for a home or office that has multiple printers. The DP-G321 provides a 10/100Mbps auto-sensing Ethernet...
...-to-use a standard parallel printer with the DP-G321. „ Because the DP-G321 is very portable and inexpensive compared to a PC-based print server, and the Print Server connects to your home or office. Introduction The D-Link DP-G321 Print Server is an ideal wireless high-speed Print Server for a home or office that has multiple printers. The DP-G321 provides a 10/100Mbps auto-sensing Ethernet...
Product Manual
Page 5
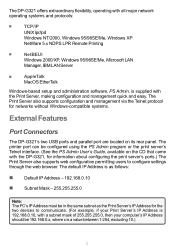
... and management via the Telnet protocol for the two devices to configure settings through the web browser. The DP-G321 offers extraordinary flexibility, operating with the Print Server, making configuration and management quick and easy. The printer port can be 192.168.0.x, where x is ...ports and parallel port are located on the CD that came with the DP-G321, for information about configuring the print server's ports.) The Print Server also supports web configuration permitting users to communicate. (For example, if your Print Server's IP Address is 192.168.0.10, with a subnet mask of ...
... and management via the Telnet protocol for the two devices to configure settings through the web browser. The DP-G321 offers extraordinary flexibility, operating with the Print Server, making configuration and management quick and easy. The printer port can be 192.168.0.x, where x is ...ports and parallel port are located on the CD that came with the DP-G321, for information about configuring the print server's ports.) The Print Server also supports web configuration permitting users to communicate. (For example, if your Print Server's IP Address is 192.168.0.10, with a subnet mask of ...
Product Manual
Page 6
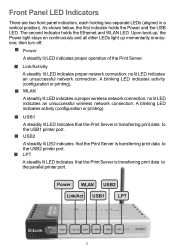
... light stays on continuously and all other LEDs light up momentarily one-byone, then turn off. Power WLAN USB2 Link/Act USB1 LPT 6 USB2 A steadily lit LED indicates that the Print Server is transferring print data to the USB1 printer port. no lit LED indicates an unsuccessful wireless network connection. USB1 A steadily lit LED...
... light stays on continuously and all other LEDs light up momentarily one-byone, then turn off. Power WLAN USB2 Link/Act USB1 LPT 6 USB2 A steadily lit LED indicates that the Print Server is transferring print data to the USB1 printer port. no lit LED indicates an unsuccessful wireless network connection. USB1 A steadily lit LED...
Product Manual
Page 7
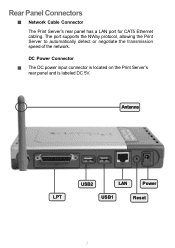
Antenna USB2 LAN Power LPT USB1 Reset 7 DC Power Connector The DC power input connector is located on the Print Server's rear panel and is labeled DC 5V. Rear Panel Connectors Network Cable Connector The Print Server's rear panel has a LAN port for CAT5 Ethernet cabling. The port supports the NWay protocol, allowing the Print Server to automatically detect or negotiate the transmission speed of the network.
Antenna USB2 LAN Power LPT USB1 Reset 7 DC Power Connector The DC power input connector is located on the Print Server's rear panel and is labeled DC 5V. Rear Panel Connectors Network Cable Connector The Print Server's rear panel has a LAN port for CAT5 Ethernet cabling. The port supports the NWay protocol, allowing the Print Server to automatically detect or negotiate the transmission speed of the network.
Product Manual
Page 10
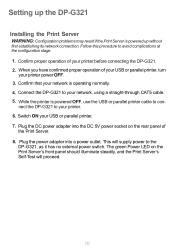
.... 5. Plug the power adapter into the DC 5V power socket on the Print Server's front panel should illuminate steadily, and the Print Server's Self-Test will supply power to con- Setting up the DP-G321 Installing the Print Server WARNING: Configuration problems may result if the Print Server is powered up without first establishing its network connection. The green Power...
.... 5. Plug the power adapter into the DC 5V power socket on the Print Server's front panel should illuminate steadily, and the Print Server's Self-Test will supply power to con- Setting up the DP-G321 Installing the Print Server WARNING: Configuration problems may result if the Print Server is powered up without first establishing its network connection. The green Power...

Product Manual
Page 12
... Enter. When you can access and control the Print Server's configuration through four links on the top of the Print Server's configuration will be using for the configuration of your Print Server. Using the Web Configuration Please use an Ethernet connection for configuration. Using a CAT5 cable, connect the DP-G321 to the Ethernet-adapter equipped computer in your web... of this main screen: Home, Configuration, Tools, and Help. 12 In addition to communicate. This set of numbers is the default IP Address of the DP-G321.
... Enter. When you can access and control the Print Server's configuration through four links on the top of the Print Server's configuration will be using for the configuration of your Print Server. Using the Web Configuration Please use an Ethernet connection for configuration. Using a CAT5 cable, connect the DP-G321 to the Ethernet-adapter equipped computer in your web... of this main screen: Home, Configuration, Tools, and Help. 12 In addition to communicate. This set of numbers is the default IP Address of the DP-G321.

Product Manual
Page 13
...status, and the status of your printing tasks, etc. Device Status: Information about the print server, including the firmware version, MAC/IP address, and the "up time" can monitor the networking status in this field display information about the DP-G321's System Status and Printer Status. Home... > System As shown here, the System displays the status of your print server, printer, and network. Ethernet Status: You can be found in this ...
...status, and the status of your printing tasks, etc. Device Status: Information about the print server, including the firmware version, MAC/IP address, and the "up time" can monitor the networking status in this field display information about the DP-G321's System Status and Printer Status. Home... > System As shown here, the System displays the status of your print server, printer, and network. Ethernet Status: You can be found in this ...

Product Manual
Page 17
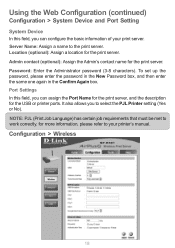
Using the Web Configuration (continued) Configuration Click on your printer. it provides the configuration options that include System Device and Port Setting. Consult your printers owner manual for the PJL (Printer Job Language) and print speed supported on the Configuration tab from the tools bar of the configuration page to configure the DP-G321 Print Server. Click the Save button on the bottom of the main screen to enter the configuration page; System Device and Port Setting This option will show you settings required to ensure the settings are updated and saved. 17
Using the Web Configuration (continued) Configuration Click on your printer. it provides the configuration options that include System Device and Port Setting. Consult your printers owner manual for the PJL (Printer Job Language) and print speed supported on the Configuration tab from the tools bar of the configuration page to configure the DP-G321 Print Server. Click the Save button on the bottom of the main screen to enter the configuration page; System Device and Port Setting This option will show you settings required to ensure the settings are updated and saved. 17
Product Manual
Page 18
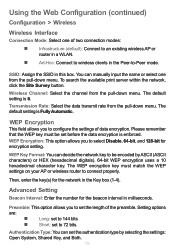
...Confirm Again box. Port Settings In this field, you can assign the Port Name for the print server, and the description for more information, please refer to the print server. for the USB or printer ports. Using the Web Configuration (continued) Configuration > System Device... > Wireless 18 Password: Enter the Administrator password (3-8 characters). It also allows you to work correctly. Server Name: Assign a name to your print server. Location (optional): Assign a location for the print server. Admin contact (optional): Assign the Admin's contact name for the...
...Confirm Again box. Port Settings In this field, you can assign the Port Name for the print server, and the description for more information, please refer to the print server. for the USB or printer ports. Using the Web Configuration (continued) Configuration > System Device... > Wireless 18 Password: Enter the Administrator password (3-8 characters). It also allows you to work correctly. Server Name: Assign a name to your print server. Location (optional): Assign a location for the print server. Admin contact (optional): Assign the Admin's contact name for the...
Product Manual
Page 19
SSID: Assign the SSID in the Key box (1-4). To search the available print server within the network, click the Site Survey button. Wireless Channel: Select the channel from the pull-down menu. Then, enter the key(s) for the network ...
SSID: Assign the SSID in the Key box (1-4). To search the available print server within the network, click the Site Survey button. Wireless Channel: Select the channel from the pull-down menu. Then, enter the key(s) for the network ...
Product Manual
Page 21
Using the Web Configuration (continued) Configuration > Network TCP/IP This field contains three options that you want the print server associated with in this box. UPnP: This option allows you should enter the related information in the box. AppleTalk Enter the ...settings in this field. In the following boxes, including IP Address, Subnet Mask, and Default Gateway. USB1 / USB2 / LPT Chooser Name: Display the print server name. PostScript Level: Select from the pull-down menu (Level 1 or Level 2). TIP: Once you to enable or disable UPnP mode. Microsoft Network Enter...
Using the Web Configuration (continued) Configuration > Network TCP/IP This field contains three options that you want the print server associated with in this box. UPnP: This option allows you should enter the related information in the box. AppleTalk Enter the ...settings in this field. In the following boxes, including IP Address, Subnet Mask, and Default Gateway. USB1 / USB2 / LPT Chooser Name: Display the print server name. PostScript Level: Select from the pull-down menu (Level 1 or Level 2). TIP: Once you to enable or disable UPnP mode. Microsoft Network Enter...

Product Manual
Page 22
The User List at the bottom of the screen displays the current defined user and related information for the print server. Using the Web Configuration (continued) Configuration > User Printing Control By configuring the Enable User Printing Control option (Yes or No), the user in the User List is permitted to /from the User List. Define Users You can add/delete the user(s) to access the print server or not. Click Apply to save the changes. 22
The User List at the bottom of the screen displays the current defined user and related information for the print server. Using the Web Configuration (continued) Configuration > User Printing Control By configuring the Enable User Printing Control option (Yes or No), the user in the User List is permitted to /from the User List. Define Users You can add/delete the user(s) to access the print server or not. Click Apply to save the changes. 22

Product Manual
Page 25
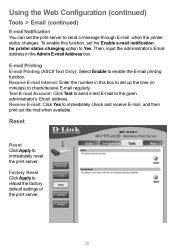
... Configuration (continued) Tools > Email E-mail Account You can be printed out directly through the printer (ASCII text only). Incoming E-mail (POP3) Server Address: Enter the server address that is used to receive your mail server needs to verify the user when sending E-mail, the DP-G321 will apply the same Account Name and Password to send...
... Configuration (continued) Tools > Email E-mail Account You can be printed out directly through the printer (ASCII text only). Incoming E-mail (POP3) Server Address: Enter the server address that is used to receive your mail server needs to verify the user when sending E-mail, the DP-G321 will apply the same Account Name and Password to send...
Product Manual
Page 26
... Click Apply to the given administrator's Email address. Test E-mail Account: Click Test to send a test E-mail to immediately reset the print server. Receive E-mail: Click Yes to check/receive E-mail regularly. Receive E-mail Interval: Enter the number in this function, set the Enable... through E-mail when the printer status changes. Using the Web Configuration (continued) Tools > Email (continued) E-mail Notification You can set the print server to Yes. To enable this box to set up the time (in the Admin E-mail Address box. Then, input the administrator's Email address...
... Click Apply to the given administrator's Email address. Test E-mail Account: Click Test to send a test E-mail to immediately reset the print server. Receive E-mail: Click Yes to check/receive E-mail regularly. Receive E-mail Interval: Enter the number in this function, set the Enable... through E-mail when the printer status changes. Using the Web Configuration (continued) Tools > Email (continued) E-mail Notification You can set the print server to Yes. To enable this box to set up the time (in the Admin E-mail Address box. Then, input the administrator's Email address...

Product Manual
Page 27
Click Browse to locate the firmware file, then click Apply. 27 Using the Web Configuration (continued) Tools > Upgrade Firmware Upgrade When a new version of firmware is available (e.g., downloaded from the manufacturer's website), you can upgrade the firmware of your print server.
Click Browse to locate the firmware file, then click Apply. 27 Using the Web Configuration (continued) Tools > Upgrade Firmware Upgrade When a new version of firmware is available (e.g., downloaded from the manufacturer's website), you can upgrade the firmware of your print server.

Product Manual
Page 28
Restore Device Configuration from File You can reload a configuration that you saved before. Click Browse to point to file and then save in the computer. Using the Web Configuration (continued) Tools > Backup Backup Device Configuration to File Click Apply to backup your current configuration of the print server to the backup file, and then click Apply. 28
Restore Device Configuration from File You can reload a configuration that you saved before. Click Browse to point to file and then save in the computer. Using the Web Configuration (continued) Tools > Backup Backup Device Configuration to File Click Apply to backup your current configuration of the print server to the backup file, and then click Apply. 28

Product Manual
Page 29
Click on any screen in the Web Configuration Utility. 29 Using the Web Configuration (continued) Help Click on your DP-G321 Print Server. This page provides a link to enter the Help Page. Please check the website regularly for more information on each topic for product and firmware updates. D-Link's support website will provide the most up to date information on the Help link from the tools bar of the main screen to D-Link's support website.
Click on any screen in the Web Configuration Utility. 29 Using the Web Configuration (continued) Help Click on your DP-G321 Print Server. This page provides a link to enter the Help Page. Please check the website regularly for more information on each topic for product and firmware updates. D-Link's support website will provide the most up to date information on the Help link from the tools bar of the main screen to D-Link's support website.

Product Manual
Page 30
... Address should be 192.168.0.x, where x is a value between 1-254, excluding 10.) See Networking Basics: Assigning a Static IP Address in the same subnet as the Print Server's IP Address for the two devices to change an IP Address. 30 Note: The PC's IP Address must be in this manual to find out...
... Address should be 192.168.0.x, where x is a value between 1-254, excluding 10.) See Networking Basics: Assigning a Static IP Address in the same subnet as the Print Server's IP Address for the two devices to change an IP Address. 30 Note: The PC's IP Address must be in this manual to find out...


