User Manual
Page 5
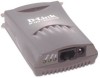
If Windows is very portable (pocket-sized) and inexpensive compared to a PC-based print server, and because the DP-101P+ connects to your D-Link print servers quick and easy in a Windows environment. The DP-101P+ offers extraordinary flexibility, operating with all major ...printing ♦ NetBEUI Windows NT/2000, Windows 95/98/Me, Windows for Workgroups, Microsoft LAN Manager, IBM LAN Server ♦ AppleTalk MacOS EtherTalk Your D-Link DP-101P+ package includes PS Admin, a Windowsbased setup and administration program, which makes configuration and management of your file servers...
If Windows is very portable (pocket-sized) and inexpensive compared to a PC-based print server, and because the DP-101P+ connects to your D-Link print servers quick and easy in a Windows environment. The DP-101P+ offers extraordinary flexibility, operating with all major ...printing ♦ NetBEUI Windows NT/2000, Windows 95/98/Me, Windows for Workgroups, Microsoft LAN Manager, IBM LAN Server ♦ AppleTalk MacOS EtherTalk Your D-Link DP-101P+ package includes PS Admin, a Windowsbased setup and administration program, which makes configuration and management of your file servers...
User Manual
Page 8
....255.0 Note:The PC's IP address must correspond with the print server's IP address in the PS Admin program, or by commands issued to the DP-101P+ via Telnet. DP-101P+ Print Server User's Manual Printer Port The printer port, is configurable by commands in the same segment for configuration procedures. See the PS Admin User's Guide for the two...
....255.0 Note:The PC's IP address must correspond with the print server's IP address in the PS Admin program, or by commands issued to the DP-101P+ via Telnet. DP-101P+ Print Server User's Manual Printer Port The printer port, is configurable by commands in the same segment for configuration procedures. See the PS Admin User's Guide for the two...
User Manual
Page 10
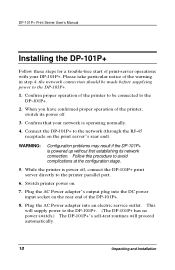
... to be made before supplying power to the printer parallel port. 6. WARNING: Configuration problems may result if the DP-101P+ is powered up without first establishing its power off , connect the DP-101P+ print server directly to the DP-101P+. 1. Confirm that your DP-101P+. Connect the DP-101P+ to the DP-101P+. 2. This will proceed automatically. 10 Unpacking and Installation When you have confirmed...
... to be made before supplying power to the printer parallel port. 6. WARNING: Configuration problems may result if the DP-101P+ is powered up without first establishing its power off , connect the DP-101P+ print server directly to the DP-101P+. 1. Confirm that your DP-101P+. Connect the DP-101P+ to the DP-101P+. 2. This will proceed automatically. 10 Unpacking and Installation When you have confirmed...
User Manual
Page 12
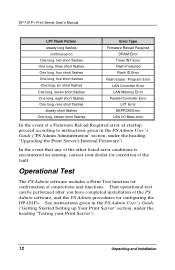
... given in the PS Admin User's Guide ("Getting Started Setting up Your Print Server" section, under the heading "Upgrading the Print Server's Internal Firmware"). DP-101P+ Print Server User's Manual LPT Flash Pattern Error Type steady long flashes Firmware Reload Required...Print Server"). 12 Unpacking and Installation That operational test can be performed after you have completed installation of connections and functions. See instructions given in the PS Admin User's Guide ("PS Admin Administration" section, under the heading "Testing your dealer for configuring the DP-101P...
... given in the PS Admin User's Guide ("Getting Started Setting up Your Print Server" section, under the heading "Upgrading the Print Server's Internal Firmware"). DP-101P+ Print Server User's Manual LPT Flash Pattern Error Type steady long flashes Firmware Reload Required...Print Server"). 12 Unpacking and Installation That operational test can be performed after you have completed installation of connections and functions. See instructions given in the PS Admin User's Guide ("PS Admin Administration" section, under the heading "Testing your dealer for configuring the DP-101P...

User Guide
Page 1
DP-101P+ Pocket Size Print Server Web Configuration User's Manual Rev.01 (June, 2001) Made In Taiwan RECYCLABLE
DP-101P+ Pocket Size Print Server Web Configuration User's Manual Rev.01 (June, 2001) Made In Taiwan RECYCLABLE

User Guide
Page 2
TABLE OF CONTENTS WEB CONFIGURATION 3 CONFIGURING THE PRINT SERVER 4 MANAGEMENT 5 SYSTEM STATUS 5 PRINTER STATUS 6 CONFIGURATION 7 SERVER DEVICE 7 TCP/IP PROTOCOL 8 NETBEUI PROTOCOL 9 APPLETALK PROTOCOL 10 TOOLS 11 PRINT TEST 11 RESET 12 FACTORY RESET 13 HELP 14 ABOUT 14 2
TABLE OF CONTENTS WEB CONFIGURATION 3 CONFIGURING THE PRINT SERVER 4 MANAGEMENT 5 SYSTEM STATUS 5 PRINTER STATUS 6 CONFIGURATION 7 SERVER DEVICE 7 TCP/IP PROTOCOL 8 NETBEUI PROTOCOL 9 APPLETALK PROTOCOL 10 TOOLS 11 PRINT TEST 11 RESET 12 FACTORY RESET 13 HELP 14 ABOUT 14 2

User Guide
Page 3
Web Configuration This manual describes the use of the Web Configuration for controlling and configuring print servers. 3
Web Configuration This manual describes the use of the Web Configuration for controlling and configuring print servers. 3

User Guide
Page 4
The print server's welcome screen will be four options on the systems tool bar to choose from to communicate. Configuring the Print Server Open web browser and type http://192.168.0.1 in the same segment for the two devices to set your print server. Press Enter. Note:The PC's IP address must correspond with the print server's IP address in the address box. The number is the default IP address of your print server and they are as follows: ♦ Management ♦ Configuration ♦ Tools ♦ Help 4 There will appear.
The print server's welcome screen will be four options on the systems tool bar to choose from to communicate. Configuring the Print Server Open web browser and type http://192.168.0.1 in the same segment for the two devices to set your print server. Press Enter. Note:The PC's IP address must correspond with the print server's IP address in the address box. The number is the default IP address of your print server and they are as follows: ♦ Management ♦ Configuration ♦ Tools ♦ Help 4 There will appear.

User Guide
Page 7
Server Device Click on "Configuration" in the systems tool bar and in the Configuration Table. Configuration Click on "Server Device" in the Configuration Table it provides settings to configure the print server for the Server Device, TCP/IP Protocol, NetBEUI Protocol and AppleTalk Protocol. The page will appear as below providing the settings required to ensure the settings are updated and saved. 7 Click the "Save" button to configure the print server.
Server Device Click on "Configuration" in the systems tool bar and in the Configuration Table. Configuration Click on "Server Device" in the Configuration Table it provides settings to configure the print server for the Server Device, TCP/IP Protocol, NetBEUI Protocol and AppleTalk Protocol. The page will appear as below providing the settings required to ensure the settings are updated and saved. 7 Click the "Save" button to configure the print server.

User Guide
Page 8
The page will appear as below providing the settings required to ensure the settings are saved and updated. 8 TCP/IP Protocol Click on "TCP/IP Protocol" in the Configuration Table. Click the "Save" button to configure the print server.
The page will appear as below providing the settings required to ensure the settings are saved and updated. 8 TCP/IP Protocol Click on "TCP/IP Protocol" in the Configuration Table. Click the "Save" button to configure the print server.

User Guide
Page 9
NetBEUI Protocol Click on "NetBEUI Protocol" in the Configuration Table. Click the "Save" button to configure the print server. The page will appear as below providing the settings required to ensure the settings are saved and updated. 9
NetBEUI Protocol Click on "NetBEUI Protocol" in the Configuration Table. Click the "Save" button to configure the print server. The page will appear as below providing the settings required to ensure the settings are saved and updated. 9

User Guide
Page 10
The page will appear as below providing the settings required to ensure the settings are saved and updated. 10 AppleTalk Protocol Click on "AppleTalk Protocol" in the Configuration Table. Click the "Save" button to configure the print server.
The page will appear as below providing the settings required to ensure the settings are saved and updated. 10 AppleTalk Protocol Click on "AppleTalk Protocol" in the Configuration Table. Click the "Save" button to configure the print server.