
Manual
Page 2
DNS-G120 User's Manual Table of Contents Table of Contents Package Contents 3 Introduction 4 Features and Benefits 5 Hardware Overview 6 Getting Started 8 Hardware Installation 9 Installation Considerations 10 Windows® Connect Now (WCN 11 Connecting to a Wireless Network 14 Mapping a Drive 16 Using the Easy Search Utility 19 Using the Configuration Utility... Download Scheduling 42 Scheduling Status 45 Networking Basics 46 Troubleshooting 52 Technical Specifications 53 Contacting Technical Support 55 Warranty 56 Registration 59 D-Link Systems, Inc. 2
DNS-G120 User's Manual Table of Contents Table of Contents Package Contents 3 Introduction 4 Features and Benefits 5 Hardware Overview 6 Getting Started 8 Hardware Installation 9 Installation Considerations 10 Windows® Connect Now (WCN 11 Connecting to a Wireless Network 14 Mapping a Drive 16 Using the Easy Search Utility 19 Using the Configuration Utility... Download Scheduling 42 Scheduling Status 45 Networking Basics 46 Troubleshooting 52 Technical Specifications 53 Contacting Technical Support 55 Warranty 56 Registration 59 D-Link Systems, Inc. 2

Manual
Page 3
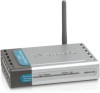
... Computer with Windows XP or 2000 Internet Explorer version 6.0 or Netscape Navigator version 7.0 and above items are missing, please contact your DNS-G120. D-Link Systems, Inc. 3 Once your wireless configuration is used during initial setup. DNS-G120 User's Manual Package Contents Package Contents D-Link DNS-G120 Wireless Network Storage Adapter ...* It is required that an Ethernet cable is set, you may disconnect the Ethernet cable and begin communicating wirelessly with the DNS-G120 will cause damage and void the warranty for this product.
... Computer with Windows XP or 2000 Internet Explorer version 6.0 or Netscape Navigator version 7.0 and above items are missing, please contact your DNS-G120. D-Link Systems, Inc. 3 Once your wireless configuration is used during initial setup. DNS-G120 User's Manual Package Contents Package Contents D-Link DNS-G120 Wireless Network Storage Adapter ...* It is required that an Ethernet cable is set, you may disconnect the Ethernet cable and begin communicating wirelessly with the DNS-G120 will cause damage and void the warranty for this product.
Manual
Page 4
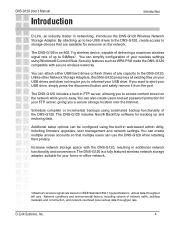
... networking, introduces the DNS-G120 Wireless Network Storage Adapter. DNS-G120 User's Manual Introduction Introduction D-Link, an industry leader in web-based admin utility, including firmware upgrades, user management and network settings. Actual data throughput will vary. The DNS-G120 is a fully featured wireless network storage adapter, suitable for your wireless settings using Windows® Connect Now...
... networking, introduces the DNS-G120 Wireless Network Storage Adapter. DNS-G120 User's Manual Introduction Introduction D-Link, an industry leader in web-based admin utility, including firmware upgrades, user management and network settings. Actual data throughput will vary. The DNS-G120 is a fully featured wireless network storage adapter, suitable for your wireless settings using Windows® Connect Now...

Manual
Page 11
Click Next. D-Link Systems, Inc. 11 To create new wireless settings, click Setup a new wireless network. Click Start > Accessories > Communications > Wireless Network Setup Wizard. If you do not have Windows XP (SP2) or do not wish to use WCN to setup your wireless settings, skip ...continue. Click Next. If you will learn how to use the same settings on the DNS-G120. DNS-G120 User's Manual Windows Connect Now Windows® Connect Now (WCN) Note: This feature is only available through Windows XP with Service Pack 2 installed. In this section, you have a USB fl...
Click Next. D-Link Systems, Inc. 11 To create new wireless settings, click Setup a new wireless network. Click Start > Accessories > Communications > Wireless Network Setup Wizard. If you do not have Windows XP (SP2) or do not wish to use WCN to setup your wireless settings, skip ...continue. Click Next. If you will learn how to use the same settings on the DNS-G120. DNS-G120 User's Manual Windows Connect Now Windows® Connect Now (WCN) Note: This feature is only available through Windows XP with Service Pack 2 installed. In this section, you have a USB fl...
Manual
Page 12
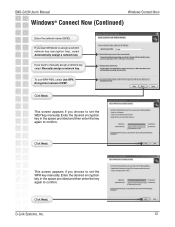
DNS-G120 User's Manual Windows Connect Now Windows® Connect Now (Continued) Enter the network name (SSID). Enter the desired encryption key in the space provided and then enter the key again to manually assign a network key select Manually assign a network key. D-Link Systems, Inc. 12 Click Next. This screen appears if you want Windows to set...
DNS-G120 User's Manual Windows Connect Now Windows® Connect Now (Continued) Enter the network name (SSID). Enter the desired encryption key in the space provided and then enter the key again to manually assign a network key select Manually assign a network key. D-Link Systems, Inc. 12 Click Next. This screen appears if you want Windows to set...
Manual
Page 13
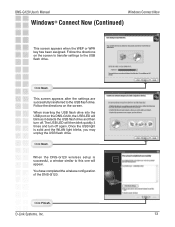
DNS-G120 User's Manual Windows Connect Now Windows® Connect Now (Continued) This screen appears when the WEP or WPA key has been assigned. When the DNS-G120 wireless setup is solid and the WLAN light blinks, you may unplug the USB flash drive. D-Link Systems, Inc. 13 Click Next. You have completed the wireless confi...
DNS-G120 User's Manual Windows Connect Now Windows® Connect Now (Continued) This screen appears when the WEP or WPA key has been assigned. When the DNS-G120 wireless setup is solid and the WLAN light blinks, you may unplug the USB flash drive. D-Link Systems, Inc. 13 Click Next. You have completed the wireless confi...

Manual
Page 14
DNS-G120 User's Manual Connecting to a Wireless Network Connecting to a Wireless Network If you have configured the wireless settings using Windows® Connect Now (WCN), you may skip this section and continue to page 16. Open your Web browser and type http://DNS-G120 into the URL address box and then press the Enter or Return key. Click Enabled Click Site Survey D-Link Systems, Inc. 14 The logon screen will appear. Click Config Next, click Wireless on the left side. Type admin for the username and leave the password field blank.
DNS-G120 User's Manual Connecting to a Wireless Network Connecting to a Wireless Network If you have configured the wireless settings using Windows® Connect Now (WCN), you may skip this section and continue to page 16. Open your Web browser and type http://DNS-G120 into the URL address box and then press the Enter or Return key. Click Enabled Click Site Survey D-Link Systems, Inc. 14 The logon screen will appear. Click Config Next, click Wireless on the left side. Type admin for the username and leave the password field blank.

Manual
Page 17
... D-Link Systems, Inc. \\DNS-G120\Shared folder 17 DNS-G120 User's Manual Mapping a Drive Mapping a Drive (continued) As an alternate method, you entered into the Setup Wizard or in the Home>LAN screen in Windows. Right-click Start and click Explore. Please see the following instructions for mapping a USB drive so that you can access the DNS-G120...
... D-Link Systems, Inc. \\DNS-G120\Shared folder 17 DNS-G120 User's Manual Mapping a Drive Mapping a Drive (continued) As an alternate method, you entered into the Setup Wizard or in the Home>LAN screen in Windows. Right-click Start and click Explore. Please see the following instructions for mapping a USB drive so that you can access the DNS-G120...

Manual
Page 23
Using the Configuration Utility Click Next Enter the workgroup name of your network contains a DHCP server or router. Click Next D-Link Systems, Inc. 23 To connect to a wireless network, select Enable and click on pages 26-27). The IP address must be used. Click... Survey or you have configured the wireless settings using Windows® Connect Now (WCN), click Next without any configuration changes. If not, select Static IP and enter the IP address information to page 11 for the DNS-G120. By default, the wireless function is disabled. Enter a name ...
Using the Configuration Utility Click Next Enter the workgroup name of your network contains a DHCP server or router. Click Next D-Link Systems, Inc. 23 To connect to a wireless network, select Enable and click on pages 26-27). The IP address must be used. Click... Survey or you have configured the wireless settings using Windows® Connect Now (WCN), click Next without any configuration changes. If not, select Static IP and enter the IP address information to page 11 for the DNS-G120. By default, the wireless function is disabled. Enter a name ...

Manual
Page 26
...Authentication: WEP can make up to select an available wireless AP or router. Encryption Mode: Select the level of your DNS-G120. ASCII - You can use Windows® Connect Now to associate with the access point. Please refer to page 11 if you wish to use different ... Select the network type from the drop-down menu. Default Key: Select which WEP key to associate with it. D-Link Systems, Inc. 26 only A-F and 0-9 are valid characters. DNS-G120 User's Manual Home > Wireless Using the Configuration Utility Wireless: Select Enabled or Disabled. Open: to allow...
...Authentication: WEP can make up to select an available wireless AP or router. Encryption Mode: Select the level of your DNS-G120. ASCII - You can use Windows® Connect Now to associate with the access point. Please refer to page 11 if you wish to use different ... Select the network type from the drop-down menu. Default Key: Select which WEP key to associate with it. D-Link Systems, Inc. 26 only A-F and 0-9 are valid characters. DNS-G120 User's Manual Home > Wireless Using the Configuration Utility Wireless: Select Enabled or Disabled. Open: to allow...

Manual
Page 39
After the login screen appears, wait 30 seconds before logging into the DNS-G120. D-Link Systems, Inc. 39 When the "upgrade is complete" message appears, click Restart. DNS-G120 User's Manual Tools > Firmware Using the Configuration Utility Browse: After you have downloaded the firmware upgrade file to your hard drive, click Browse to begin the firmware upgrade. When you have found it, click Open in the browser window and click Apply in this screen to find the upgrade.
After the login screen appears, wait 30 seconds before logging into the DNS-G120. D-Link Systems, Inc. 39 When the "upgrade is complete" message appears, click Restart. DNS-G120 User's Manual Tools > Firmware Using the Configuration Utility Browse: After you have downloaded the firmware upgrade file to your hard drive, click Browse to begin the firmware upgrade. When you have found it, click Open in the browser window and click Apply in this screen to find the upgrade.

Manual
Page 44
...clock will be written over by Last Modified Date/Time and overwrite the destination if the source is more recent. D-Link Systems, Inc. 44 DNS-G120 User's Manual Using the Configuration Menu Download Scheduling (continued) Test: This button is provided to test the given URL...This means that appear as the Last Modified Date/Time is checked, then DNS-G120 will be displayed in Overwrite mode. Note: Incremental Backup is Year/Month/ Day. Click on the button, a window will appear with identical names will compare identical file names at the destination drive...
...clock will be written over by Last Modified Date/Time and overwrite the destination if the source is more recent. D-Link Systems, Inc. 44 DNS-G120 User's Manual Using the Configuration Menu Download Scheduling (continued) Test: This button is provided to test the given URL...This means that appear as the Last Modified Date/Time is checked, then DNS-G120 will be displayed in Overwrite mode. Note: Incremental Backup is Year/Month/ Day. Click on the button, a window will appear with identical names will compare identical file names at the destination drive...

Manual
Page 46
this field is optional. To rename the computer and join a domain, Click Change. DNS-G120 User's Manual Networking Basics Networking Basics To name your computer n Windows XP, please follow these directions. Click Start (in the lower left corner of the screen). Right-click on My Computer. Select Properties and click. Select the Computer Name Tab in the System Properties window. You may enter a Computer Description if you wish; D-Link Systems, Inc. 46
this field is optional. To rename the computer and join a domain, Click Change. DNS-G120 User's Manual Networking Basics Networking Basics To name your computer n Windows XP, please follow these directions. Click Start (in the lower left corner of the screen). Right-click on My Computer. Select Properties and click. Select the Computer Name Tab in the System Properties window. You may enter a Computer Description if you wish; D-Link Systems, Inc. 46

Manual
Page 47
D-Link Systems, Inc. 47 DNS-G120 User's Manual Networking Basics In this window, enter the Computer name. Select Workgroup and enter the name of the Workgroup. All computers on your network must have the same Workgroup name. Click OK.
D-Link Systems, Inc. 47 DNS-G120 User's Manual Networking Basics In this window, enter the Computer name. Select Workgroup and enter the name of the Workgroup. All computers on your network must have the same Workgroup name. Click OK.

Manual
Page 48
D-Link Systems, Inc. 48 DNS-G120 User's Manual Networking Basics Checking the IP Address in Windows XP The wireless adapter-equipped computers in the task bar. Click on the Local Area Connection icon in your IP address, subnet mask, and ...the default gateway. Click Close. To check the IP Address of IP Address Range). This screen will appear: Click the Support tab. This window will list your network must be in the same IP Address range (see Getting Started in this manual for a definition of the adapter...
D-Link Systems, Inc. 48 DNS-G120 User's Manual Networking Basics Checking the IP Address in Windows XP The wireless adapter-equipped computers in the task bar. Click on the Local Area Connection icon in your IP address, subnet mask, and ...the default gateway. Click Close. To check the IP Address of IP Address Range). This screen will appear: Click the Support tab. This window will list your network must be in the same IP Address range (see Getting Started in this manual for a definition of the adapter...

Manual
Page 49
...Link Systems, Inc. 49 If you are not using a DHCP capable router, or you need to Start. Double-click on Control Panel. Double-click on the network, using a DHCP-capable router you will automatically assign IP addresses to the computers on Network Connections. DNS-G120... User's Manual Networking Basics Assigning a Static IP Address in Windows XP/2000 Note: DHCP-enabled routers will not need to assign a static IP address, please follow ...
...Link Systems, Inc. 49 If you are not using a DHCP capable router, or you need to Start. Double-click on Control Panel. Double-click on the network, using a DHCP-capable router you will automatically assign IP addresses to the computers on Network Connections. DNS-G120... User's Manual Networking Basics Assigning a Static IP Address in Windows XP/2000 Note: DHCP-enabled routers will not need to assign a static IP address, please follow ...

Manual
Page 51
...Windows XP and 2000 Go to this one will show four replies from the wireless router or access point, as shown. Checking the Wireless Connection by your ISP (Internet Service Provider.) Click OK. A good wireless connection will appear. D-Link Systems, Inc. 51 DNS-G120 ...User's Manual Networking Basics Input your DNS server addresses. (Note: If you are entering a DNS server, you must enter the IP address of the wireless router or access point....
...Windows XP and 2000 Go to this one will show four replies from the wireless router or access point, as shown. Checking the Wireless Connection by your ISP (Internet Service Provider.) Click OK. A good wireless connection will appear. D-Link Systems, Inc. 51 DNS-G120 ...User's Manual Networking Basics Input your DNS server addresses. (Note: If you are entering a DNS server, you must enter the IP address of the wireless router or access point....

Manual
Page 53
... factors may adversely affect wireless signal range. DNS-G120 User's Manual Technical Specifications Technical Specifications Standards • IEEE 802.11 • IEEE 802.11b • IEEE 802.11g • IEEE 802.3 • IEEE 802.3u • USB 1.1 • USB 2.0 • WCN (Windows Connect Now) Device Management • Web-Based...
... factors may adversely affect wireless signal range. DNS-G120 User's Manual Technical Specifications Technical Specifications Standards • IEEE 802.11 • IEEE 802.11b • IEEE 802.11g • IEEE 802.3 • IEEE 802.3u • USB 1.1 • USB 2.0 • WCN (Windows Connect Now) Device Management • Web-Based...

Installation Guide
Page 2
Package Contents D-Link DNS-G120 Wireless Storage Adapter Manual and Software on CD Ethernet Cable 2 5V 2.5A Power Supply D-Link Systems, Inc. Once your wireless network. System Requirements DNS-G120 Install Guide System Requirements Computer with Windows XP or 2000 with an installed Ethernet Adapter* Internet Explorer 6.0 or Netscape Navigator 7.0 and above An 802.11g/b wireless network USB...
Package Contents D-Link DNS-G120 Wireless Storage Adapter Manual and Software on CD Ethernet Cable 2 5V 2.5A Power Supply D-Link Systems, Inc. Once your wireless network. System Requirements DNS-G120 Install Guide System Requirements Computer with Windows XP or 2000 with an installed Ethernet Adapter* Internet Explorer 6.0 or Netscape Navigator 7.0 and above An 802.11g/b wireless network USB...

Installation Guide
Page 7
... with Service Pack 2 or do not have Windows XP with Service Pack 2 installed. Click Start > Accessories > Communications > Wireless Network Setup Wizard. D-Link Systems, Inc. 7 In this section, you do not wish to use the Wireless Network Setup Wizard to easily and securely set up the DNS-G120 on a wireless network.You will need to...
... with Service Pack 2 or do not have Windows XP with Service Pack 2 installed. Click Start > Accessories > Communications > Wireless Network Setup Wizard. D-Link Systems, Inc. 7 In this section, you do not wish to use the Wireless Network Setup Wizard to easily and securely set up the DNS-G120 on a wireless network.You will need to...


