User Guide
Page 2
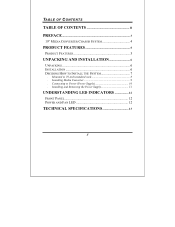
Connecting to 19-inch standard rack 8 . TABLE OF CONTENTS TABLE OF CONTENTS II PREFACE 3 19" MEDIA CONVERTER CHASSIS SYSTEM 4 PRODUCT FEATURES 5 PRODUCT FEATURES 5 UNPACKING AND INSTALLATION 6 UNPACKING 6 INSTALLATION 6 DECIDING HOW TO INSTALL THE SYSTEM 7 . Installing Media Converter 9 . Installing and Removing the Power Supply 11 UNDERSTANDING LED INDICATORS 12 FRONT PANEL 12 POWER AND FAN LED 12 TECHNICAL SPECIFICATIONS 13 ii Mounted to Power (Power Supply 10 .
Connecting to 19-inch standard rack 8 . TABLE OF CONTENTS TABLE OF CONTENTS II PREFACE 3 19" MEDIA CONVERTER CHASSIS SYSTEM 4 PRODUCT FEATURES 5 PRODUCT FEATURES 5 UNPACKING AND INSTALLATION 6 UNPACKING 6 INSTALLATION 6 DECIDING HOW TO INSTALL THE SYSTEM 7 . Installing Media Converter 9 . Installing and Removing the Power Supply 11 UNDERSTANDING LED INDICATORS 12 FRONT PANEL 12 POWER AND FAN LED 12 TECHNICAL SPECIFICATIONS 13 ii Mounted to Power (Power Supply 10 .
User Guide
Page 3
... a second power supply shall be ordered separately! 3 P R E FA C E This manual describes how to sixteen media converters, each of housing up to install and use the 19" Media Converter Chassis System. The system introduced here is fitted with redundant power supplies.
... a second power supply shall be ordered separately! 3 P R E FA C E This manual describes how to sixteen media converters, each of housing up to install and use the 19" Media Converter Chassis System. The system introduced here is fitted with redundant power supplies.
User Guide
Page 4
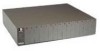
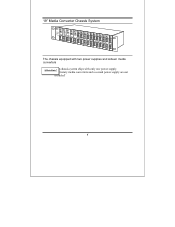
19" Media Converter Chassis System The chassis equipped with two power supplies and sixteen media converters AttentionPT!rhoeprciehtaasrsyismseydstieamcosnhviperstewristhanodnlaysoencoenpdowpoewr seurpspulpyp.ly are not included! 4
19" Media Converter Chassis System The chassis equipped with two power supplies and sixteen media converters AttentionPT!rhoeprciehtaasrsyismseydstieamcosnhviperstewristhanodnlaysoencoenpdowpoewr seurpspulpyp.ly are not included! 4
User Guide
Page 5
...; Power redundancy & power isolation ¾ One high quality internal power supply provided, and a second power supply option for bay and fan power status ¾ Standard 19" rackmountable size, 2U ¾ Non-stop operation & minimal downtime ¾ The following items are designed to be hot swappable to allow easy and quick replacement: -
...; Power redundancy & power isolation ¾ One high quality internal power supply provided, and a second power supply option for bay and fan power status ¾ Standard 19" rackmountable size, 2U ¾ Non-stop operation & minimal downtime ¾ The following items are designed to be hot swappable to allow easy and quick replacement: -
User Guide
Page 6
... information for replacement. Specifically, the site you select should be subjected to the Switch, we recommend that you shall find these items listed below. ¾ 19" Media Converter Chassis System ¾ One power supply installed on the chassis ¾ One AC power cord ¾ User's Manual ¾ Accessories: rackmount screws (8 pcs...
... information for replacement. Specifically, the site you select should be subjected to the Switch, we recommend that you shall find these items listed below. ¾ 19" Media Converter Chassis System ¾ One power supply installed on the chassis ¾ One AC power cord ¾ User's Manual ¾ Accessories: rackmount screws (8 pcs...
User Guide
Page 8
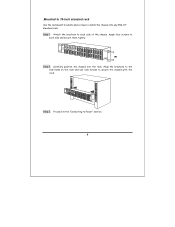
Step 2: Carefully position the chassis into any EIA 19" standard rack. Step 3: Proceed to the "Connecting to each side of the chassis. Apply four screws to Power" section. 8 Align the brackets to the side holes on the rack and use rack screws to each side and secure them tightly. .Mounted to 19-inch standard rack Use the rackmount brackets and screws to install the chassis into the rack. Step 1: Attach the brackets to secure the chassis with the rack.
Step 2: Carefully position the chassis into any EIA 19" standard rack. Step 3: Proceed to the "Connecting to each side of the chassis. Apply four screws to Power" section. 8 Align the brackets to the side holes on the rack and use rack screws to each side and secure them tightly. .Mounted to 19-inch standard rack Use the rackmount brackets and screws to install the chassis into the rack. Step 1: Attach the brackets to secure the chassis with the rack.
User Guide
Page 13
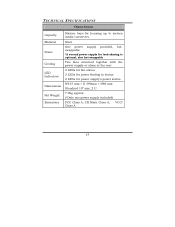
... rear 2 LEDs for fan status 2 LEDs for power feeding in status 2 LEDs for power supply's power status W415 mm × D 390mm × H89 mm Standard 19" size, 2 U 7.0kg approx. (*Only one power supply included) FCC Class A, CE Mark Class A, VCCI Class A 13
... rear 2 LEDs for fan status 2 LEDs for power feeding in status 2 LEDs for power supply's power status W415 mm × D 390mm × H89 mm Standard 19" size, 2 U 7.0kg approx. (*Only one power supply included) FCC Class A, CE Mark Class A, VCCI Class A 13