Manual
Page 3
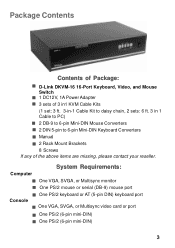
... port Console ! One PS/2 (6-pin mini-DIN) ! System Requirements: Computer ! One VGA, SVGA, or Multisync video card or port ! Manual ! 2 Rack Mount Brackets 8 Screws If any of Package: ! Package Contents Contents of the above items are missing, please contact your reseller. D-Link DKVM-16 16-Port Keyboard, Video, and Mouse Switch ! 1 DC12V, 1A Power Adapter ! 3 sets of 3 in1 KVM Cable Kits (1 set: 3 ft. 3-in-1 Cable Kit to daisy chain, 2 sets...
... port Console ! One PS/2 (6-pin mini-DIN) ! System Requirements: Computer ! One VGA, SVGA, or Multisync video card or port ! Manual ! 2 Rack Mount Brackets 8 Screws If any of Package: ! Package Contents Contents of the above items are missing, please contact your reseller. D-Link DKVM-16 16-Port Keyboard, Video, and Mouse Switch ! 1 DC12V, 1A Power Adapter ! 3 sets of 3 in1 KVM Cable Kits (1 set: 3 ft. 3-in-1 Cable Kit to daisy chain, 2 sets...
Manual
Page 4
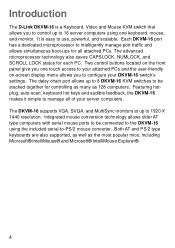
... for each PC. The DKVM-16 supports VGA, SVGA, and MultiSync monitors at up to 8 DKVM-16 KVM switches to configure your server computers. It is a Keyboard, Video and Mouse KVM switch that allows you to control up to intelligently manage port traffic and allows simultaneous boot-ups for all of your DKVM-16 switch's settings. Featuring hotplug, auto-scan, keyboard hot keys and audible feedback, the DKVM-16 makes it simple to use, powerful, and scalable.
... for each PC. The DKVM-16 supports VGA, SVGA, and MultiSync monitors at up to 8 DKVM-16 KVM switches to configure your server computers. It is a Keyboard, Video and Mouse KVM switch that allows you to control up to intelligently manage port traffic and allows simultaneous boot-ups for all of your DKVM-16 switch's settings. Featuring hotplug, auto-scan, keyboard hot keys and audible feedback, the DKVM-16 makes it simple to use, powerful, and scalable.
Manual
Page 5
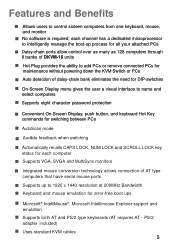
... provides the ability to 1920 x 1440 resolution at 200MHz Bandwidth ! Auto detection of DKVM-16 units ! On-Screen Display menu gives the user a visual interface to control sixteen computers from one keyboard, mouse, and monitor ! Convenient On-Screen Display, push button, and keyboard Hot Key commands for DIP-switches ! Integrated mouse conversion technology allows connection of AT type computers that have serial mouse ports ! Uses standard KVM cables 5
... provides the ability to 1920 x 1440 resolution at 200MHz Bandwidth ! Auto detection of DKVM-16 units ! On-Screen Display menu gives the user a visual interface to control sixteen computers from one keyboard, mouse, and monitor ! Convenient On-Screen Display, push button, and keyboard Hot Key commands for DIP-switches ! Integrated mouse conversion technology allows connection of AT type computers that have serial mouse ports ! Uses standard KVM cables 5

Manual
Page 7
...-15 female port, labeled with the monitor symbol at the CONSOLE connector on a 19" rack. Take note of the length of your cables so that all of your computers are distanced properly. Hardware Installation (Continued) WARNING Make sure that your computers, DKVM-16, keyboard, mouse, and monitor are powered off before attempting to connect the cabling to avoid damage to your DKVM-16 Step 1 Find...
...-15 female port, labeled with the monitor symbol at the CONSOLE connector on a 19" rack. Take note of the length of your cables so that all of your computers are distanced properly. Hardware Installation (Continued) WARNING Make sure that your computers, DKVM-16, keyboard, mouse, and monitor are powered off before attempting to connect the cabling to avoid damage to your DKVM-16 Step 1 Find...

Manual
Page 9
.... Be sure to add a serial to PS/2 converter included with the DKVM-16 before connecting the 3-in -1 cable, locate the mouse connector (green) and connect one end of the included VGA cable (15-pin HDDB Male / Male) to the female connectors on the back panel of the DKVM-16. Hardware Installation (Continued) Step 5 Connect one end to the PS/2 mouse port on the back panel...
.... Be sure to add a serial to PS/2 converter included with the DKVM-16 before connecting the 3-in -1 cable, locate the mouse connector (green) and connect one end of the included VGA cable (15-pin HDDB Male / Male) to the female connectors on the back panel of the DKVM-16. Hardware Installation (Continued) Step 5 Connect one end to the PS/2 mouse port on the back panel...
Manual
Page 10
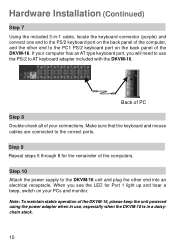
... of the DKVM-16, please keep the unit powered using the power adapter when in a daisychain stack. 10 Step 9 Repeat steps 5 through 8 for Port 1 light up and hear a beep, switch on your computer has an AT type keyboard port, you see the LED for the remainder of your connections. When you will need to use , especially when the DKVM-16 is in use the PS/2 to the DKVM-16 unit...
... of the DKVM-16, please keep the unit powered using the power adapter when in a daisychain stack. 10 Step 9 Repeat steps 5 through 8 for Port 1 light up and hear a beep, switch on your computer has an AT type keyboard port, you see the LED for the remainder of your connections. When you will need to use , especially when the DKVM-16 is in use the PS/2 to the DKVM-16 unit...

Manual
Page 11
... verify the functionality in the boot-up process. Note: Please do not press the "push" button of this manual. Hardware Installation (Continued) Step 11 Now power up all cables for proper connections before going to the trouble-shooting section of the KVM switch or run Hot Key) while the computers are in the same manner. If you find errors, recheck all computers simultaneously.
... verify the functionality in the boot-up process. Note: Please do not press the "push" button of this manual. Hardware Installation (Continued) Step 11 Now power up all cables for proper connections before going to the trouble-shooting section of the KVM switch or run Hot Key) while the computers are in the same manner. If you find errors, recheck all computers simultaneously.
Manual
Page 12
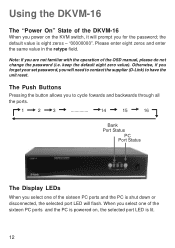
... forget your set password, you are not familiar with the operation of the sixteen PC ports and the PC is powered on, the selected port LED is lit. 12 "00000000". keep the default eight zero value). the default value is eight zeros - When you for the password; Using the DKVM-16 The "Power On" State of the DKVM-16 When you power on the KVM switch, it will...
... forget your set password, you are not familiar with the operation of the sixteen PC ports and the PC is powered on, the selected port LED is lit. 12 "00000000". keep the default eight zero value). the default value is eight zeros - When you for the password; Using the DKVM-16 The "Power On" State of the DKVM-16 When you power on the KVM switch, it will...

Manual
Page 13
... will now appear in the hot key mode within 2 seconds, the keyboard will not be reset by powering off the DKVM-16. If you add a new DKVM-16 as a slave bank, please use the reset button of the DKVM-16 will revert back to Operation System control state. The PC ports can only be reset. To send commands to the DKVM-16, the "SCROLL LOCK" key must be pressed twice within...
... will now appear in the hot key mode within 2 seconds, the keyboard will not be reset by powering off the DKVM-16. If you add a new DKVM-16 as a slave bank, please use the reset button of the DKVM-16 will revert back to Operation System control state. The PC ports can only be reset. To send commands to the DKVM-16, the "SCROLL LOCK" key must be pressed twice within...
Manual
Page 15
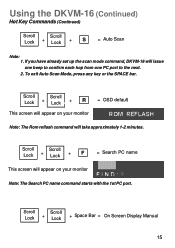
... already set up the scan mode command, DKVM-16 will take approximately 1-2 minutes. Scroll Scroll Lock + Lock + Space Bar = On Screen Display Manual 15 Scroll Scroll Lock + Lock + R This screen will appear on your monitor = OSD default Note: The Rom reflash command will issue one beep to confirm each hop from one PC port to the next. 2. Using the DKVM-16 (Continued) Hot Key Commands...
... already set up the scan mode command, DKVM-16 will take approximately 1-2 minutes. Scroll Scroll Lock + Lock + Space Bar = On Screen Display Manual 15 Scroll Scroll Lock + Lock + R This screen will appear on your monitor = OSD default Note: The Rom reflash command will issue one beep to confirm each hop from one PC port to the next. 2. Using the DKVM-16 (Continued) Hot Key Commands...

Manual
Page 16
... use the attached 3 feet 3-in -one Cable Kit to the console port (white color block) of the master KVM bank (bank1). Step 1 Connect your DKVM-16 units. Step 2 Use the 3-in -one Cable Kit to connect the daisy-chain port of the 2nd KVM switch. You can daisy chain up to daisy-chain your keyboard, mouse, and monitor to daisy chain the KVM Switches. Daisy-Chaining the DKVM-16...
... use the attached 3 feet 3-in -one Cable Kit to the console port (white color block) of the master KVM bank (bank1). Step 1 Connect your DKVM-16 units. Step 2 Use the 3-in -one Cable Kit to connect the daisy-chain port of the 2nd KVM switch. You can daisy chain up to daisy-chain your keyboard, mouse, and monitor to daisy chain the KVM Switches. Daisy-Chaining the DKVM-16...

Manual
Page 17
... The DKVM-16 supports the "Hot Plug" function for easy addition or removal of Operating System, it will cause unpredictable behaviors or shut down the PC. A PC can arrange or maintain PCs as it is active and selected, you must switch to a different port before changing the configuration, and then you apply the Hot Plug function to power it...
... The DKVM-16 supports the "Hot Plug" function for easy addition or removal of Operating System, it will cause unpredictable behaviors or shut down the PC. A PC can arrange or maintain PCs as it is active and selected, you must switch to a different port before changing the configuration, and then you apply the Hot Plug function to power it...
Manual
Page 18
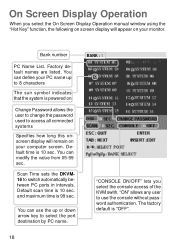
... select the On Screen Display Operation manual window using the "Hot Key" function, the following on screen display will remain on your monitor. Default time is 10 sec. Default scan time is 10 sec. Factory default names are listed. "ON" allows any user to switch automatically between PC ports in intervals. Bank number PC Name List. On Screen Display Operation When you select the console access of the KVM swith.
... select the On Screen Display Operation manual window using the "Hot Key" function, the following on screen display will remain on your monitor. Default time is 10 sec. Default scan time is 10 sec. Factory default names are listed. "ON" allows any user to switch automatically between PC ports in intervals. Bank number PC Name List. On Screen Display Operation When you select the console access of the KVM swith.
Manual
Page 19
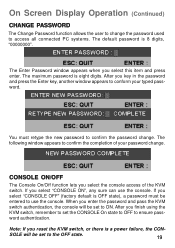
...: If you finish using the KVM switch, remember to set the CONSOLE On state to OFF to conform your password change . The maximum password is 8 digits, "00000000". After you reset the KVM switch, or there is OFF state), a password must retype the new password to access all connected PC systems. The default password is eight digits. The Enter Password window appears when you select "CONSOLE OFF" (factory default is a power failure, the CON...
...: If you finish using the KVM switch, remember to set the CONSOLE On state to OFF to conform your password change . The maximum password is 8 digits, "00000000". After you reset the KVM switch, or there is OFF state), a password must retype the new password to access all connected PC systems. The default password is eight digits. The Enter Password window appears when you select "CONSOLE OFF" (factory default is a power failure, the CON...
Manual
Page 21
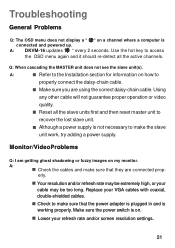
... the lost slave unit. ! A: DKVM-16 updates " " every 2 seconds. A: ! Using any other cable will not guarantee proper operation or video quality. ! Reset all the active channels. A: ! Check the cables and make the slave unit work, try adding a power supply. Your resolution and/or refresh rate may be extremely high, or your refresh rate and/or screen resolution settings. 21 Although a power supply is on. ! Use the hot key to access the...
... the lost slave unit. ! A: DKVM-16 updates " " every 2 seconds. A: ! Using any other cable will not guarantee proper operation or video quality. ! Reset all the active channels. A: ! Check the cables and make the slave unit work, try adding a power supply. Your resolution and/or refresh rate may be extremely high, or your refresh rate and/or screen resolution settings. 21 Although a power supply is on. ! Use the hot key to access the...

Manual
Page 22
.... Check the cables and make sure that they are connected prop- Make sure the power switch is on . A: ! Check to make sure that the keyboard driver is for 101,102, or 104-key keyboards, and not old XT keyboards. ! Make sure that the PS/2 mouse port (or IRQ) is enabled. ! Check the cables and make sure that they are connected prop- erly to a DKVM-16...
.... Check the cables and make sure that they are connected prop- Make sure the power switch is on . A: ! Check to make sure that the keyboard driver is for 101,102, or 104-key keyboards, and not old XT keyboards. ! Make sure that the PS/2 mouse port (or IRQ) is enabled. ! Check the cables and make sure that they are connected prop- erly to a DKVM-16...

Manual
Page 23
.../2 mouse. A combo mouse will work just as long as it is set for the PS/2 mode with Computers Using Serial Mouse Output Note: The DKVM-16 has integrated mouse conversion technology. What do I switch from one port to serial mouse signals. Make sure that the power adapter is plugged in and is on this . Troubleshooting (Continued) Q: The computer boots up correctly, but the mouse...
.../2 mouse. A combo mouse will work just as long as it is set for the PS/2 mode with Computers Using Serial Mouse Output Note: The DKVM-16 has integrated mouse conversion technology. What do I switch from one port to serial mouse signals. Make sure that the power adapter is plugged in and is on this . Troubleshooting (Continued) Q: The computer boots up correctly, but the mouse...

Manual
Page 24
... or remove the power adapter from the power adapter and the PC's PS/2 port. A: ! Although the PCs connected to the DKVM-16 are unable to daisychain more banks. 24 A: The DKVM-16 draws power from the switch. Troubleshooting (Continued) Q: The wheel on the mouse does not work on laptops) are able to support enough power to the switch, the DKVM-16 requires a power adapter to supply enough power for the switch, but the switch still works. The DKVM-16...
... or remove the power adapter from the power adapter and the PC's PS/2 port. A: ! Although the PCs connected to the DKVM-16 are unable to daisychain more banks. 24 A: The DKVM-16 draws power from the switch. Troubleshooting (Continued) Q: The wheel on the mouse does not work on laptops) are able to support enough power to the switch, the DKVM-16 requires a power adapter to supply enough power for the switch, but the switch still works. The DKVM-16...

Manual
Page 25
Access Pcs Manual Selection Hot Key Switching Configuration Keyboard State Keyboard Mouse Resolution Bandwidth Enclosure Storage (Celsius) Dimensions Weight (lbs) Power Supply : 16 : 3 : 6-pin Mini-DIN Female : 6-pin Mini-DIN Female : 15-pin HD DB type Female : Two 6-pin Mini-DIN + One 15-pin HDDB : 1 : Yes : Yes : 8 : 128 : Push Button : Yes : Buzzer : Saved and Restored : PS/2 : PS/2 : 1920 x 1440 : 200Mhz : Metal : -20~60...
Access Pcs Manual Selection Hot Key Switching Configuration Keyboard State Keyboard Mouse Resolution Bandwidth Enclosure Storage (Celsius) Dimensions Weight (lbs) Power Supply : 16 : 3 : 6-pin Mini-DIN Female : 6-pin Mini-DIN Female : 15-pin HD DB type Female : Two 6-pin Mini-DIN + One 15-pin HDDB : 1 : Yes : Yes : 8 : 128 : Push Button : Yes : Buzzer : Saved and Restored : PS/2 : PS/2 : 1920 x 1440 : 200Mhz : Metal : -20~60...
Manual
Page 27
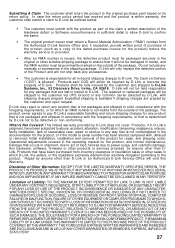
... be shipped to D-Link. D-Link will only replace the defective portion of the package. Any hardware, software, firmware or other products or services provided by the customer and upon request. Submitting A Claim: The customer shall return the product to D-Link. D-Link will not be held responsible for any product that are lost in the operating manual for which D-Link, the sellers, or...
... be shipped to D-Link. D-Link will only replace the defective portion of the package. Any hardware, software, firmware or other products or services provided by the customer and upon request. Submitting A Claim: The customer shall return the product to D-Link. D-Link will not be held responsible for any product that are lost in the operating manual for which D-Link, the sellers, or...


