
DGS-1100 Series Datasheet
Page 1
... port when a loop is detected • Cable Diagnostics Management Features • Web-based GUI • SmartConsole Utility Overview D-Link's DGS-1100 Series is the newest addition to optimize performance for quieter operation and provides a longer product life. They are also suitable for ... Efficient Ethernet, these switches consume less power during idle periods. DGS-1100-08/16/24 EasySmart Switch Series Features Energy Efficient Ethernet • IEEE 802.3az compliant D-Link Green Technology • Power Saving by Link Status • Power Saving by Cable Length • Provides ...
... port when a loop is detected • Cable Diagnostics Management Features • Web-based GUI • SmartConsole Utility Overview D-Link's DGS-1100 Series is the newest addition to optimize performance for quieter operation and provides a longer product life. They are also suitable for ... Efficient Ethernet, these switches consume less power during idle periods. DGS-1100-08/16/24 EasySmart Switch Series Features Energy Efficient Ethernet • IEEE 802.3az compliant D-Link Green Technology • Power Saving by Link Status • Power Saving by Cable Length • Provides ...

DGS-1100 Series Datasheet
Page 2
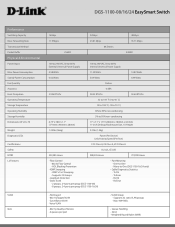
...administrators to quickly examine the quality of the copper cables and also determine the type of cable error. Technical Specification DGS-1100-08 DGS-1100-16 DGS-1100-24 General Port Standard & Functions Number of Ports 8 IEEE 802.3 compliant IEEE 802.3u compliant IEEE 802.... configuration and basic setup of the Smart Switches quick and easy. The DGS-1100 Series also features D-Link Green Technology that enables administrators to 20 meters. DGS-1100-08/16/24 EasySmart Switch D-Link Green/Power Saving Performance Compliant with IEEE802.3az Energy Efficient Ethernet, these switches...
...administrators to quickly examine the quality of the copper cables and also determine the type of cable error. Technical Specification DGS-1100-08 DGS-1100-16 DGS-1100-24 General Port Standard & Functions Number of Ports 8 IEEE 802.3 compliant IEEE 802.3u compliant IEEE 802.... configuration and basic setup of the Smart Switches quick and easy. The DGS-1100 Series also features D-Link Green Technology that enables administrators to 20 meters. DGS-1100-08/16/24 EasySmart Switch D-Link Green/Power Saving Performance Compliant with IEEE802.3az Energy Efficient Ethernet, these switches...
DGS-1100 Series Datasheet
Page 3
...˚F (-10 to 70 ˚C) 10% to 95% non-condensing 5% to -One - Supports 32 Groups • Loopback Detection • Static Trunk - 2 groups, 2-4 ports per group (DGS-1100-08) - 8 groups, 2-4 ports per port • VLAN Group - Tx Ok - Strict - One-to 95% non-condensing 6.73" x 3.86" x 1.1" (171mm x 98 mm x 28mm...Power (Per Device) Link/Activity/Speed (Per Port) FCC Class A, CE Class A, VCCI Class A UL/cUL, CE LVD 503,585 Hours 988,205 Hours 774,990 Hours • Flow Control - 802.3x Flow Control - Weighted Round Robin (WRR) Tx Error - DGS-1100-08/16/24 EasySmart ...
...˚F (-10 to 70 ˚C) 10% to 95% non-condensing 5% to -One - Supports 32 Groups • Loopback Detection • Static Trunk - 2 groups, 2-4 ports per group (DGS-1100-08) - 8 groups, 2-4 ports per port • VLAN Group - Tx Ok - Strict - One-to 95% non-condensing 6.73" x 3.86" x 1.1" (171mm x 98 mm x 28mm...Power (Per Device) Link/Activity/Speed (Per Port) FCC Class A, CE Class A, VCCI Class A UL/cUL, CE LVD 503,585 Hours 988,205 Hours 774,990 Hours • Flow Control - 802.3x Flow Control - Weighted Round Robin (WRR) Tx Error - DGS-1100-08/16/24 EasySmart ...

DGS-1100 Series Datasheet
Page 4
... | 800.326.1688 | dlink.com Canada | 2525 Meadowvale Blvd | Mississauga, ON L5N 5S2 | 800.361.5265 | dlink.ca ©2012 D-Link Corporation/D-Link Systems, Inc. DGS-1100-8/16/24 EasySmart Switch Security Management D-Link Green RFC Standard List Warranty Warranty Ordering Information Product DGS-1100-08 DGS-1100-16 DGS-1100-24 QR CODES Scan Codes for more details. Max. 32 entries...
... | 800.326.1688 | dlink.com Canada | 2525 Meadowvale Blvd | Mississauga, ON L5N 5S2 | 800.361.5265 | dlink.ca ©2012 D-Link Corporation/D-Link Systems, Inc. DGS-1100-8/16/24 EasySmart Switch Security Management D-Link Green RFC Standard List Warranty Warranty Ordering Information Product DGS-1100-08 DGS-1100-16 DGS-1100-24 QR CODES Scan Codes for more details. Max. 32 entries...

Manual
Page 2
... > Tool Menu ...19 i D-Link EasySmart Switch User Manual Table of Contents Table of Contents ...i About This Guide ...1 Terms/Usage...1 Copyright and Trademarks ...1 1 Product Introduction ...2 DGS-1100-08 ...2 Front Panel ...2 Rear Panel...2 DGS-1100-16 ...3 Front Panel ...3 Rear Panel...3 DGS-1100-24 ...3 Front Panel ...3 Rear Panel...4 2 Hardware Installation ...5 Step 1: Unpacking...5 Packing contents of DGS-1100-08...5 Packing contents of DGS-1100-16/24...5 Step...
... > Tool Menu ...19 i D-Link EasySmart Switch User Manual Table of Contents Table of Contents ...i About This Guide ...1 Terms/Usage...1 Copyright and Trademarks ...1 1 Product Introduction ...2 DGS-1100-08 ...2 Front Panel ...2 Rear Panel...2 DGS-1100-16 ...3 Front Panel ...3 Rear Panel...3 DGS-1100-24 ...3 Front Panel ...3 Rear Panel...4 2 Hardware Installation ...5 Step 1: Unpacking...5 Packing contents of DGS-1100-08...5 Packing contents of DGS-1100-16/24...5 Step...

Manual
Page 3
... Emission (EMI) Certifications ...38 Safety Certifications...38 Features ...38 L2 Features ...38 VLAN ...38 QoS (Quality of Service)...38 Management...38 Power Saving ...38 Appendix C - D-Link EasySmart Switch User Manual Reboot Device ...19 Reset System ...19 Firmware Backup & Upgrade ...19 Configuration Backup & Restore ...20 Function Tree ...21 Device Information...21 System...
... Emission (EMI) Certifications ...38 Safety Certifications...38 Features ...38 L2 Features ...38 VLAN ...38 QoS (Quality of Service)...38 Management...38 Power Saving ...38 Appendix C - D-Link EasySmart Switch User Manual Reboot Device ...19 Reset System ...19 Firmware Backup & Upgrade ...19 Configuration Backup & Restore ...20 Function Tree ...21 Device Information...21 System...

Manual
Page 4
... management system. 4. Trademarks used in any proprietary interest in this text: D-Link and the D-LINK logo are registered trademarks of the device. D-Link EasySmart Switch User Manual About This Guide This guide provides instructions to install the D-Link Gigabit Ethernet EasySmart Switch DGS-1100-08/16/24, how to use of Microsoft Corporation. A CAUTION indicates potential property...
... management system. 4. Trademarks used in any proprietary interest in this text: D-Link and the D-LINK logo are registered trademarks of the device. D-Link EasySmart Switch User Manual About This Guide This guide provides instructions to install the D-Link Gigabit Ethernet EasySmart Switch DGS-1100-08/16/24, how to use of Microsoft Corporation. A CAUTION indicates potential property...

Manual
Page 5
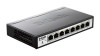
...business (SMB) networking. All models are born to legacy devices which do not support IEEE 802.3az, D-Link Green Technologies can save energy without compromising any performance. DGS-1100-08 8-Port 10/100/1000Mpbs EasySmart Switch Front Panel Figure 1 - In most of use cases and environments, switches... a power source. Amber: Indicates that the port is running at 10/100M. DGS-1100-08 Rear Panel 5V/1A AC adapter: The port is received, the switch wakes and works immediately. D-Link's next generation EasySmart Ethernet switch series blends plug-and-play simplicity with easy-to...
...business (SMB) networking. All models are born to legacy devices which do not support IEEE 802.3az, D-Link Green Technologies can save energy without compromising any performance. DGS-1100-08 8-Port 10/100/1000Mpbs EasySmart Switch Front Panel Figure 1 - In most of use cases and environments, switches... a power source. Amber: Indicates that the port is running at 10/100M. DGS-1100-08 Rear Panel 5V/1A AC adapter: The port is received, the switch wakes and works immediately. D-Link's next generation EasySmart Ethernet switch series blends plug-and-play simplicity with easy-to...

Manual
Page 6
...seconds the Switch will change back to a power source. Light off: No link. Blinking: Indicates that the Switch is running at 1000M. Green: Indicates that the port is connected to connect the AC power cord. DGS-1100-24 Front Panel Power LED: The Power LED lights up when the Switch ...: The power port is connected to the default configuration and all changes will be lost. DGS-1100-16 16-Port 10/100/1000Mpbs EasySmart Switch Front Panel D-Link EasySmart Switch User Manual Figure 3 - DGS-1100-16 Front Panel Power LED: The Power LED lights up when the Switch is running at...
...seconds the Switch will change back to a power source. Light off: No link. Blinking: Indicates that the Switch is running at 1000M. Green: Indicates that the port is connected to connect the AC power cord. DGS-1100-24 Front Panel Power LED: The Power LED lights up when the Switch ...: The power port is connected to the default configuration and all changes will be lost. DGS-1100-16 16-Port 10/100/1000Mpbs EasySmart Switch Front Panel D-Link EasySmart Switch User Manual Figure 3 - DGS-1100-16 Front Panel Power LED: The Power LED lights up when the Switch is running at...

Manual
Page 7
Rear Panel Figure 6- DGS-1100-24 Rear Panel Power: Connect the supplied AC power cable to the default settings. All previous changes will be lost. Reset: Press the reset button for 5 seconds to reset the Switch back to this port. 4 Green: Indicates that the port is either sending or receiving data to the port. Light off: No link. D-Link EasySmart Switch User Manual Blinking: Indicates that the Switch is running at 1000M. Amber: Indicates that the port is running at 10/100M.
Rear Panel Figure 6- DGS-1100-24 Rear Panel Power: Connect the supplied AC power cable to the default settings. All previous changes will be lost. Reset: Press the reset button for 5 seconds to reset the Switch back to this port. 4 Green: Indicates that the port is either sending or receiving data to the port. Light off: No link. D-Link EasySmart Switch User Manual Blinking: Indicates that the Switch is running at 1000M. Amber: Indicates that the port is running at 10/100M.

Manual
Page 8
... One Multi-lingual Getting Started Guide One CD with the device must be attached on the bottom at each corner of DGS-1100-08 One D-Link EasySmart Switch One AC Power Adapter Four rubber feet One accessory kit for replacement. Allow enough ventilation space between the device...the packing list located in the User Manual to the bottom 5 Desktop or Shelf Installation When installing the switch on the switch. D-Link EasySmart Switch User Manual 2 Hardware Installation This chapter provides unpacking and installation information for replacement. Step 2: Switch Installation For safe switch...
... One Multi-lingual Getting Started Guide One CD with the device must be attached on the bottom at each corner of DGS-1100-08 One D-Link EasySmart Switch One AC Power Adapter Four rubber feet One accessory kit for replacement. Allow enough ventilation space between the device...the packing list located in the User Manual to the bottom 5 Desktop or Shelf Installation When installing the switch on the switch. D-Link EasySmart Switch User Manual 2 Hardware Installation This chapter provides unpacking and installation information for replacement. Step 2: Switch Installation For safe switch...

Manual
Page 9
... the screws provided with the equipment rack to the Switch Then, use of the equipment is not achieved due to the branch circuit (e.g. D) Circuit Overloading - D-Link EasySmart Switch User Manual Rack Installation The switch can be mounted in an EIA standard size 11-inch rack, which can be placed in a wiring...
... the screws provided with the equipment rack to the Switch Then, use of the equipment is not achieved due to the branch circuit (e.g. D) Circuit Overloading - D-Link EasySmart Switch User Manual Rack Installation The switch can be mounted in an EIA standard size 11-inch rack, which can be placed in a wiring...

Manual
Page 10
... As a precaution, the switch should be mounted on a wall. Hook the mounting holes of the switch for this purpose. Figure 10 -Wall mount installation Step 3 - D-Link EasySmart Switch User Manual Wall-mount The Switch can be unplugged in the AC Power Cord Users may now connect the AC power cord into...
... As a precaution, the switch should be mounted on a wall. Hook the mounting holes of the switch for this purpose. Figure 10 -Wall mount installation Step 3 - D-Link EasySmart Switch User Manual Wall-mount The Switch can be unplugged in the AC Power Cord Users may now connect the AC power cord into...

Manual
Page 11
... the ground connector on the power supply and system, a 12 to local and national installation requirements. Figure 12 -Ground cable, screw and #8 terminal lug ring 8 D-Link EasySmart Switch User Manual Grounding the Switch This section describes how to connect the EasySmart Switch to the switch. Step 3: Insert the ground screw into...
... the ground connector on the power supply and system, a 12 to local and national installation requirements. Figure 12 -Ground cable, screw and #8 terminal lug ring 8 D-Link EasySmart Switch User Manual Grounding the Switch This section describes how to connect the EasySmart Switch to the switch. Step 3: Insert the ground screw into...

Manual
Page 12
... choice. A standard Ethernet cable Connect the Ethernet cable to any of the ports on the front panel of your device: 1. D-Link EasySmart Switch User Manual 3 Getting Started This chapter introduces the management interface of your PC and it is easier to initialize multiple EasySmart... Switches. Each switch can be in the same range as the switch. Please refer to begin the web configuration of D-Link EasySmart Switch. However, if you do not need the following equipment to the following installation instructions for communication with a RJ-45 Ethernet...
... choice. A standard Ethernet cable Connect the Ethernet cable to any of the ports on the front panel of your device: 1. D-Link EasySmart Switch User Manual 3 Getting Started This chapter introduces the management interface of your PC and it is easier to initialize multiple EasySmart... Switches. Each switch can be in the same range as the switch. Please refer to begin the web configuration of D-Link EasySmart Switch. However, if you do not need the following equipment to the following installation instructions for communication with a RJ-45 Ethernet...

Manual
Page 13
...This will automatically load the web configuration in the installation CD is a program for the installation of the SmartConsole Utility; Figure 15 - D-Link EasySmart Switch User Manual Figure 13 -Connected Ethernet cable Login Web-based Management In order to login and configure the switch via an Ethernet connection...PC should have an IP address in the same subnet as it appears in the address bar. There are two options for discovering D-Link Smart Switches and EasySmart Switches within the same L2 network segment connected to launch the Web-based Management, you may either click the ...
...This will automatically load the web configuration in the installation CD is a program for the installation of the SmartConsole Utility; Figure 15 - D-Link EasySmart Switch User Manual Figure 13 -Connected Ethernet cable Login Web-based Management In order to login and configure the switch via an Ethernet connection...PC should have an IP address in the same subnet as it appears in the address bar. There are two options for discovering D-Link Smart Switches and EasySmart Switches within the same L2 network segment connected to launch the Web-based Management, you may either click the ...

Manual
Page 14
...2: Follow these steps to open the SmartConsole Utility. 6. Double click on you CD-Rom/DVD-Rom Drive to Start > Programs > D-Link SmartConsole Utility and open the folder. Select SmartConsole Utility and double click on the installation CD. 1. Upon completion, go to start the ...your PC before installing the latest SmartConsole Utility. The autorun program will guide you can open the utility by clicking Start > Programs > D-Link SmartConsole Utility. 5. Option 1: Follow these steps to install the utility. 5. Follow the on the Windows desktop, click Computer. 3. From...
...2: Follow these steps to open the SmartConsole Utility. 6. Double click on you CD-Rom/DVD-Rom Drive to Start > Programs > D-Link SmartConsole Utility and open the folder. Select SmartConsole Utility and double click on the installation CD. 1. Upon completion, go to start the ...your PC before installing the latest SmartConsole Utility. The autorun program will guide you can open the utility by clicking Start > Programs > D-Link SmartConsole Utility. 5. Option 1: Follow these steps to install the utility. 5. Follow the on the Windows desktop, click Computer. 3. From...

Manual
Page 15
... secs, 30 secs, 1mins, 2mins, and 5 mins for selecting the monitoring time intervals. SmartConsole Utility Settings 12 D-Link EasySmart Switch User Manual 4 SmartConsole Utility The D-Link SmartConsole Utility allows the administrator to quickly discover all D-Link Smart Switches and EasySmart Switches which were selected as the main body, and SmartConsole Settings at the...
... secs, 30 secs, 1mins, 2mins, and 5 mins for selecting the monitoring time intervals. SmartConsole Utility Settings 12 D-Link EasySmart Switch User Manual 4 SmartConsole Utility The D-Link SmartConsole Utility allows the administrator to quickly discover all D-Link Smart Switches and EasySmart Switches which were selected as the main body, and SmartConsole Settings at the...

Manual
Page 16
... content of the SmartConsole Utility and the device. Click OK to exit Figure 19 - Click View Trap to show the events of this trap message. D-Link EasySmart Switch User Manual NOTE: If the Group Interval is set to 0, IGMP Snooping must be disabled in the SmartConsole Settings will not be discovered...
... content of the SmartConsole Utility and the device. Click OK to exit Figure 19 - Click View Trap to show the events of this trap message. D-Link EasySmart Switch User Manual NOTE: If the Group Interval is set to 0, IGMP Snooping must be disabled in the SmartConsole Settings will not be discovered...

Manual
Page 17
... Save As: Records the setting of the Switch. 14 Help Click this icon to launch the Device Settings window. Here you will see below options: D-Link EasySmart Switch User Manual Figure 20- File By clicking on this icon to launch the SmartConsole Info window.
... Save As: Records the setting of the Switch. 14 Help Click this icon to launch the Device Settings window. Here you will see below options: D-Link EasySmart Switch User Manual Figure 20- File By clicking on this icon to launch the SmartConsole Info window.


