
Product Manual
Page 2
Copyright © 2011 by D-Link Systems, Inc. D-Link DCS-7110 User Manual 2 Revision 1.0 Manual Revisions Date March 7, 2011 Description DCS-7110 Revision A1 with firmware version 1.00 Trademarks D-Link and the D-Link logo are trademarks or registered trademarks of their respective companies. All rights reserved. This publication may not be reproduced, in whole or in the United ...
Copyright © 2011 by D-Link Systems, Inc. D-Link DCS-7110 User Manual 2 Revision 1.0 Manual Revisions Date March 7, 2011 Description DCS-7110 Revision A1 with firmware version 1.00 Trademarks D-Link and the D-Link logo are trademarks or registered trademarks of their respective companies. All rights reserved. This publication may not be reproduced, in whole or in the United ...
Product Manual
Page 3
Preface Table of Contents Preface 2 Manual Revisions 2 Trademarks 2 Product Overview 5 Package Contents 5 System Requirements 5 Introduction 6 Features 7 Hardware Overview 8 Front Panel 8 Cable Connectors 9 Installation 10 Hardware Installation 10 Ceiling Mount 10 Wall ... 48 Tamper Detection 49 DI and DO 50 Event Settings 51 Recording 57 Recording Settings 57 PTZ Control 59 Digital PTZ 59 Mechanical PTZ 60 D-Link DCS-7110 User Manual 3
Preface Table of Contents Preface 2 Manual Revisions 2 Trademarks 2 Product Overview 5 Package Contents 5 System Requirements 5 Introduction 6 Features 7 Hardware Overview 8 Front Panel 8 Cable Connectors 9 Installation 10 Hardware Installation 10 Ceiling Mount 10 Wall ... 48 Tamper Detection 49 DI and DO 50 Event Settings 51 Recording 57 Recording Settings 57 PTZ Control 59 Digital PTZ 59 Mechanical PTZ 60 D-Link DCS-7110 User Manual 3
Product Manual
Page 5
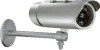
Product Overview Product Overview Package Contents ƒƒ DCS-7110 HD IR Outdoor Camera ƒƒ Mounting Bracket ƒƒ Power Adapter ƒƒ CAT5 Ethernet Cable ƒƒ User Manual and Software on CD-ROM ƒƒ Quick Install Guide Note: Using a power supply...cause damage and void the warranty for multiple camera viewing and recording in IP surveillance program) ƒƒ An available Ethernet connection D-Link DCS-7110 User Manual 5 If any of RAM (512MB recommended) ƒƒ Web Browser: Internet Explorer 6.x or higher ƒƒ VGA card ...
Product Overview Product Overview Package Contents ƒƒ DCS-7110 HD IR Outdoor Camera ƒƒ Mounting Bracket ƒƒ Power Adapter ƒƒ CAT5 Ethernet Cable ƒƒ User Manual and Software on CD-ROM ƒƒ Quick Install Guide Note: Using a power supply...cause damage and void the warranty for multiple camera viewing and recording in IP surveillance program) ƒƒ An available Ethernet connection D-Link DCS-7110 User Manual 5 If any of RAM (512MB recommended) ƒƒ Web Browser: Internet Explorer 6.x or higher ƒƒ VGA card ...
Product Manual
Page 6
...audio or video equipment for any liability whatsoever for recording the image or voice of his or her state. D-Link DCS-7110 User Manual 6 The ICR filter can be manually applied via the web, or set to capture crisp color images during the daytime and detailed grayscale images at night...cut removable (ICR) filter. This camera is suitable for the end-user's intended use of capturing video in both dark and light environments thanks to provide high-quality live video over the Internet. Product Overview Introduction D-Link DCS-7110 is prohibited in certain states or jurisdictions.
...audio or video equipment for any liability whatsoever for recording the image or voice of his or her state. D-Link DCS-7110 User Manual 6 The ICR filter can be manually applied via the web, or set to capture crisp color images during the daytime and detailed grayscale images at night...cut removable (ICR) filter. This camera is suitable for the end-user's intended use of capturing video in both dark and light environments thanks to provide high-quality live video over the Internet. Product Overview Introduction D-Link DCS-7110 is prohibited in certain states or jurisdictions.
Product Manual
Page 7
..., switches, and alarm relays. The DCS-7110 also incorporates Power over Ethernet (PoE), allowing it to be mounted outdoors, the DCS-7110 includes an IP66 certified enclosure which dramatically increases usability. High-Quality Video at HD Resolution The DCS-7110 provides real-time video feeds at up too much network bandwidth. D-Link DCS-7110 User Manual 7 It also comes with a visible...
..., switches, and alarm relays. The DCS-7110 also incorporates Power over Ethernet (PoE), allowing it to be mounted outdoors, the DCS-7110 includes an IP66 certified enclosure which dramatically increases usability. High-Quality Video at HD Resolution The DCS-7110 provides real-time video feeds at up too much network bandwidth. D-Link DCS-7110 User Manual 7 It also comes with a visible...

Product Manual
Page 8
Product Overview Hardware Overview Front Panel Sunshield Adjustable sunshield protects the camera sensor from direct sunlight D-Link DCS-7110 User Manual Infrared LEDs IR LEDs Illuminate the camera's field of view IR-Cut Removable (ICR) Sensor IR-Cut Removable sensor judges lighting conditions and switches from day mode to night mode accordingly 8
Product Overview Hardware Overview Front Panel Sunshield Adjustable sunshield protects the camera sensor from direct sunlight D-Link DCS-7110 User Manual Infrared LEDs IR LEDs Illuminate the camera's field of view IR-Cut Removable (ICR) Sensor IR-Cut Removable sensor judges lighting conditions and switches from day mode to night mode accordingly 8
Product Manual
Page 9
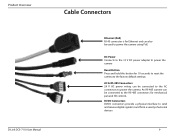
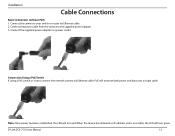
... send and receive digital signals to power the camera. Product Overview Cable Connectors D-Link DCS-7110 User Manual Ethernet (PoE) RJ-45 connector is for Ethernet and can be used to power the camera using PoE DC Power Connects to the 12 V DC power adapter to power the camera Reset Button Press and hold this button for...
... send and receive digital signals to power the camera. Product Overview Cable Connectors D-Link DCS-7110 User Manual Ethernet (PoE) RJ-45 connector is for Ethernet and can be used to power the camera using PoE DC Power Connects to the 12 V DC power adapter to power the camera Reset Button Press and hold this button for...
Product Manual
Page 10
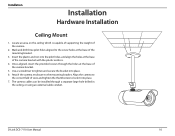
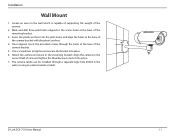
... secure the bracket into place. 7. Installation Installation Hardware Installation Ceiling Mount 1. Use a screwdriver to the correct field of the camera bracket with the plastic anchors. 4. D-Link DCS-7110 User Manual 10 Once aligned, insert the provided screws through a separate large hole drilled in the ceiling, or using an external cable conduit. The camera cables can...
... secure the bracket into place. 7. Installation Installation Hardware Installation Ceiling Mount 1. Use a screwdriver to the correct field of the camera bracket with the plastic anchors. 4. D-Link DCS-7110 User Manual 10 Once aligned, insert the provided screws through a separate large hole drilled in the ceiling, or using an external cable conduit. The camera cables can...
Product Manual
Page 11
Use a screwdriver to the mounting bracket. D-Link DCS-7110 User Manual 11 Insert the plastic anchors into the pilot holes, and align the holes at the base of the camera bracket. 5. Attach the camera enclosure to ...
Use a screwdriver to the mounting bracket. D-Link DCS-7110 User Manual 11 Insert the plastic anchors into the pilot holes, and align the holes at the base of the camera bracket. 5. Attach the camera enclosure to ...
Product Manual
Page 12
D-Link DCS-7110 User Manual 12 Note: Once power has been established, the LED will turn green. When the device has obtained an IP address and is accessible, the LED ...
D-Link DCS-7110 User Manual 12 Note: Once power has been established, the LED will turn green. When the device has obtained an IP address and is accessible, the LED ...

Product Manual
Page 13
After clicking Setup Wizard, the window on your CD-ROM drive. Click Setup Wizard to begin the installation. If the Autorun function on the right will open. Type D:\autorun.exe, where D: represents the drive letter of your computer is disabled, or if the D-Link Launcher fails to start automatically, click Start > Run. D-Link DCS-7110 User Manual 13 Click Next to continue. Installation Software Installation Setup Wizard Insert the DCS-7110 CD into your computer's CD-ROM drive to begin the installation.
After clicking Setup Wizard, the window on your CD-ROM drive. Click Setup Wizard to begin the installation. If the Autorun function on the right will open. Type D:\autorun.exe, where D: represents the drive letter of your computer is disabled, or if the D-Link Launcher fails to start automatically, click Start > Run. D-Link DCS-7110 User Manual 13 Click Next to continue. Installation Software Installation Setup Wizard Insert the DCS-7110 CD into your computer's CD-ROM drive to begin the installation.

Product Manual
Page 14
Note: The installation may take several minutes to accept the License Agreement. D-Link DCS-7110 User Manual 14 Installation Click Yes to finish. To start the installation process, click Next.
Note: The installation may take several minutes to accept the License Agreement. D-Link DCS-7110 User Manual 14 Installation Click Yes to finish. To start the installation process, click Next.

Product Manual
Page 15
Click on the D-Link Setup Wizard SE icon that was created in your Windows Start menu. Installation Click Finish to complete the installation. Start > D-Link > Setup Wizard SE D-Link DCS-7110 User Manual 15
Click on the D-Link Setup Wizard SE icon that was created in your Windows Start menu. Installation Click Finish to complete the installation. Start > D-Link > Setup Wizard SE D-Link DCS-7110 User Manual 15
Product Manual
Page 16
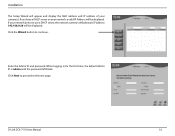
Enter the Admin ID and password. When logging in for the first time, the default Admin ID is admin with the password left blank. Installation The Setup Wizard will be displayed. D-Link DCS-7110 User Manual 16 Click the Wizard button to the next page. If you have a DHCP server on your network, a valid IP Address will appear and display the MAC address and IP address of your network does not use a DHCP server, the network camera's default static IP address 192.168.0.20 will be displayed. If your camera(s). Click Next to proceed to continue.
Enter the Admin ID and password. When logging in for the first time, the default Admin ID is admin with the password left blank. Installation The Setup Wizard will be displayed. D-Link DCS-7110 User Manual 16 Click the Wizard button to the next page. If you have a DHCP server on your network, a valid IP Address will appear and display the MAC address and IP address of your network does not use a DHCP server, the network camera's default static IP address 192.168.0.20 will be displayed. If your camera(s). Click Next to proceed to continue.

Product Manual
Page 17
Select static IP if the camera will use the same IP address each time it boots up. Installation Select DHCP if your settings and click Restart. Click Next to proceed to confirm your camera obtains an IP address automatically when it is started. D-Link DCS-7110 User Manual 17 Take a moment to the next page.
Select static IP if the camera will use the same IP address each time it boots up. Installation Select DHCP if your settings and click Restart. Click Next to proceed to confirm your camera obtains an IP address automatically when it is started. D-Link DCS-7110 User Manual 17 Take a moment to the next page.

Product Manual
Page 18
... Setup D-ViewCam software is included for the administrator to the documentation on the DCS-7110 CD-ROM to install this device pack. D-Link DCS-7110 User Manual 18 For more information about D-ViewCam, please refer to manage multiple D-Link IP cameras remotely. Device Pack Installation Users who already have D-ViewCam v3.10 or higher installed must first install the...
... Setup D-ViewCam software is included for the administrator to the documentation on the DCS-7110 CD-ROM to install this device pack. D-Link DCS-7110 User Manual 18 For more information about D-ViewCam, please refer to manage multiple D-Link IP cameras remotely. Device Pack Installation Users who already have D-ViewCam v3.10 or higher installed must first install the...

Product Manual
Page 19
Your address may differ. Note: For example, the address is 192.168.1.179. D-Link DCS-7110 User Manual 19 Enter Admin for your new D-Link Network Camera using the Web-based Configuration Utility. Click OK to configure your Network Camera (http://192.168.1.179). Configuration Configuration Web-based Configuration Utility This section will show you how to continue. To access the configuration utility, open a web-browser such as Internet Explorer and enter the IP address for the username and then leave the password blank by default.
Your address may differ. Note: For example, the address is 192.168.1.179. D-Link DCS-7110 User Manual 19 Enter Admin for your new D-Link Network Camera using the Web-based Configuration Utility. Click OK to configure your Network Camera (http://192.168.1.179). Configuration Configuration Web-based Configuration Utility This section will show you how to continue. To access the configuration utility, open a web-browser such as Internet Explorer and enter the IP address for the username and then leave the password blank by default.
Product Manual
Page 20
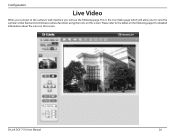
D-Link DCS-7110 User Manual 20 Please refer to the camera's web interface you will allow you connect to the tables on the following page. Configuration Live Video When you to view the camera's video feed and control basic camera functions using the icons on this screen. This is the Live Video page which will see the following pages for detailed information about the icons on the screen.
D-Link DCS-7110 User Manual 20 Please refer to the camera's web interface you will allow you connect to the tables on the following page. Configuration Live Video When you to view the camera's video feed and control basic camera functions using the icons on this screen. This is the Live Video page which will see the following pages for detailed information about the icons on the screen.

Product Manual
Page 21
... page 28. Select this option to fit your needs. For more information about e-PTZ operation, please refer to visit the D-Link website. The logos and website can access the setup page. Securicam Logo Client Settings Language Setup Digital Output Video Stream Global View...be customized to adjust the language settings. Click on this item to control the e-PTZ function (Electronic Pan/Tilt/Zoom). D-Link DCS-7110 User Manual 21 Configuration D-Link Logo Click this logo to PTZ Control on the local computer. The Global View window contains a full view image (the ...
... page 28. Select this option to fit your needs. For more information about e-PTZ operation, please refer to visit the D-Link website. The logos and website can access the setup page. Securicam Logo Client Settings Language Setup Digital Output Video Stream Global View...be customized to adjust the language settings. Click on this item to control the e-PTZ function (Electronic Pan/Tilt/Zoom). D-Link DCS-7110 User Manual 21 Configuration D-Link Logo Click this logo to PTZ Control on the local computer. The Global View window contains a full view image (the ...

Product Manual
Page 22
.../Zoom speed Pan Speed Control Tilt Speed Control Zoom Speed Control *See Mechanical PTZ on page 61 for detailed information. It allows users to quickly move the camera to magnify or shrink the digital image. Direction: Control the camera's pan or tilt directions (up ... This camera supports both "digital" (e-PTZ) and "mechanical" pan/tilt/ zoom control. Digital PTZ Control Panel Mechanical PTZ Control Panel* D-Link DCS-7110 User Manual 22 Mechanical PTZ: Connect the camera to PTZ Control for more information about the installation of pan, tilt, zoom, and focus features Before ...
.../Zoom speed Pan Speed Control Tilt Speed Control Zoom Speed Control *See Mechanical PTZ on page 61 for detailed information. It allows users to quickly move the camera to magnify or shrink the digital image. Direction: Control the camera's pan or tilt directions (up ... This camera supports both "digital" (e-PTZ) and "mechanical" pan/tilt/ zoom control. Digital PTZ Control Panel Mechanical PTZ Control Panel* D-Link DCS-7110 User Manual 22 Mechanical PTZ: Connect the camera to PTZ Control for more information about the installation of pan, tilt, zoom, and focus features Before ...


