Product Manual
Page 3
... Panel 8 Cable Connectors 9 Installation 10 Hardware Installation 10 Ceiling Mount 10 Wall Mount 11 Cable Connections 12 Software Installation 13 Setup Wizard 13 Configuration 19 Web-based Configuration Utility 19 Live Video 20 Client Setup 24 Setup 25 Basic Setup 25 Advanced Setup 26 System Overview 27 Video 28 Video Settings 28 Image Settings 31 Day and Night Settings 33 Network 34 IP Settings 34 Port and Access Name Settings 37 Dynamic DNS 39 HTTPS 40 Access List 42 Advanced Settings 44 Event Management 48...
... Panel 8 Cable Connectors 9 Installation 10 Hardware Installation 10 Ceiling Mount 10 Wall Mount 11 Cable Connections 12 Software Installation 13 Setup Wizard 13 Configuration 19 Web-based Configuration Utility 19 Live Video 20 Client Setup 24 Setup 25 Basic Setup 25 Advanced Setup 26 System Overview 27 Video 28 Video Settings 28 Image Settings 31 Day and Night Settings 33 Network 34 IP Settings 34 Port and Access Name Settings 37 Dynamic DNS 39 HTTPS 40 Access List 42 Advanced Settings 44 Event Management 48...
Product Manual
Page 5
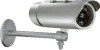
... above items are missing, please contact your reseller. Product Overview Product Overview Package Contents ƒƒ DCS-7110 HD IR Outdoor Camera ƒƒ Mounting Bracket ƒƒ Power Adapter ƒƒ CAT5 Ethernet Cable ƒƒ User Manual and Software on CD-ROM ƒƒ Quick Install Guide Note: Using a power supply with a different voltage than the one included with 512MB memory and a 32MB video card is required for this...
... above items are missing, please contact your reseller. Product Overview Product Overview Package Contents ƒƒ DCS-7110 HD IR Outdoor Camera ƒƒ Mounting Bracket ƒƒ Power Adapter ƒƒ CAT5 Ethernet Cable ƒƒ User Manual and Software on CD-ROM ƒƒ Quick Install Guide Note: Using a power supply with a different voltage than the one included with 512MB memory and a 32MB video card is required for this...
Product Manual
Page 7
... an RS-485 interface, providing connectivity to check the camera's video feed while on the go without the need . This extends monitoring capability, allowing users to an optional pan/tilt scanner. D-Link DCS-7110 User Manual 7 Likewise, intuitive graphic icons reduce the amount text and clutter within the browser window. Anti-tamper features make this camera suitable for supplemental power cabling. This freshly-designed web interface features a clean, compact...
... an RS-485 interface, providing connectivity to check the camera's video feed while on the go without the need . This extends monitoring capability, allowing users to an optional pan/tilt scanner. D-Link DCS-7110 User Manual 7 Likewise, intuitive graphic icons reduce the amount text and clutter within the browser window. Anti-tamper features make this camera suitable for supplemental power cabling. This freshly-designed web interface features a clean, compact...
Product Manual
Page 9
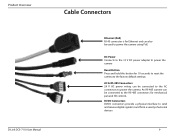
... 10 seconds to reset the camera to the factory default settings AC & RS-485 Connectors 24 V AC power wiring can be connected to the AC connectors to power the camera. Product Overview Cable Connectors D-Link DCS-7110 User Manual Ethernet (PoE) RJ-45 connector is for Ethernet and can also be used to power the camera using PoE DC Power Connects to the 12 V DC power adapter to power the camera Reset Button Press and hold this button for mechanical pan and tilt controls.
... 10 seconds to reset the camera to the factory default settings AC & RS-485 Connectors 24 V AC power wiring can be connected to the AC connectors to power the camera. Product Overview Cable Connectors D-Link DCS-7110 User Manual Ethernet (PoE) RJ-45 connector is for Ethernet and can also be used to power the camera using PoE DC Power Connects to the 12 V DC power adapter to power the camera Reset Button Press and hold this button for mechanical pan and tilt controls.
Product Manual
Page 12
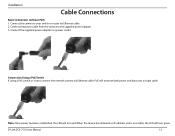
... power outlet. Connection Using a PoE Switch If using a PoE switch or router, connect the network camera via Ethernet cable. 2. D-Link DCS-7110 User Manual 12 Installation Cable Connections Basic Connection (without PoE) 1. When the device has obtained an IP address and is accessible, the LED will turn red. Connect the supplied power adapter to your switch or router via Ethernet cable. PoE will turn green. Note: Once power has been established, the LED will transmit both power and data over a single cable. Connect the power cable from the camera to the supplied power...
... power outlet. Connection Using a PoE Switch If using a PoE switch or router, connect the network camera via Ethernet cable. 2. D-Link DCS-7110 User Manual 12 Installation Cable Connections Basic Connection (without PoE) 1. When the device has obtained an IP address and is accessible, the LED will turn red. Connect the supplied power adapter to your switch or router via Ethernet cable. PoE will turn green. Note: Once power has been established, the LED will transmit both power and data over a single cable. Connect the power cable from the camera to the supplied power...

Product Manual
Page 18
... that the new camera is a comprehensive management tool for the administrator to manage multiple D-Link IP cameras remotely. For more information about D-ViewCam, please refer to the documentation on the DCS-7110 CD-ROM to use the software to install this device pack. Installation D-ViewCam Device Pack Setup D-ViewCam software is included for IP surveillance. D-Link DCS-7110 User Manual 18 Users running D-ViewCam v3.2 do not need to configure all the advanced settings for your cameras. Device Pack Installation Users who already...
... that the new camera is a comprehensive management tool for the administrator to manage multiple D-Link IP cameras remotely. For more information about D-ViewCam, please refer to the documentation on the DCS-7110 CD-ROM to use the software to install this device pack. Installation D-ViewCam Device Pack Setup D-ViewCam software is included for IP surveillance. D-Link DCS-7110 User Manual 18 Users running D-ViewCam v3.2 do not need to configure all the advanced settings for your cameras. Device Pack Installation Users who already...

Product Manual
Page 19
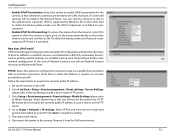
Note: For example, the address is 192.168.1.179. Click OK to configure your Network Camera (http://192.168.1.179). To access the configuration utility, open a web-browser such as Internet Explorer and enter the IP address for the username and then leave the password blank by default. Enter Admin for your new D-Link Network Camera using the Web-based Configuration Utility. Your address may differ. Configuration Configuration Web-based Configuration Utility This section will show you how to continue. D-Link DCS-7110 User Manual 19
Note: For example, the address is 192.168.1.179. Click OK to configure your Network Camera (http://192.168.1.179). To access the configuration utility, open a web-browser such as Internet Explorer and enter the IP address for the username and then leave the password blank by default. Enter Admin for your new D-Link Network Camera using the Web-based Configuration Utility. Your address may differ. Configuration Configuration Web-based Configuration Utility This section will show you how to continue. D-Link DCS-7110 User Manual 19
Product Manual
Page 35
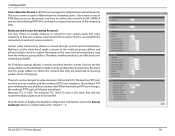
... Network Camera shortcuts at My Network Places. D-Link DCS-7110 User Manual 35 Follow the steps below to enable the setting. 5. Click Save to acquire the camera's public IP address. 1. How does UPnP work? Select System log so that you will reboot. 6. Remove it from anywhere with an Internet connection. Go to Media Settings). Set up the camera on the LAN 2. Services and capabilities offered by Windows XP or later. Select PPPoE and enter the user name and password...
... Network Camera shortcuts at My Network Places. D-Link DCS-7110 User Manual 35 Follow the steps below to enable the setting. 5. Click Save to acquire the camera's public IP address. 1. How does UPnP work? Select System log so that you will reboot. 6. Remove it from anywhere with an Internet connection. Go to Media Settings). Set up the camera on the LAN 2. Services and capabilities offered by Windows XP or later. Select PPPoE and enter the user name and password...
Product Manual
Page 37
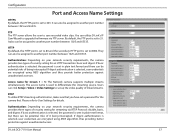
.... Access name for the camera first. If basic authentication is selected, the password is selected, user credentials are encrypted using MD5 algorithm and thus provide better protection against unauthorized access. Authentication: Depending on your network security requirements, the camera provides three types of linked streams. RTSP To utilize RTSP streaming authentication, make sure that you have set to another port number between 1025 and 65535. D-Link DCS-7110 User Manual 37 FTP The FTP server allows the user to User Settings...
.... Access name for the camera first. If basic authentication is selected, the password is selected, user credentials are encrypted using MD5 algorithm and thus provide better protection against unauthorized access. Authentication: Depending on your network security requirements, the camera provides three types of linked streams. RTSP To utilize RTSP streaming authentication, make sure that you have set to another port number between 1025 and 65535. D-Link DCS-7110 User Manual 37 FTP The FTP server allows the user to User Settings...
Product Manual
Page 38
... address. The access name is used to enable multicast or unicast for your camera audio and video streaming so that tells the router the range a packet can be forwarded. D-Link DCS-7110 User Manual 38 When the multicast RTP port changes, the multicast RTCP port will change accordingly. Multicast and Unicast Streaming Protocols You may choose to differentiate the streaming source. Unicast video transmission delivers a stream through point-to enable multicast for Stream 1 ~ 5: This camera supports multiple...
... address. The access name is used to enable multicast or unicast for your camera audio and video streaming so that tells the router the range a packet can be forwarded. D-Link DCS-7110 User Manual 38 When the multicast RTP port changes, the multicast RTCP port will change accordingly. Multicast and Unicast Streaming Protocols You may choose to differentiate the streaming source. Unicast video transmission delivers a stream through point-to enable multicast for Stream 1 ~ 5: This camera supports multiple...
Product Manual
Page 42
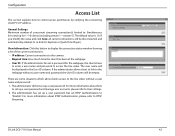
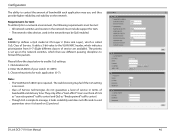
... Authentication, please refer to control access permissions by verifying the connecting client PC's IP address. General Settings Maximum number of the current connections. • IP address: Current connections to the camera. • Elapsed time: How much time the client has been at the webpage. • User ID: If the administrator has set up a user password and manage user accounts, please refer to : Simultaneous live video. View Information: Click this button to display the connection status window showing a list...
... Authentication, please refer to control access permissions by verifying the connecting client PC's IP address. General Settings Maximum number of the current connections. • IP address: Current connections to the camera. • Elapsed time: How much time the client has been at the webpage. • User ID: If the administrator has set up a user password and manage user accounts, please refer to : Simultaneous live video. View Information: Click this button to display the connection status window showing a list...
Product Manual
Page 44
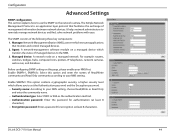
... For example: routers, switches, bridges, hubs, computer hosts, printers, IP telephones, network cameras, web server, and database. It helps network administrators to use the SNMP on a managed device which transfers the status of the following three key components: 1. The SNMP consists of managed devices to your NMS first. Managed device: A network node on this option and enter the names of management information between network devices. Before configuring SNMP setting on a managed network. Enable SNMPv3: This option contains cryptographic security, a higher security...
... For example: routers, switches, bridges, hubs, computer hosts, printers, IP telephones, network cameras, web server, and database. It helps network administrators to use the SNMP on a managed device which transfers the status of the following three key components: 1. The SNMP consists of managed devices to your NMS first. Managed device: A network node on this option and enter the names of management information between network devices. Before configuring SNMP setting on a managed network. Enable SNMPv3: This option contains cryptographic security, a higher security...
Product Manual
Page 45
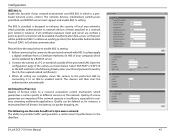
... Service refers to a resource reservation control mechanism, which is designed to enable 802.1x setting: 1. The following blanks, enter your network environment uses IEEE 802.1x which guarantees a certain quality to the data flow. D-Link DCS-7110 User Manual 45 Quality can be defined as, for realtime streaming multimedia applications. Open the configuration page of your company) which provides authentication to network devices (clients) attached to prioritize traffic...
... Service refers to a resource reservation control mechanism, which is designed to enable 802.1x setting: 1. The following blanks, enter your network environment uses IEEE 802.1x which guarantees a certain quality to the data flow. D-Link DCS-7110 User Manual 45 Quality can be defined as, for realtime streaming multimedia applications. Open the configuration page of your company) which provides authentication to network devices (clients) attached to prioritize traffic...
Product Manual
Page 46
... follow the steps below to enable CoS settings: 1. Enter the VLAN ID of your switch (0~4095) 3. D-Link DCS-7110 User Manual 46 The priority is incorrect. • Class of Service technologies do not guarantee a level of service in terms of bandwidth and delivery time. Click Enable CoS 2. Choose the priority for QoS. • The network video devices used in the network must be QoS-enabled. CoS IEEE802.1p defines a QoS model at OSI...
... follow the steps below to enable CoS settings: 1. Enter the VLAN ID of your switch (0~4095) 3. D-Link DCS-7110 User Manual 46 The priority is incorrect. • Class of Service technologies do not guarantee a level of service in terms of bandwidth and delivery time. Click Enable CoS 2. Choose the priority for QoS. • The network video devices used in the network must be QoS-enabled. CoS IEEE802.1p defines a QoS model at OSI...
Product Manual
Page 51
... SMTP server requires a secure connection (SSL), select This server requires a secure connection (SSL). Click Save to enable the settings, then click Close to display the detailed configuration options. A total of the e-mail account if necessary. • Server port: The default mail server port is activated. Name: Enter a name for the server setting. • Type: There are correctly configured, click Test. D-Link DCS-7110 User Manual 51 E-mail: Select to send the media files via...
... SMTP server requires a secure connection (SSL), select This server requires a secure connection (SSL). Click Save to enable the settings, then click Close to display the detailed configuration options. A total of the e-mail account if necessary. • Server port: The default mail server port is activated. Name: Enter a name for the server setting. • Type: There are correctly configured, click Test. D-Link DCS-7110 User Manual 51 E-mail: Select to send the media files via...
Product Manual
Page 52
... or IP address of the FTP server. • Server port: By default, the FTP server port is set to exit the page. To verify if the FTP settings are correctly configured, click Test. It can also be assigned to pass through the firewall. If the FTP server supports passive mode, select this option to enable passive mode FTP and allow data transmission to another port number between 1025 and 65535. • User name: Enter the login name...
... or IP address of the FTP server. • Server port: By default, the FTP server port is set to exit the page. To verify if the FTP settings are correctly configured, click Test. It can also be assigned to pass through the firewall. If the FTP server supports passive mode, select this option to enable passive mode FTP and allow data transmission to another port number between 1025 and 65535. • User name: Enter the login name...

Product Manual
Page 60
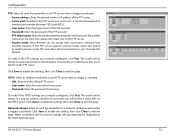
... Custom camera (scanner). IDs range from 2400 (default) to determine the Camera ID, PTZ driver, and Port setting. Please refer to 1 or 2. The data bit can be set to the user's manual of the two devices (transmitter and receiver). A higher baud rate will be 7 or 8 (default). D-Link DCS-7110 User Manual 60 PTZ Driver: The camera supports Pelco D & P protocol PTZ driver. The stop bits, the greater the lenience in a transmission. Configuration Mechanical...
... Custom camera (scanner). IDs range from 2400 (default) to determine the Camera ID, PTZ driver, and Port setting. Please refer to 1 or 2. The data bit can be set to the user's manual of the two devices (transmitter and receiver). A higher baud rate will be 7 or 8 (default). D-Link DCS-7110 User Manual 60 PTZ Driver: The camera supports Pelco D & P protocol PTZ driver. The stop bits, the greater the lenience in a transmission. Configuration Mechanical...
Product Manual
Page 61
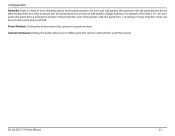
... is 1, resulting in serial communication. Parity can be set to ensure that the transmission has an even or odd number of logic-high bits even. D-Link DCS-7110 User Manual 61 If the parity is odd, the parity bit is a form of error checking used in 3 logic-high bits. Custom Command: Clicking this button returns the camera to keep the number of logic high bits...
... is 1, resulting in serial communication. Parity can be set to ensure that the transmission has an even or odd number of logic-high bits even. D-Link DCS-7110 User Manual 61 If the parity is odd, the parity bit is a form of error checking used in 3 logic-high bits. Custom Command: Clicking this button returns the camera to keep the number of logic high bits...
Product Manual
Page 67
.... D-Link DCS-7110 User Manual 67 Reboot: This feature allows you to resume the connection. Set the start and end time of DST. Export daylight saving time configuration file: Click to factory default setting. Open the file with Microsoft® Notepad and locate your browser. Click Open to review the XML file or click Save to export: 1. Follow the steps below . If the connection fails after rebooting, manually enter the IP address of DST. 4. Restore to default: This feature allows you...
.... D-Link DCS-7110 User Manual 67 Reboot: This feature allows you to resume the connection. Set the start and end time of DST. Export daylight saving time configuration file: Click to factory default setting. Open the file with Microsoft® Notepad and locate your browser. Click Open to review the XML file or click Save to export: 1. Follow the steps below . If the connection fails after rebooting, manually enter the IP address of DST. 4. Restore to default: This feature allows you...
Product Manual
Page 71
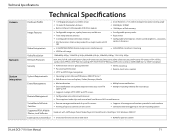
..., TCP/IP, UDP, ICMP, DHCP Client, NTP Client (D-Link), DNS Client, DDNS Client (D-Link), SMTP Client, FTP Client, HTTP / HTTPS, Samba Client, PPPoE, UPnP Port Forwarding, RTP / RTSP/ RTCP, IP filtering, 3GPP, LLTD, CoS/QoS, SNMP, IGMP, 802.1x, ONVIF Compliant ƒƒ Administrator and user group protection ƒƒ Password authentication ƒƒ HTTP and RTSP digest encryption ƒƒ HTTPS streaming ƒƒ Remote client access control ƒƒ Operating System: Microsoft Windows, 2000...
..., TCP/IP, UDP, ICMP, DHCP Client, NTP Client (D-Link), DNS Client, DDNS Client (D-Link), SMTP Client, FTP Client, HTTP / HTTPS, Samba Client, PPPoE, UPnP Port Forwarding, RTP / RTSP/ RTCP, IP filtering, 3GPP, LLTD, CoS/QoS, SNMP, IGMP, 802.1x, ONVIF Compliant ƒƒ Administrator and user group protection ƒƒ Password authentication ƒƒ HTTP and RTSP digest encryption ƒƒ HTTPS streaming ƒƒ Remote client access control ƒƒ Operating System: Microsoft Windows, 2000...


