
User Manual
Page 3
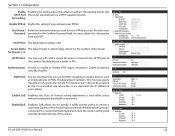
... Camera 9 Waterproofing Your Installation 11 Software Installation 14 Configuration 17 Using the Configuration Interface 17 Live Video 19 Setup 20 Setup Wizard 20 Network Setup 25 Dynamic DNS 28 Image Setup 29 Video 31 Motion Detection 32 Time and Date 33 Event Setup 34 Advanced 42 ICR and IR 42 HTTPS 43 Access List 44 SNMP 45 Maintenance 47 Admin 47 System 48 Firmware Upgrade 49 Status 50 Device Info 50 Logs 51 Help 52 Technical Specifications...
... Camera 9 Waterproofing Your Installation 11 Software Installation 14 Configuration 17 Using the Configuration Interface 17 Live Video 19 Setup 20 Setup Wizard 20 Network Setup 25 Dynamic DNS 28 Image Setup 29 Video 31 Motion Detection 32 Time and Date 33 Event Setup 34 Advanced 42 ICR and IR 42 HTTPS 43 Access List 44 SNMP 45 Maintenance 47 Admin 47 System 48 Firmware Upgrade 49 Status 50 Device Info 50 Logs 51 Help 52 Technical Specifications...
User Manual
Page 4
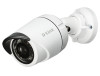
Safety Notice: Installation and servicing should be done by certified technicians so as to conform to all local codes and prevent voiding your reseller. D-Link DCS-4703E User Manual 4 Section 1: Product Overview Product Overview Package Contents DCS-4703E Vigilance Full HD Outdoor PoE Mini Bullet Camera Cable Waterproofing Connector Rubber Power Connector Plug Mounting Kit CD-ROM with User Manual and software Quick Installation Guide If any of the above items are missing, please contact your warranty.
Safety Notice: Installation and servicing should be done by certified technicians so as to conform to all local codes and prevent voiding your reseller. D-Link DCS-4703E User Manual 4 Section 1: Product Overview Product Overview Package Contents DCS-4703E Vigilance Full HD Outdoor PoE Mini Bullet Camera Cable Waterproofing Connector Rubber Power Connector Plug Mounting Kit CD-ROM with User Manual and software Quick Installation Guide If any of the above items are missing, please contact your warranty.
User Manual
Page 5
...-free installation. The DCS-4703E can be easily installed in CPU and incorporates a web server, allowing it to transmit excellent real-time Full HD resolution video for security and outdoor surveillance. the professional sensor results in removable IR-cut filter and IR LEDs give the DCS-4703E the capability to view up to be accessed remotely, controlled and configured from any PC/Notebook over Ethernet (PoE) port D-Link DCS-4703E User Manual 5 The DCS-4703E has an IP66 certified weatherproof housing...
...-free installation. The DCS-4703E can be easily installed in CPU and incorporates a web server, allowing it to transmit excellent real-time Full HD resolution video for security and outdoor surveillance. the professional sensor results in removable IR-cut filter and IR LEDs give the DCS-4703E the capability to view up to be accessed remotely, controlled and configured from any PC/Notebook over Ethernet (PoE) port D-Link DCS-4703E User Manual 5 The DCS-4703E has an IP66 certified weatherproof housing...

User Manual
Page 6
... power it will continue to configure and access the Network Camera from several sources, such as when motion is a stand-alone system with a built-in infrared LEDs enable night time viewing of up to 20 meters. Supports a Variety of Platforms With support for a simple and clutter-free installation. IR LEDs for Flexible Installation The DCS-4703E can be triggered from a remote site via Intranet or Internet. Other features include image monitoring, recording images to a hard drive, viewing...
... power it will continue to configure and access the Network Camera from several sources, such as when motion is a stand-alone system with a built-in infrared LEDs enable night time viewing of up to 20 meters. Supports a Variety of Platforms With support for a simple and clutter-free installation. IR LEDs for Flexible Installation The DCS-4703E can be triggered from a remote site via Intranet or Internet. Other features include image monitoring, recording images to a hard drive, viewing...

User Manual
Page 7
Section 1: Product Overview Hardware Overview Front and Back 3 4 1 2 5 1 Camera Lens Fixed lens to record video of the surrounding area 2 IR LEDs Infrared LEDs illuminate the camera's field of view at night 3 Grounding Screw Can be attached to a grounding wire if desired 4 Reset Button Press and hold for 10 seconds to reset camera back to the factory default settings 5 Adjustment Ring Loosen to adjust camera angle and tighten to lock camera angle D-Link DCS-4703E User Manual 7
Section 1: Product Overview Hardware Overview Front and Back 3 4 1 2 5 1 Camera Lens Fixed lens to record video of the surrounding area 2 IR LEDs Infrared LEDs illuminate the camera's field of view at night 3 Grounding Screw Can be attached to a grounding wire if desired 4 Reset Button Press and hold for 10 seconds to reset camera back to the factory default settings 5 Adjustment Ring Loosen to adjust camera angle and tighten to lock camera angle D-Link DCS-4703E User Manual 7

User Manual
Page 8
Section 1: Product Overview Sides 12 1 Ethernet Jack RJ-45 connector for Ethernet, can also be used to power the camera using Power over Ethernet (PoE) 2 Power Connector Connects to an optional 12 V / 1.5 A power adapter (not included) D-Link DCS-4703E User Manual 8
Section 1: Product Overview Sides 12 1 Ethernet Jack RJ-45 connector for Ethernet, can also be used to power the camera using Power over Ethernet (PoE) 2 Power Connector Connects to an optional 12 V / 1.5 A power adapter (not included) D-Link DCS-4703E User Manual 8

User Manual
Page 9
... base. Use a 6 mm drill bit to position the camera. D-Link DCS-4703E User Manual 9 Step 1 Place the mounting sticker where you are running the camera cables through the wall, drill a hole in the center and pull the cables through the cable channel on the bottom. Step 2 Use the screws provided to mount the camera to the wall. If you configure and test your camera before mounting it. Make sure the camera base will be positioned...
... base. Use a 6 mm drill bit to position the camera. D-Link DCS-4703E User Manual 9 Step 1 Place the mounting sticker where you are running the camera cables through the wall, drill a hole in the center and pull the cables through the cable channel on the bottom. Step 2 Use the screws provided to mount the camera to the wall. If you configure and test your camera before mounting it. Make sure the camera base will be positioned...
User Manual
Page 14
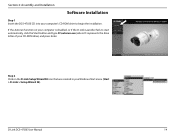
Section 2: Assembly and Installation Software Installation Step 1 Insert the DCS-4703E CD into your computer's CD-ROM drive to start automatically, click the Start button and type D:\autorun.exe (where D: represents the drive letter of your CD-ROM drive) and press Enter. D-Link DCS-4703E User Manual 14 If the Autorun function on the D-Link Setup Wizard SE icon that was created in your computer is disabled, or if the D-Link Launcher fails to begin the installation. Step 2 Click on your Windows Start menu (Start > D-Link > Setup Wizard SE).
Section 2: Assembly and Installation Software Installation Step 1 Insert the DCS-4703E CD into your computer's CD-ROM drive to start automatically, click the Start button and type D:\autorun.exe (where D: represents the drive letter of your CD-ROM drive) and press Enter. D-Link DCS-4703E User Manual 14 If the Autorun function on the D-Link Setup Wizard SE icon that was created in your computer is disabled, or if the D-Link Launcher fails to begin the installation. Step 2 Click on your Windows Start menu (Start > D-Link > Setup Wizard SE).
User Manual
Page 15
If your network, a valid IP Address will be displayed. D-Link DCS-4703E User Manual 15 Step 4 Enter the Admin ID and password. Click Next to change the admin ID and password for the first time, the default Admin ID is admin with the password left blank. Select your camera(s). When logging in for the camera, and enter the new ID and password you wish to use a DHCP server, the network camera's default static IP 192.168.0.20...
If your network, a valid IP Address will be displayed. D-Link DCS-4703E User Manual 15 Step 4 Enter the Admin ID and password. Click Next to change the admin ID and password for the first time, the default Admin ID is admin with the password left blank. Select your camera(s). When logging in for the camera, and enter the new ID and password you wish to use a DHCP server, the network camera's default static IP 192.168.0.20...

User Manual
Page 16
Click Next to manually enter the IP settings for the camera. Select Static IP if you want to continue. D-Link DCS-4703E User Manual 16 Step 6 Take a moment to confirm your camera obtains an IP address automatically from a DHCP server such as a router. Section 2: Assembly and Installation Step 5 Select DHCP if your settings and click Restart.
Click Next to manually enter the IP settings for the camera. Select Static IP if you want to continue. D-Link DCS-4703E User Manual 16 Step 6 Take a moment to confirm your camera obtains an IP address automatically from a DHCP server such as a router. Section 2: Assembly and Installation Step 5 Select DHCP if your settings and click Restart.
User Manual
Page 17
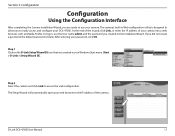
... Windows Start menu (Start > D-Link > Setup Wizard SE). D-Link DCS-4703E User Manual 17 At the end of the wizard, click Link, or enter the IP address of the camera. To log in, use the User name admin and the password you did not create a password, the default password is designed to allow you are ready to use your camera. Section 3: Configuration Configuration Using the Configuration Interface After completing the Camera Installation Wizard, you to easily access and configure...
... Windows Start menu (Start > D-Link > Setup Wizard SE). D-Link DCS-4703E User Manual 17 At the end of the wizard, click Link, or enter the IP address of the camera. To log in, use the User name admin and the password you did not create a password, the default password is designed to allow you are ready to use your camera. Section 3: Configuration Configuration Using the Configuration Interface After completing the Camera Installation Wizard, you to easily access and configure...

User Manual
Page 18
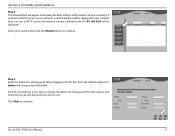
Section 3: Configuration Step 3 The first time you connect to the camera, you just created. Step 5 This section displays your video profile and view or operate the camera. Step 4 Enter admin as the username and enter the password you will need to continue. You can select your camera's live video. Enter a password, then click the Save button. Click OK to create a password for the administrator account. D-Link DCS-4703E User Manual 18
Section 3: Configuration Step 3 The first time you connect to the camera, you just created. Step 5 This section displays your video profile and view or operate the camera. Step 4 Enter admin as the username and enter the password you will need to continue. You can select your camera's live video. Enter a password, then click the Save button. Click OK to create a password for the administrator account. D-Link DCS-4703E User Manual 18

User Manual
Page 19
... part of the available icons listed below to your camera's live video. Language: You may also select your camera's video. Take a Snapshot This will stop recording. Set a Storage Folder Select a storage folder to save a snapshot to operate the camera. If you close the browser window, the recording will save snapshots and video clips to digitally zoom in progress, this menu. D-Link DCS-4703E User Manual 19 Motion Trigger Indicator Recording Indicator This indicator will change color when a trigger event...
... part of the available icons listed below to your camera's live video. Language: You may also select your camera's video. Take a Snapshot This will stop recording. Set a Storage Folder Select a storage folder to save a snapshot to operate the camera. If you close the browser window, the recording will save snapshots and video clips to digitally zoom in progress, this menu. D-Link DCS-4703E User Manual 19 Motion Trigger Indicator Recording Indicator This indicator will change color when a trigger event...

User Manual
Page 20
To quickly configure your Network Camera, click Internet Connection Setup Wizard. Alternatively, you want to Network Setup on page 32. D-Link DCS-4703E User Manual 20 Section 3: Configuration Setup Setup Wizard To configure your Network Camera's motion detection settings, click Motion Detection Setup Wizard. If you may click Manual Internet Connection Setup to manually configure your Network Camera and skip to enter your settings without running the wizard, click Manual Motion Detection Setup and skip toMotion Detection on page 25.
To quickly configure your Network Camera, click Internet Connection Setup Wizard. Alternatively, you want to Network Setup on page 32. D-Link DCS-4703E User Manual 20 Section 3: Configuration Setup Setup Wizard To configure your Network Camera's motion detection settings, click Motion Detection Setup Wizard. If you may click Manual Internet Connection Setup to manually configure your Network Camera and skip to enter your settings without running the wizard, click Manual Motion Detection Setup and skip toMotion Detection on page 25.
User Manual
Page 21
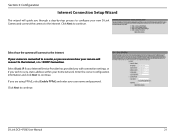
... a router, or you are using PPPoE, select Enable PPPoE and enter your user name and password. Enter the correct configuration information and click Next to continue. Select Static IP if your Internet Service Provider has provided you with connection settings, or if you wish to the Internet. D-Link DCS-4703E User Manual 21 Select how the camera will connect to set a static address within your home network. Click Next to the internet. Section 3: Configuration Internet Connection Setup...
... a router, or you are using PPPoE, select Enable PPPoE and enter your user name and password. Enter the correct configuration information and click Next to continue. Select Static IP if your Internet Service Provider has provided you with connection settings, or if you wish to the Internet. D-Link DCS-4703E User Manual 21 Select how the camera will connect to set a static address within your home network. Click Next to the internet. Section 3: Configuration Internet Connection Setup...
User Manual
Page 23
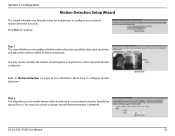
...-by-step process to configure your camera's motion detection functions. D-Link DCS-4703E User Manual 23 Section 3: Configuration Motion Detection Setup Wizard This wizard will allow you to enable or disable motion detection, specify the detection sensitivity, and adjust the camera's ability to detect movement. You may also choose to always record whenever motion is detected. Click Next to configure motion detection. Specify the day and hours. Step 2 This step allows you to enable motion detection based on page 32...
...-by-step process to configure your camera's motion detection functions. D-Link DCS-4703E User Manual 23 Section 3: Configuration Motion Detection Setup Wizard This wizard will allow you to enable or disable motion detection, specify the detection sensitivity, and adjust the camera's ability to detect movement. You may also choose to always record whenever motion is detected. Click Next to configure motion detection. Specify the day and hours. Step 2 This step allows you to enable motion detection based on page 32...
User Manual
Page 26
... 3: Configuration Enable Enabling this setting if your network uses PPPoE. You may specify the address of the camera. Digest encryption uses MD5 hashes. User Name / Enter the username and password for RTSP streaming to enable or disable RTSP digest encryption. Re-enter your Password: password in the Confirm Password field. HTTP Port: The default port number is 443. The default port number is 80. D-Link DCS-4703E User Manual 26 Authentication: Choose to mobile devices, such as mobile phones or PDAs. RTSP Port: The port number...
... 3: Configuration Enable Enabling this setting if your network uses PPPoE. You may specify the address of the camera. Digest encryption uses MD5 hashes. User Name / Enter the username and password for RTSP streaming to enable or disable RTSP digest encryption. Re-enter your Password: password in the Confirm Password field. HTTP Port: The default port number is 443. The default port number is 80. D-Link DCS-4703E User Manual 26 Authentication: Choose to mobile devices, such as mobile phones or PDAs. RTSP Port: The port number...

User Manual
Page 28
D-Link DCS-4703E User Manual 28 Server Address: Select your DDNS updates. Enable DDNS: Check this box to enable the DDNS function. After making any changes, click the Save Settings button to save your camera using a domain name instead of the DDNS services listed in hours. Host Name: Enter the host name of your Dynamic DNS Server from the drop down box on this page. Password: Enter the password used to connect to the DDNS server. User Name: Enter...
D-Link DCS-4703E User Manual 28 Server Address: Select your DDNS updates. Enable DDNS: Check this box to enable the DDNS function. After making any changes, click the Save Settings button to save your camera using a domain name instead of the DDNS services listed in hours. Host Name: Enter the host name of your Dynamic DNS Server from the drop down box on this page. Password: Enter the password used to connect to the DDNS server. User Name: Enter...

User Manual
Page 29
... video. D-Link DCS-4703E User Manual 29 You may configure the video image settings for your power lines to avoid camera flicker or moving objects. Mirror: This will flip the image vertically. Exposure Mode: Changes the exposure mode. You can choose from recordings and snapshots. The Max Gain setting will be blocked/excluded from Auto, Outdoor, Indoor, and Fluorescent. Use the drop-down box to change white balance settings to help balance colors for Indoor, Outdoor, or Night...
... video. D-Link DCS-4703E User Manual 29 You may configure the video image settings for your power lines to avoid camera flicker or moving objects. Mirror: This will flip the image vertically. Exposure Mode: Changes the exposure mode. You can choose from recordings and snapshots. The Max Gain setting will be blocked/excluded from Auto, Outdoor, Indoor, and Fluorescent. Use the drop-down box to change white balance settings to help balance colors for Indoor, Outdoor, or Night...

User Manual
Page 54
... to local hard drive • Operating System: Microsoft Windows 10/8/7/Vista • Web Browser: Internet Explorer 7 or higher • Supports all management functions provided in web interface • Scheduled motion triggered, or manual recording options • Supports multiple SMTP and FTP servers • Multiple event notifications • Multiple recording methods for easy backup • Configuration interface accessible via web browser • Protocol: Standard TCP/IP • Remote management/control of up to 32 cameras • Viewing of...
... to local hard drive • Operating System: Microsoft Windows 10/8/7/Vista • Web Browser: Internet Explorer 7 or higher • Supports all management functions provided in web interface • Scheduled motion triggered, or manual recording options • Supports multiple SMTP and FTP servers • Multiple event notifications • Multiple recording methods for easy backup • Configuration interface accessible via web browser • Protocol: Standard TCP/IP • Remote management/control of up to 32 cameras • Viewing of...

