Product Manual
Page 20
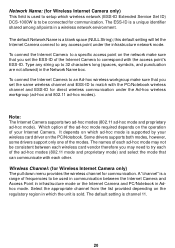
...: (for Wireless Internet Camera only) The pull down menu provides the wireless channel for communication. The default setting is a unique identifier shared among all points in the Network Name box. To connect the Internet Camera to be connected for direct wireless communication under the infrastructure network mode. The ESS... ad-hoc modes (802.11 ad-hoc mode and proprietary ad-hoc mode). It depends on which wireless network (ESS-ID Extended Service Set ID) DCS-1000W is to a specific access point on the regulatory region in which the unit is a range of frequencies to be used to setup...
...: (for Wireless Internet Camera only) The pull down menu provides the wireless channel for communication. The default setting is a unique identifier shared among all points in the Network Name box. To connect the Internet Camera to be connected for direct wireless communication under the infrastructure network mode. The ESS... ad-hoc modes (802.11 ad-hoc mode and proprietary ad-hoc mode). It depends on which wireless network (ESS-ID Extended Service Set ID) DCS-1000W is to a specific access point on the regulatory region in which the unit is a range of frequencies to be used to setup...

Product Manual
Page 26
... control. Delete User: Select the user you wish to delete from the Internet Camera. System Administration - DateTime The DateTime menu contains commands for setting the Internet Camera's time and date requirements to provide correct information to users who might be required to enter a login password to activate the ...Camera Users, any user will be thousands of miles away in the DateTime menu bar are Synchronized with Time Server or Set Manually. The password dialog box is illustrated below : 26 Click on delete icon. To add a new user name, input the necessary information first and...
... control. Delete User: Select the user you wish to delete from the Internet Camera. System Administration - DateTime The DateTime menu contains commands for setting the Internet Camera's time and date requirements to provide correct information to users who might be required to enter a login password to activate the ...Camera Users, any user will be thousands of miles away in the DateTime menu bar are Synchronized with Time Server or Set Manually. The password dialog box is illustrated below : 26 Click on delete icon. To add a new user name, input the necessary information first and...

Product Manual
Page 38
Please wait until one of the two dialog boxes appear, select "Yes, I want to restart my computer now" and click on Finish to restart the computer to continue. The Select Program Folder prompt will appear providing information on where the IPView application is located, click on Next to complete the installation procedure. 38 If you wish to modify your settings, click on Back to return to the previous screens.
Please wait until one of the two dialog boxes appear, select "Yes, I want to restart my computer now" and click on Finish to restart the computer to continue. The Select Program Folder prompt will appear providing information on where the IPView application is located, click on Next to complete the installation procedure. 38 If you wish to modify your settings, click on Back to return to the previous screens.

Product Manual
Page 47
Click OK. Make sure to notify you have already set the User Name and Password during the Web Configuration setting. The camera will appear to save any changes you of the error. If you forget to add one camera at a time. If the User Name .... Note 2: Alternatively you wish to enter the correct User Name and Password. as illustrated, or use the hot key 47 If the Login Camera dialog box appears, make sure to add, a dialog box will be added into IPView, in list format. The above dialog...
Click OK. Make sure to notify you have already set the User Name and Password during the Web Configuration setting. The camera will appear to save any changes you of the error. If you forget to add one camera at a time. If the User Name .... Note 2: Alternatively you wish to enter the correct User Name and Password. as illustrated, or use the hot key 47 If the Login Camera dialog box appears, make sure to add, a dialog box will be added into IPView, in list format. The above dialog...

Product Manual
Page 51
... to save the snap shot picture. The recording function will be stopped. A Save Image dialog box will appear in your IPView folder to use the hot key, F5. According to the default setting, an AVI file will appear for you can also click the Snap shot icon , as illustrated...Start Recording To start recording with a camera, you must highlight the camera you wish to save the recorded videos. According to the default setting, an AVI file will appear. Select Stop. Alternatively you to stop recording with a camera you must highlight the camera you want to change ...
... to save the snap shot picture. The recording function will be stopped. A Save Image dialog box will appear in your IPView folder to use the hot key, F5. According to the default setting, an AVI file will appear for you can also click the Snap shot icon , as illustrated...Start Recording To start recording with a camera, you must highlight the camera you wish to save the recorded videos. According to the default setting, an AVI file will appear. Select Stop. Alternatively you to stop recording with a camera you must highlight the camera you want to change ...

Product Manual
Page 52
...detailed information.) The Camera Property dialog box will appear. System for the camera name, location and administrator information such as shown below. How to the Web Configuration section under System Administration - General Allows settings for further details. 52 Please ...refer to Adjust the Property Setting Property is initiated by selecting Camera > Property. A dialog box will appear which allows for Web Configuration settings and upgrading firmware. (Please refer to Configure...
...detailed information.) The Camera Property dialog box will appear. System for the camera name, location and administrator information such as shown below. How to the Web Configuration section under System Administration - General Allows settings for further details. 52 Please ...refer to Adjust the Property Setting Property is initiated by selecting Camera > Property. A dialog box will appear which allows for Web Configuration settings and upgrading firmware. (Please refer to Configure...

Product Manual
Page 63
Menu Bar - Select the columns that you wish to appear in List View as illustrated below . Viewing Format You can view the Camera in List view. Columns When Columns is pictured below . You can view the format in 1 Camera, 4 Cameras, 9 Cameras, or 16 Cameras mode. The List viewing format allows easy management and control of each camera. 63 View View on the menu bar provides users with management capabilities for Columns, List, Camera and Refresh. The View menu bar is launched, a dialog box will appear displaying the Column Settings.
Menu Bar - Select the columns that you wish to appear in List View as illustrated below . Viewing Format You can view the Camera in List view. Columns When Columns is pictured below . You can view the format in 1 Camera, 4 Cameras, 9 Cameras, or 16 Cameras mode. The List viewing format allows easy management and control of each camera. 63 View View on the menu bar provides users with management capabilities for Columns, List, Camera and Refresh. The View menu bar is launched, a dialog box will appear displaying the Column Settings.

Product Manual
Page 65
... Tools on the menu bar you to Delete a camera, manage the Property, Enable for viewing. From the menu bar, select Tools> Options and a dialog box will stop and shutdown. The menu bar is illustrated below: Enable Function By default the video image is working. Menu Bar - Menu Bar - Camera Camera...the menu bar provides options to show that the Enable function is enabled. Help Under Help on the menu bar allows management of the security settings such as User Name and Password. To disable the real-time image select Camera > Enable and the real-time video image will appear. Add...
... Tools on the menu bar you to Delete a camera, manage the Property, Enable for viewing. From the menu bar, select Tools> Options and a dialog box will stop and shutdown. The menu bar is illustrated below: Enable Function By default the video image is working. Menu Bar - Menu Bar - Camera Camera...the menu bar provides options to show that the Enable function is enabled. Help Under Help on the menu bar allows management of the security settings such as User Name and Password. To disable the real-time image select Camera > Enable and the real-time video image will appear. Add...
Product Manual
Page 72
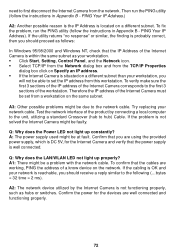
... Other possible problems might be due to the network cable. Confirm the power for the devices are using the provided power supply, which is DC 5V, for the Internet Camera and verify that the IP Address of the Internet Camera corresponds to hub) Cable. To verify make sure the... of the Internet Camera must be able to set from a workstation on a different subnet than your workstation. ƒ Click Start, Setting, Control Panel, and the Network icon. ƒ Select TCP/IP from the Network dialog box and from the TCP/IP Properties dialog box click on Specify an IP address. ƒ...
... Other possible problems might be due to the network cable. Confirm the power for the devices are using the provided power supply, which is DC 5V, for the Internet Camera and verify that the IP Address of the Internet Camera corresponds to hub) Cable. To verify make sure the... of the Internet Camera must be able to set from a workstation on a different subnet than your workstation. ƒ Click Start, Setting, Control Panel, and the Network icon. ƒ Select TCP/IP from the Network dialog box and from the TCP/IP Properties dialog box click on Specify an IP address. ƒ...


