Product Manual
Page 2
... a Pole 15 Configuration 17 Factory Default Setting 17 Web-based Configuration 18 Wizard 20 Basic Settings 23 Wireless 23 Network 29 QoS 31 Service 34 D-Link DAP-3712 User Manual System 37 Status 39 Info 39 Statistics 41 Network 42 Syslog Info 43 Tools 44 Ping IP 44 Traceroute 45...
... a Pole 15 Configuration 17 Factory Default Setting 17 Web-based Configuration 18 Wizard 20 Basic Settings 23 Wireless 23 Network 29 QoS 31 Service 34 D-Link DAP-3712 User Manual System 37 Status 39 Info 39 Statistics 41 Network 42 Syslog Info 43 Tools 44 Ping IP 44 Traceroute 45...

Product Manual
Page 3
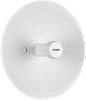
Product Overview Package Contents DAP-3712 20 km Long Range 802.11ac Wireless Bridge Power Injector Power cord Mounting tie Quick Start Guide D-Link DAP-3712 User Manual 3 Section 1 -
Product Overview Package Contents DAP-3712 20 km Long Range 802.11ac Wireless Bridge Power Injector Power cord Mounting tie Quick Start Guide D-Link DAP-3712 User Manual 3 Section 1 -

Product Manual
Page 4
Product Overview System Requirements Web-based Configuration Requirements Computer with the following: • Microsoft Windows®, Apple Mac OS, or a Linux-based operating system Browser Requirements: • Microsoft Edge, Firefox 60.0, Safari ,or Chrome 68.0.3440.106 D-Link DAP-3712 User Manual 4 Section 1 -
Product Overview System Requirements Web-based Configuration Requirements Computer with the following: • Microsoft Windows®, Apple Mac OS, or a Linux-based operating system Browser Requirements: • Microsoft Edge, Firefox 60.0, Safari ,or Chrome 68.0.3440.106 D-Link DAP-3712 User Manual 4 Section 1 -

Product Manual
Page 5
Product Overview Introduction The DAP-3712 is a high-performance 802.11ac 2T2R outdoor-deployable wireless bridge that can deliver connectivity at a distance of network traffic, building materials and construction, and network overhead, lower actual data throughput rate. Network conditions and environmental factors, including volume of up to multiple network locations. The DAP-3712 has a built-in 23 dBi dish antenna that provides wireless connectivity to 20 km. Note: Actual data throughput will vary. Section 1 - D-Link DAP-3712 User Manual 5
Product Overview Introduction The DAP-3712 is a high-performance 802.11ac 2T2R outdoor-deployable wireless bridge that can deliver connectivity at a distance of network traffic, building materials and construction, and network overhead, lower actual data throughput rate. Network conditions and environmental factors, including volume of up to multiple network locations. The DAP-3712 has a built-in 23 dBi dish antenna that provides wireless connectivity to 20 km. Note: Actual data throughput will vary. Section 1 - D-Link DAP-3712 User Manual 5
Product Manual
Page 6
...-based UI makes the installation and setup processes much easier • Reliable PoE+ 802.3at standard power input • Waterproof housing and protection from weather D-Link DAP-3712 User Manual 6 Product Overview Features • High-performance 802.11ac 2×2 chip • Max.
...-based UI makes the installation and setup processes much easier • Reliable PoE+ 802.3at standard power input • Waterproof housing and protection from weather D-Link DAP-3712 User Manual 6 Product Overview Features • High-performance 802.11ac 2×2 chip • Max.
Product Manual
Page 7
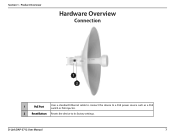
D-Link DAP-3712 User Manual 7 Product Overview Hardware Overview Connection 1 2 1 PoE Port Uses a standard Ethernet cable to connect the device to a PoE power source such as a PoE switch or PoE injector. 2 Reset Button Resets the device to its factory settings. Section 1 -
D-Link DAP-3712 User Manual 7 Product Overview Hardware Overview Connection 1 2 1 PoE Port Uses a standard Ethernet cable to connect the device to a PoE power source such as a PoE switch or PoE injector. 2 Reset Button Resets the device to its factory settings. Section 1 -
Product Manual
Page 8
Product Overview Hardware Overview LED Indicators 1 1 Signal Strength Signal strength indicators. Three lights indicate a strong signal. D-Link DAP-3712 User Manual 8 One light indicates a weak signal. Section 1 - Two lights indicate a medium signal.
Product Overview Hardware Overview LED Indicators 1 1 Signal Strength Signal strength indicators. Three lights indicate a strong signal. D-Link DAP-3712 User Manual 8 One light indicates a weak signal. Section 1 - Two lights indicate a medium signal.

Product Manual
Page 9
Assemble the dish of the DAP-3712 by sliding the two halves together until they lock in the center of the dish. Section 2 - Connect the antenna and base through the hole in place. 2. D-Link DAP-3712 User Manual 9 Installation Installation Assembling the Access Point 1.
Assemble the dish of the DAP-3712 by sliding the two halves together until they lock in the center of the dish. Section 2 - Connect the antenna and base through the hole in place. 2. D-Link DAP-3712 User Manual 9 Installation Installation Assembling the Access Point 1.

Product Manual
Page 10
Insert the cable into the PoE port, then attach the cover to position the antenna at the desired. Section 2 - Use the adjustment kit to the device. 4. Connect the adjustment kit to the base of the DAP-3712. D-Link DAP-3712 User Manual 10 Installation 3. Thread a standard RJ-45 Ethernet cable through the cover for the PoE port on the underside of the DAP-3712 by pressing it in until it clicks and locks in place.
Insert the cable into the PoE port, then attach the cover to position the antenna at the desired. Section 2 - Use the adjustment kit to the device. 4. Connect the adjustment kit to the base of the DAP-3712. D-Link DAP-3712 User Manual 10 Installation 3. Thread a standard RJ-45 Ethernet cable through the cover for the PoE port on the underside of the DAP-3712 by pressing it in until it clicks and locks in place.
Product Manual
Page 11
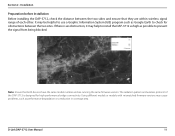
Note: Ensure that they are running the same firmware version. Installation Preparation before Installation Before installing the DAP-3712, check the distance between the two sites. D-Link DAP-3712 User Manual 11 If there is designed for obstructions between the two sides and ensure that both devices have the same model number and are ...
Note: Ensure that they are running the same firmware version. Installation Preparation before Installation Before installing the DAP-3712, check the distance between the two sites. D-Link DAP-3712 User Manual 11 If there is designed for obstructions between the two sides and ensure that both devices have the same model number and are ...

Product Manual
Page 12
The Ethernet ports on the access point. Using another cable, attach the PoE injector to your browser. D-Link DAP-3712 User Manual 12 Section 2 - Cable Requirements Use a CAT 5 cable with the static IP address 192.168.0.2 and a subnet mask of your switch or management computer. ... an uneven sheath; Installation Powering the Access Point To power the DAP-3712, use a standard Ethernet cable to a 48 V PoE injector. Use an Ethernet cable to connect the LAN port on the DAP-3712 to the PoE Out port on the DAP-3712 to connect the PoE port on the PoE injector. Configuring the ...
The Ethernet ports on the access point. Using another cable, attach the PoE injector to your browser. D-Link DAP-3712 User Manual 12 Section 2 - Cable Requirements Use a CAT 5 cable with the static IP address 192.168.0.2 and a subnet mask of your switch or management computer. ... an uneven sheath; Installation Powering the Access Point To power the DAP-3712, use a standard Ethernet cable to a 48 V PoE injector. Use an Ethernet cable to connect the LAN port on the DAP-3712 to the PoE Out port on the DAP-3712 to connect the PoE port on the PoE injector. Configuring the ...
Product Manual
Page 13
Section 2 - Installation 4. Follow the Setup Wizard's instructions to the administration user interface. Log in to configure the device in Access Point Mode. The default login information is: Username: admin Password: admin 5. D-Link DAP-3712 User Manual 13
Section 2 - Installation 4. Follow the Setup Wizard's instructions to the administration user interface. Log in to configure the device in Access Point Mode. The default login information is: Username: admin Password: admin 5. D-Link DAP-3712 User Manual 13
Product Manual
Page 14
...the device. On step four of the instructions above to the Status page and check the information under Associated Stations (shown below). D-Link DAP-3712 User Manual 14 Enter the same SSID and key that wireless connectivity between the two devices is different from the drop-down list. ...Follow steps 1-4 of the Setup Wizard (Wireless), select Client from the first DAP-3712's IP address (for instance, by changing it to configure the device in Client Mode. 2. Launch the Setup Wizard to 192.168.0.51,...
...the device. On step four of the instructions above to the Status page and check the information under Associated Stations (shown below). D-Link DAP-3712 User Manual 14 Enter the same SSID and key that wireless connectivity between the two devices is different from the drop-down list. ...Follow steps 1-4 of the Setup Wizard (Wireless), select Client from the first DAP-3712's IP address (for instance, by changing it to configure the device in Client Mode. 2. Launch the Setup Wizard to 192.168.0.51,...
Product Manual
Page 15
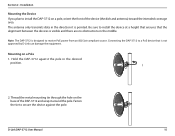
...around the pole. Fasten the tie to install the device at a height that ensures that is visible and there are no obstructions in the middle. D-Link DAP-3712 User Manual 15 The antenna only transmits data in the desired position. 2. Mounting on the base of the device (the dish and antenna) toward ...the intended coverage area. Thread the metal mounting tie through the hole on a Pole 1. Connecting the DAP-3712 to a PoE device that the alignment between the devices is not approved by D-Link can damage the equipment. Section 2 -
...around the pole. Fasten the tie to install the device at a height that ensures that is visible and there are no obstructions in the middle. D-Link DAP-3712 User Manual 15 The antenna only transmits data in the desired position. 2. Mounting on the base of the device (the dish and antenna) toward ...the intended coverage area. Thread the metal mounting tie through the hole on a Pole 1. Connecting the DAP-3712 to a PoE device that the alignment between the devices is not approved by D-Link can damage the equipment. Section 2 -
Product Manual
Page 16
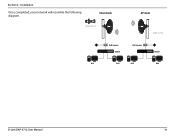
Client mode DAP-3712 AP mode DAP-3712 PoE injector Switch PoE injector Switch PC1 PC2 PC3 PC4 D-Link DAP-3712 User Manual 16 Section 2 - Installation Once completed, your network will resemble the following diagram.
Client mode DAP-3712 AP mode DAP-3712 PoE injector Switch PoE injector Switch PC1 PC2 PC3 PC4 D-Link DAP-3712 User Manual 16 Section 2 - Installation Once completed, your network will resemble the following diagram.
Product Manual
Page 17
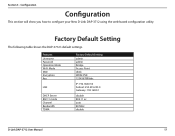
Features Username Password Operation Mode Wi-Fi Mode SSID Encryption Key LAN DHCP Server 802.11 mode Channel Bandwidth TDMA Factory Default Setting admin admin Bridge Access Point dlink WPA2-PSK 1234567890abc IP: 192.168.0.50 Subnet: 255.255.255.0 Gateway: 192.168.0.1 disable 802.11 ac auto 80 MHz disable D-Link DAP-3712 User Manual 17 Section 3 - Factory Default Setting The following table shows the DAP-3712's default settings. Configuration Configuration This section will show you how to configure your New D-Link DAP-3712 using the web-based configuration utility.
Features Username Password Operation Mode Wi-Fi Mode SSID Encryption Key LAN DHCP Server 802.11 mode Channel Bandwidth TDMA Factory Default Setting admin admin Bridge Access Point dlink WPA2-PSK 1234567890abc IP: 192.168.0.50 Subnet: 255.255.255.0 Gateway: 192.168.0.1 disable 802.11 ac auto 80 MHz disable D-Link DAP-3712 User Manual 17 Section 3 - Factory Default Setting The following table shows the DAP-3712's default settings. Configuration Configuration This section will show you how to configure your New D-Link DAP-3712 using the web-based configuration utility.

Product Manual
Page 18
Configuration Web-based Configuration To log in the DAP-3712 web interface, you will appear, as seen below. D-Link DAP-3712 User Manual 18 Section 3 - The Local Area Connection Properties dialog box will need to configure your computer and click Properties, then click Continue. Right-click the Local Area Connection icon on your computer's TCP/IP settings: 1.
Configuration Web-based Configuration To log in the DAP-3712 web interface, you will appear, as seen below. D-Link DAP-3712 User Manual 18 Section 3 - The Local Area Connection Properties dialog box will need to configure your computer and click Properties, then click Continue. Right-click the Local Area Connection icon on your computer's TCP/IP settings: 1.

Product Manual
Page 19
Here, * can be set to 192.168.0.*. In the above figure, the IP address should be any number between 1-255 (but not 50, since the DAP-3712's default IP address is 192.168.0.50). Configuration 2. Select Internet Protocol (TCP/IP) and click the Properties button, and the following dialog box will appear: 3. D-Link DAP-3712 User Manual 19 Section 3 -
Here, * can be set to 192.168.0.*. In the above figure, the IP address should be any number between 1-255 (but not 50, since the DAP-3712's default IP address is 192.168.0.50). Configuration 2. Select Internet Protocol (TCP/IP) and click the Properties button, and the following dialog box will appear: 3. D-Link DAP-3712 User Manual 19 Section 3 -

Product Manual
Page 20
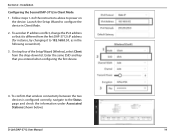
When you log into the address bar of your web browser, and the following login interface will automatic pop-up. Section 3 - Wizard When you are done configuring the IP settings above, enter the default IP address (192.168.0.50) into the DAP-3712 for the first time, the Wizard page will appear. To configure the device, follow these steps: D-Link DAP-3712 User Manual 20 You can also click Wizard in the top right corner. Configuration 4.
When you log into the address bar of your web browser, and the following login interface will automatic pop-up. Section 3 - Wizard When you are done configuring the IP settings above, enter the default IP address (192.168.0.50) into the DAP-3712 for the first time, the Wizard page will appear. To configure the device, follow these steps: D-Link DAP-3712 User Manual 20 You can also click Wizard in the top right corner. Configuration 4.

Product Manual
Page 21
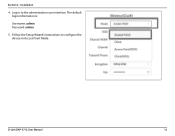
The default password is 192.168.0.50. Section 3 - Configuration 1. Country On the next screen, select your country. 3. D-Link DAP-3712 User Manual 21 The default IP is admin. 2. Click Next to advance to change the IP address of the DAP-3712. Network You can change the password. Change password If this is the first time you have logged into the DAP-3712, you will need to the next page.
The default password is 192.168.0.50. Section 3 - Configuration 1. Country On the next screen, select your country. 3. D-Link DAP-3712 User Manual 21 The default IP is admin. 2. Click Next to advance to change the IP address of the DAP-3712. Network You can change the password. Change password If this is the first time you have logged into the DAP-3712, you will need to the next page.

