Product Manual
Page 2
... with AP Mode 16 WISP Client Router Mode 17 WISP Repeater Mode 18 Wireless Installation Considerations 19 Configuration 20 Web-based Configuration Utility 20 Wireless Setup Wizard 21 Access Point Mode 22 Repeater Mode 26 Wireless Client Mode 32 Add Wireless Device With WPS 38 Manual Configuration 40 Wireless Settings 40... only 57 Port Filter (WISP modes only 58 DMZ (WISP modes only 59 Parental Control (WISP modes only 60 Advanced Network (WISP modes only 61 D-Link DAP-1360 User Manual 2
... with AP Mode 16 WISP Client Router Mode 17 WISP Repeater Mode 18 Wireless Installation Considerations 19 Configuration 20 Web-based Configuration Utility 20 Wireless Setup Wizard 21 Access Point Mode 22 Repeater Mode 26 Wireless Client Mode 32 Add Wireless Device With WPS 38 Manual Configuration 40 Wireless Settings 40... only 57 Port Filter (WISP modes only 58 DMZ (WISP modes only 59 Parental Control (WISP modes only 60 Advanced Network (WISP modes only 61 D-Link DAP-1360 User Manual 2

Product Manual
Page 5
...Protected Access (WPA-PSK/WPA2-PSK) to operate in networking, introduces the new D-Link DAP-1360 Wireless N Range Extender. The DAP-1360 supports WPS on a wireless network in just a matter of minutes. The DAP-1360 is also backwards compatible with a maximum wireless signal rate of network traffic, building...meaning that you high-speed wireless network access for wireless data communications. The DAP-1360 also includes additional security features to transfer files with 802.11b/g. With its Setup Wizard, the DAP-1360 ensures that it can be up by using the PIN method or Push ...
...Protected Access (WPA-PSK/WPA2-PSK) to operate in networking, introduces the new D-Link DAP-1360 Wireless N Range Extender. The DAP-1360 supports WPS on a wireless network in just a matter of minutes. The DAP-1360 is also backwards compatible with a maximum wireless signal rate of network traffic, building...meaning that you high-speed wireless network access for wireless data communications. The DAP-1360 also includes additional security features to transfer files with 802.11b/g. With its Setup Wizard, the DAP-1360 ensures that it can be up by using the PIN method or Push ...

Product Manual
Page 7
... be used on the utility while a physical button is a button that can change or reset the PIN. • User-friendly Setup Wizard - Section 1 - Product Overview Features • Faster Wireless Networking - D-Link DAP-1360 User Manual 7 The Web-based user interface displays advanced network management features including Content Filtering, which allows easily applied content filtering...
... be used on the utility while a physical button is a button that can change or reset the PIN. • User-friendly Setup Wizard - Section 1 - Product Overview Features • Faster Wireless Networking - D-Link DAP-1360 User Manual 7 The Web-based user interface displays advanced network management features including Content Filtering, which allows easily applied content filtering...
Product Manual
Page 8
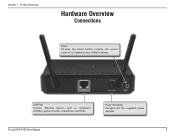
Power Receptor Receptor for the supplied power adapter. Section 1 - D-Link DAP-1360 User Manual 8 Product Overview Hardware Overview Connections Reset Pressing the Reset button restores the access point to its original factory default settings. LAN Port Connect Ethernet devices such as computers, switches, game consoles, setup boxes and hubs.
Power Receptor Receptor for the supplied power adapter. Section 1 - D-Link DAP-1360 User Manual 8 Product Overview Hardware Overview Connections Reset Pressing the Reset button restores the access point to its original factory default settings. LAN Port Connect Ethernet devices such as computers, switches, game consoles, setup boxes and hubs.
Product Manual
Page 11
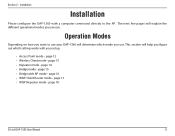
... explain the different operational modes you use. page 15 • Bridge with your setup. • Access Point mode - page 14 • Bridge mode - page 13 • Repeater mode - page 18 D-Link DAP-1360 User Manual 11 Installation Installation Please configure the DAP-1360 with a computer connected directly to use . page 12 • Wireless Client mode - The...
... explain the different operational modes you use. page 15 • Bridge with your setup. • Access Point mode - page 14 • Bridge mode - page 13 • Repeater mode - page 18 D-Link DAP-1360 User Manual 11 Installation Installation Please configure the DAP-1360 with a computer connected directly to use . page 12 • Wireless Client mode - The...

Product Manual
Page 21
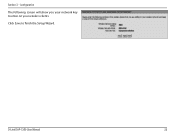
If you want to enter your settings without running the wizard, click Wireless Setup on the left side and skip to configure your wireless network, click Add Wireless Device With WPS and skip to page 38. D-Link DAP-1360 User Manual 21 Section 3 - Configuration Wireless Setup Wizard Click Launch Wireless Setup Wizard to page 40. To set up your access point.
If you want to enter your settings without running the wizard, click Wireless Setup on the left side and skip to configure your wireless network, click Add Wireless Device With WPS and skip to page 38. D-Link DAP-1360 User Manual 21 Section 3 - Configuration Wireless Setup Wizard Click Launch Wireless Setup Wizard to page 40. To set up your access point.

Product Manual
Page 23
When the device has finished rebooting the main screen will reboot automatically. Select Auto as the configuration method only if your network settings. For Manual setup, skip to continue. Click Next to the next page. It is strongly recommended to change the admin account password, enter a new password and click Next. D-Link DAP-1360 User Manual 23 Configuration If you want to change your network settings to save your wireless device supports Wi-Fi Protected Setup (WPS). Click Save to take effect AP will display. In order for your password. Section 3 -
When the device has finished rebooting the main screen will reboot automatically. Select Auto as the configuration method only if your network settings. For Manual setup, skip to continue. Click Next to the next page. It is strongly recommended to change the admin account password, enter a new password and click Next. D-Link DAP-1360 User Manual 23 Configuration If you want to change your network settings to save your wireless device supports Wi-Fi Protected Setup (WPS). Click Save to take effect AP will display. In order for your password. Section 3 -
Product Manual
Page 25
D-Link DAP-1360 User Manual 25 Section 3 - Configuration The following screen will show you your network key to finish the Setup Wizard. Click Save to enter on your wireless clients.
D-Link DAP-1360 User Manual 25 Section 3 - Configuration The following screen will show you your network key to finish the Setup Wizard. Click Save to enter on your wireless clients.
Product Manual
Page 27
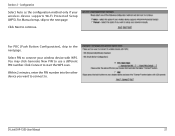
Configuration Select Auto as the configuration method only if your wireless device with WPS. For Manual setup, skip to continue. Click Next to the next page. For PBC (Push Button Configuration), skip to . Within 2 minutes, enter the PIN number into the other device you want to connect to the next page. Section 3 - Select PIN to start the WPS scan. Click Connect to connect your wireless device supports Wi-Fi Protected Setup (WPS). You may click Generate New PIN to use a different PIN number. D-Link DAP-1360 User Manual 27
Configuration Select Auto as the configuration method only if your wireless device with WPS. For Manual setup, skip to continue. Click Next to the next page. For PBC (Push Button Configuration), skip to . Within 2 minutes, enter the PIN number into the other device you want to connect to the next page. Section 3 - Select PIN to start the WPS scan. Click Connect to connect your wireless device supports Wi-Fi Protected Setup (WPS). You may click Generate New PIN to use a different PIN number. D-Link DAP-1360 User Manual 27

Product Manual
Page 29
If you want to connect to setup your access point from the list, click the radio button in the right column, and click Connect. Configuration Select Manual configuration to . Find your network manually. Section 3 - Enter the network name (SSID) of the network you do not know the exact name or would like to continue. D-Link DAP-1360 User Manual 29 Click Next to search for the wireless network, click Site Survey.
If you want to connect to setup your access point from the list, click the radio button in the right column, and click Connect. Configuration Select Manual configuration to . Find your network manually. Section 3 - Enter the network name (SSID) of the network you do not know the exact name or would like to continue. D-Link DAP-1360 User Manual 29 Click Next to search for the wireless network, click Site Survey.
Product Manual
Page 30
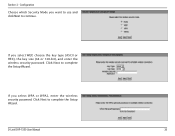
Section 3 - Click Next to continue. D-Link DAP-1360 User Manual 30 If you select WEP, choose the key type (ASCII or HEX), the key size (64 or 128-bit), and enter the wireless security password. Configuration Choose which Security Mode you want to use and click Next to complete the Setup Wizard. If you select WPA or WPA2, enter the wireless security password. Click Next to complete the Setup Wizard.
Section 3 - Click Next to continue. D-Link DAP-1360 User Manual 30 If you select WEP, choose the key type (ASCII or HEX), the key size (64 or 128-bit), and enter the wireless security password. Configuration Choose which Security Mode you want to use and click Next to complete the Setup Wizard. If you select WPA or WPA2, enter the wireless security password. Click Next to complete the Setup Wizard.
Product Manual
Page 31
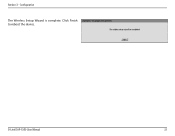
Click Finish to reboot the device. D-Link DAP-1360 User Manual 31 Section 3 - Configuration The Wireless Setup Wizard is complete.
Click Finish to reboot the device. D-Link DAP-1360 User Manual 31 Section 3 - Configuration The Wireless Setup Wizard is complete.

Product Manual
Page 33
Click Next to start the WPS scan. Select PIN to connect your wireless device supports Wi-Fi Protected Setup (WPS). Click Connect to continue. You may click Generate New PIN to the next page. For Manual setup, skip to use a different PIN number. Configuration Select Auto as the configuration method only if your wireless device with WPS. For PBC (Push Button Configuration), skip to . Within 2 minutes, enter the PIN number into the other device you want to connect to the next page. D-Link DAP-1360 User Manual 33 Section 3 -
Click Next to start the WPS scan. Select PIN to connect your wireless device supports Wi-Fi Protected Setup (WPS). Click Connect to continue. You may click Generate New PIN to the next page. For Manual setup, skip to use a different PIN number. Configuration Select Auto as the configuration method only if your wireless device with WPS. For PBC (Push Button Configuration), skip to . Within 2 minutes, enter the PIN number into the other device you want to connect to the next page. D-Link DAP-1360 User Manual 33 Section 3 -

Product Manual
Page 35
Section 3 - Click Next to search for the wireless network, click Site Survey. If you want to connect to setup your access point from the list, click the radio button in the right column, and click Connect. Find your network manually. Configuration Select Manual configuration to . Enter the network name (SSID) of the network you do not know the exact name or would like to continue. D-Link DAP-1360 User Manual 35
Section 3 - Click Next to search for the wireless network, click Site Survey. If you want to connect to setup your access point from the list, click the radio button in the right column, and click Connect. Find your network manually. Configuration Select Manual configuration to . Enter the network name (SSID) of the network you do not know the exact name or would like to continue. D-Link DAP-1360 User Manual 35

Product Manual
Page 36
Click Next to continue. If you select WEP, choose the key type (ASCII or HEX), the key size (64 or 128-bit), and enter the wireless security password. Configuration Choose which Security Mode you want to use and click Next to complete the Setup Wizard. If you select WPA or WPA2, enter the wireless security password. Section 3 - D-Link DAP-1360 User Manual 36 Click Next to complete the Setup Wizard.
Click Next to continue. If you select WEP, choose the key type (ASCII or HEX), the key size (64 or 128-bit), and enter the wireless security password. Configuration Choose which Security Mode you want to use and click Next to complete the Setup Wizard. If you select WPA or WPA2, enter the wireless security password. Section 3 - D-Link DAP-1360 User Manual 36 Click Next to complete the Setup Wizard.

Product Manual
Page 37
Click Finish to reboot the device. D-Link DAP-1360 User Manual 37 Section 3 - Configuration The Wireless Setup Wizard is complete.
Click Finish to reboot the device. D-Link DAP-1360 User Manual 37 Section 3 - Configuration The Wireless Setup Wizard is complete.
Product Manual
Page 38
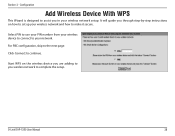
Click Connect to complete the setup. Start WPS on how to make it secure. Configuration Add Wireless Device With WPS This Wizard is designed to assist you through step-by-step instructions on the wireless device you are adding to you wireless network to continue. It will guide you in your wireless network and how to set up your wireless network setup. Select PIN to use your PIN number from your wireless device to connect to the next page. For PBC configuration, skip to your network. D-Link DAP-1360 User Manual 38 Section 3 -
Click Connect to complete the setup. Start WPS on how to make it secure. Configuration Add Wireless Device With WPS This Wizard is designed to assist you through step-by-step instructions on the wireless device you are adding to you wireless network to continue. It will guide you in your wireless network and how to set up your wireless network setup. Select PIN to use your PIN number from your wireless device to connect to the next page. For PBC configuration, skip to your network. D-Link DAP-1360 User Manual 38 Section 3 -

Product Manual
Page 39
Click Connect to complete the setup. Press down the Push Button on the wireless device that you are adding to your network. D-Link DAP-1360 User Manual 39 Section 3 - Configuration Select PBC to use the Push Button Configuration in order to connect to your network to continue.
Click Connect to complete the setup. Press down the Push Button on the wireless device that you are adding to your network. D-Link DAP-1360 User Manual 39 Section 3 - Configuration Select PBC to use the Push Button Configuration in order to connect to your network to continue.

Product Manual
Page 40
Configuration Manual Configuration Wireless Settings You may manually configure your DAP-1360 instead of running the setup wizard. • Access Point mode - page 46 • WISP Client Router mode - page 44 • Bridge mode - page 45 • Bridge with AP mode - page 47 D-Link DAP-1360 User Manual 40 page 43 • Wireless Client mode - page 41 • Repeater mode - page 47 • WISP Repeater mode - Section 3 -
Configuration Manual Configuration Wireless Settings You may manually configure your DAP-1360 instead of running the setup wizard. • Access Point mode - page 46 • WISP Client Router mode - page 44 • Bridge mode - page 45 • Bridge with AP mode - page 47 D-Link DAP-1360 User Manual 40 page 43 • Wireless Client mode - page 41 • Repeater mode - page 47 • WISP Repeater mode - Section 3 -

Product Manual
Page 42
...SSID of your wireless network to be seen by the DAP-1360. Enable: Enable the Wi-Fi Protected Setup feature. Generate New Create a random number that is still possible to the wireless network using Wi-Fi Protected Setup. You can still be displayed when the Wi-Fi ... Reset to Resets Wi-Fi Protected Status to Default: Restore the default PIN of your DAP-1360 in order to connect to select Best (automatic) for more information regarding the wireless security. D-Link DAP-1360 User Manual 42 Transmission Rate: Select the transmit rate. Section 3 - Configuration Channel Width...
...SSID of your wireless network to be seen by the DAP-1360. Enable: Enable the Wi-Fi Protected Setup feature. Generate New Create a random number that is still possible to the wireless network using Wi-Fi Protected Setup. You can still be displayed when the Wi-Fi ... Reset to Resets Wi-Fi Protected Status to Default: Restore the default PIN of your DAP-1360 in order to connect to select Best (automatic) for more information regarding the wireless security. D-Link DAP-1360 User Manual 42 Transmission Rate: Select the transmit rate. Section 3 - Configuration Channel Width...


