User Guide
Page 6
.... Proxy DNS Menu ...36 Figure 18. Redirect Port - Static Route Configuration Menu ...42 Figure 24. Bridge Configuration Menus ...47 Figure 29. Update Firmware Screen ...53 Router with PPP Configuration Menu 34 Figure 17. Login to PC Connection 7 Figure 5. Connection Profile Menu...31 Figure 14. Add Menu ...40 Figure 22. Save Changes... 26. Define Rules Menu 44 Figure 27. Bridge Configuration Menu...48 Figure 30. Layer 2 Filter Menu ...49 Figure 31. Restart System Window ...52 Figure 35. Factory Reset Screen ...52 Figure 36.
.... Proxy DNS Menu ...36 Figure 18. Redirect Port - Static Route Configuration Menu ...42 Figure 24. Bridge Configuration Menus ...47 Figure 29. Update Firmware Screen ...53 Router with PPP Configuration Menu 34 Figure 17. Login to PC Connection 7 Figure 5. Connection Profile Menu...31 Figure 14. Add Menu ...40 Figure 22. Save Changes... 26. Define Rules Menu 44 Figure 27. Bridge Configuration Menu...48 Figure 30. Layer 2 Filter Menu ...49 Figure 31. Restart System Window ...52 Figure 35. Factory Reset Screen ...52 Figure 36.
User Guide
Page 15
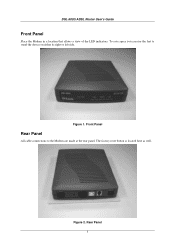
Figure 1. To save space you can use the feet to the Modem are made at the rear panel. Rear Panel 3 DSL-502G ADSL Router User's Guide Front Panel Place the Modem in a location that allows a view of the LED indicators. Front Panel Rear Panel All cable connections to stand the device on either its right or left side. The factory reset button is located here as well. Figure 2.
Figure 1. To save space you can use the feet to the Modem are made at the rear panel. Rear Panel 3 DSL-502G ADSL Router User's Guide Front Panel Place the Modem in a location that allows a view of the LED indicators. Front Panel Rear Panel All cable connections to stand the device on either its right or left side. The factory reset button is located here as well. Figure 2.
User Guide
Page 16
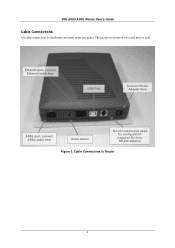
DSL-502G ADSL Router User's Guide Cable Connections All cable connections to Router 4 Cable Connections to the Router are made at the rear panel. Ethernet port, connect Ethernet cable here USB Port Connect Power Adapter here ADSL port, connect ADSL cable here Reset button RJ-14 console port used for configuration (requires RJ-14 to RS-232 adapter) Figure 3. The factory reset button is located here as well.
DSL-502G ADSL Router User's Guide Cable Connections All cable connections to Router 4 Cable Connections to the Router are made at the rear panel. Ethernet port, connect Ethernet cable here USB Port Connect Power Adapter here ADSL port, connect ADSL cable here Reset button RJ-14 console port used for configuration (requires RJ-14 to RS-232 adapter) Figure 3. The factory reset button is located here as well.
User Guide
Page 64
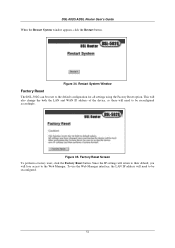
DSL-502G ADSL Router User's Guide When the Restart System window appears, click the Restart button. Restart System Window Factory Reset The DSL-502G can be reconfigured accordingly. This will also change the both the LAN and WAN IP address of the device, so these will need to the... Web Manager. Since the IP settings will return to their default, you will need to be reset to the default configuration...
DSL-502G ADSL Router User's Guide When the Restart System window appears, click the Restart button. Restart System Window Factory Reset The DSL-502G can be reconfigured accordingly. This will also change the both the LAN and WAN IP address of the device, so these will need to the... Web Manager. Since the IP settings will return to their default, you will need to be reset to the default configuration...

