User Manual
Page 1
INSTRUCTION BOOKLET BC Salt, Pepper and Spice Mill SG-3 For your safety and continued enjoyment of this product, always read the instruction book carefully before using.
INSTRUCTION BOOKLET BC Salt, Pepper and Spice Mill SG-3 For your safety and continued enjoyment of this product, always read the instruction book carefully before using.
User Manual
Page 2
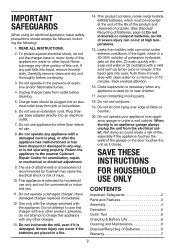
... Batteries 6 Warranty 7 2 SAVE THESE INSTRUCTIONS FOR HOUSEHOLD USE ONLY CONTENTS Important Safeguards 2 Parts and Features 3 Assembly 4 Operation 5 Quick Tips 6 Charging & Battery Life 6 Cleaning and Maintenance 6 Disposal/Recycling of table or counter. 20. Unplug charger base from outlet before continuing. 3. Plug charger base adapter directly into an electrical outlet. 7. Do not use an extension cord. Never submerge...
... Batteries 6 Warranty 7 2 SAVE THESE INSTRUCTIONS FOR HOUSEHOLD USE ONLY CONTENTS Important Safeguards 2 Parts and Features 3 Assembly 4 Operation 5 Quick Tips 6 Charging & Battery Life 6 Cleaning and Maintenance 6 Disposal/Recycling of table or counter. 20. Unplug charger base from outlet before continuing. 3. Plug charger base adapter directly into an electrical outlet. 7. Do not use an extension cord. Never submerge...
User Manual
Page 3
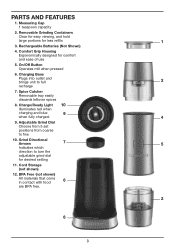
... 4. Adjustable Grind Dial Choose from 5 set positions from coarse to full 2 recharge 7. Grind Directional Arrows 7 5 Indicates which direction to turn the adjustable grind dial for comfort and ease of use 5. Spice Catcher Removable tray easily discards ...leftover spices 8. Cord Storage (not shown) 12. BPA Free (not shown) All materials that come in contact with food 6 are BPA free. 2 8 3 PARTS...
... 4. Adjustable Grind Dial Choose from 5 set positions from coarse to full 2 recharge 7. Grind Directional Arrows 7 5 Indicates which direction to turn the adjustable grind dial for comfort and ease of use 5. Spice Catcher Removable tray easily discards ...leftover spices 8. Cord Storage (not shown) 12. BPA Free (not shown) All materials that come in contact with food 6 are BPA free. 2 8 3 PARTS...
User Manual
Page 4
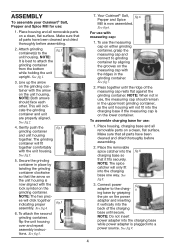
...See fig.6. To attach the second grinding container, flip the unit housing over and repeat assembly instructions. NOTE: When not in the grinding container. See fig.8. 3. See fig.9. 4 For use : 1. Place the removable spice catcher into the charging base if the measuring cap is now...: The two piec- Make sure that all removable parts on a clean, flat surface. ASSEMBLY To assemble your Cuisinart® Salt, Pepper and Spice Mill for use , the measuring cap should face each other. Make sure that all removable parts on a clean, flat surface. Line up the ...
...See fig.6. To attach the second grinding container, flip the unit housing over and repeat assembly instructions. NOTE: When not in the grinding container. See fig.8. 3. See fig.9. 4 For use : 1. Place the removable spice catcher into the charging base if the measuring cap is now...: The two piec- Make sure that all removable parts on a clean, flat surface. ASSEMBLY To assemble your Cuisinart® Salt, Pepper and Spice Mill for use , the measuring cap should face each other. Make sure that all removable parts on a clean, flat surface. Line up the ...
User Manual
Page 5
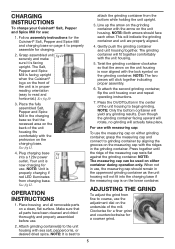
...with sea salt, peppercorns, or desired dried spice. Place housing and all parts have been cleaned and dried thoroughly and properly assembled before use : 1. NOTE: It is now charging for use , the measuring cap should face each other. The grinding container will not...used on page 4 to read and horizontal.) See fig.10. 3. Follow assembly instructions for charging. 2. NOTE: Unit is facing upright. NOTE: Only the bottom container will actually take place. Gently push the grinding container and unit housing together. CHARGING INSTRUCTIONS To charge your Cuisinart&#...
...with sea salt, peppercorns, or desired dried spice. Place housing and all parts have been cleaned and dried thoroughly and properly assembled before use : 1. NOTE: It is now charging for use , the measuring cap should face each other. The grinding container will not...used on page 4 to read and horizontal.) See fig.10. 3. Follow assembly instructions for charging. 2. NOTE: Unit is facing upright. NOTE: Only the bottom container will actually take place. Gently push the grinding container and unit housing together. CHARGING INSTRUCTIONS To charge your Cuisinart&#...
User Manual
Page 6
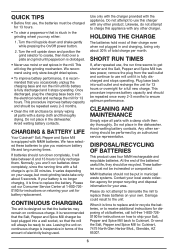
... the appliance. Any other servicing should be performed by simply wiping all parts with any other charger....use this appliance with a damp cloth then dry thoroughly. At the end of electricity being used. This will take only about 30% of old batteries, call our Consumer Service...use mill until peppercorn is time to replace and/or recycle the batteries, or to Cuisinart. Please call toll-free 1-800-7260190 for battery replacement. QUICK TIPS • Before first use, the batteries must not be recycled. NiMH batteries should be charged for instructions...
... the appliance. Any other servicing should be performed by simply wiping all parts with any other charger....use this appliance with a damp cloth then dry thoroughly. At the end of electricity being used. This will take only about 30% of old batteries, call our Consumer Service...use mill until peppercorn is time to replace and/or recycle the batteries, or to Cuisinart. Please call toll-free 1-800-7260190 for battery replacement. QUICK TIPS • Before first use, the batteries must not be recycled. NiMH batteries should be charged for instructions...
User Manual
Page 7
... 1-800-726-0190 for packages that you use . Cuisinart cannot be held responsible for in 120 volt outlets and only with accessories, replacement parts or repair service other than Cuisinart's Authorized Service Center, please remind the servicer to us. The retail store shall then, at 1-800-726-0190 to ensure that the problem is properly diagnosed, the product is not...
... 1-800-726-0190 for packages that you use . Cuisinart cannot be held responsible for in 120 volt outlets and only with accessories, replacement parts or repair service other than Cuisinart's Authorized Service Center, please remind the servicer to us. The retail store shall then, at 1-800-726-0190 to ensure that the problem is properly diagnosed, the product is not...

User Manual
Page 8
©2014 Cuisinart 150 Milford Road East Windsor, NJ 08520 Printed in China 14CE004502 G IB-12261-ESP Trademarks or service marks referred to herein are the trademarks or service marks of their respective owners.
©2014 Cuisinart 150 Milford Road East Windsor, NJ 08520 Printed in China 14CE004502 G IB-12261-ESP Trademarks or service marks referred to herein are the trademarks or service marks of their respective owners.
User Manual
Page 17
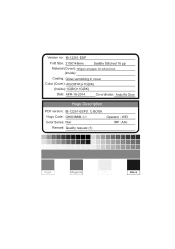
Version no : IB-12261-ESP Fold Size: 210X148mm Saddle Stitched 16 pp Material (Cover): 105gsm art paper for whole book (Inside): Coating: Gloss varnishing in cover Color (Cover): 4C(CMYK)+1C(BK) (Inside): 1C(BK)+1C(BK) Date: APR-18-2014 Co-ordinator: Andy Ws Chan Hugo Description PDF version : IB-12261-ESP(1.1) BOOK Hugo Code : GHI0388IB-1-1 Color Series: Non Remark: Quality request (1) Operator : WEI IRP : AAJ
Version no : IB-12261-ESP Fold Size: 210X148mm Saddle Stitched 16 pp Material (Cover): 105gsm art paper for whole book (Inside): Coating: Gloss varnishing in cover Color (Cover): 4C(CMYK)+1C(BK) (Inside): 1C(BK)+1C(BK) Date: APR-18-2014 Co-ordinator: Andy Ws Chan Hugo Description PDF version : IB-12261-ESP(1.1) BOOK Hugo Code : GHI0388IB-1-1 Color Series: Non Remark: Quality request (1) Operator : WEI IRP : AAJ


