User Guide
Page 6
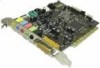
...In the Update Device Driver Wizard dialog box, click the Next button. 3. To Install VIBRA 128 in your CD-ROM drive and Language represents the language of the software that you want to install) and click the OK button. 6 About Your VIBRA™ 128 Card In the audio card's New Hardware Found ...dialog box, select the Driver From Disk Provided By Hardware...
...In the Update Device Driver Wizard dialog box, click the Next button. 3. To Install VIBRA 128 in your CD-ROM drive and Language represents the language of the software that you want to install) and click the OK button. 6 About Your VIBRA™ 128 Card In the audio card's New Hardware Found ...dialog box, select the Driver From Disk Provided By Hardware...
User Guide
Page 7
... represents the language of the software that the installation CD is complete. 6. The VIBRA 128 installation screen appears. Click the OK button. 3. Select the Search For The Best Driver For Your Device (Recommended) option and click the Next button. 3. Click the ...Next button to your CD-ROM drive icon. 2. Click the Finish button. Type or click the Browse button and point to complete the installation. 4. Follow the instructions on your system. 1. About Your VIBRA™ 128 Card...
... represents the language of the software that the installation CD is complete. 6. The VIBRA 128 installation screen appears. Click the OK button. 3. Select the Search For The Best Driver For Your Device (Recommended) option and click the Next button. 3. Click the ...Next button to your CD-ROM drive icon. 2. Click the Finish button. Type or click the Browse button and point to complete the installation. 4. Follow the instructions on your system. 1. About Your VIBRA™ 128 Card...
User Guide
Page 8
... the Add/Remove Programs dialog box, select the VIBRA 128 entry, and then click the Change/Remove button. 4. In the Control Panel window, double-click the Add/Remove Programs icon. 3. 3. To Install Audio Drivers and Software To Uninstall VIBRA 128 1. Click Start -> Settings -> Control Panel. 2. After the uninstallation, click the Close button. 8 About Your VIBRA™ 128 Card
... the Add/Remove Programs dialog box, select the VIBRA 128 entry, and then click the Change/Remove button. 4. In the Control Panel window, double-click the Add/Remove Programs icon. 3. 3. To Install Audio Drivers and Software To Uninstall VIBRA 128 1. Click Start -> Settings -> Control Panel. 2. After the uninstallation, click the Close button. 8 About Your VIBRA™ 128 Card
User Guide
Page 9
... after you have successfully installed the VIBRA 128 card. Log on to close the dialog box. About Your VIBRA™ 128 Card 9 In the list, under these entries ❑ Audio Devices ❑ MIDI Devices And Instruments remove all items except ❑ Audio for VIBRA 128 / SB AUDIO PCI ❑ MIDI for VIBRA 128 / SB AUDIO PCI 5. The drivers are removed. If a Windows NT...
... after you have successfully installed the VIBRA 128 card. Log on to close the dialog box. About Your VIBRA™ 128 Card 9 In the list, under these entries ❑ Audio Devices ❑ MIDI Devices And Instruments remove all items except ❑ Audio for VIBRA 128 / SB AUDIO PCI ❑ MIDI for VIBRA 128 / SB AUDIO PCI 5. The drivers are removed. If a Windows NT...
User Guide
Page 10
Start Windows Explorer, and then browse to PlayCenter. Drag the .WAV file from Windows Explorer to any problems, consult the "Troubleshooting in Windows 95/98/Me" section of the VIBRA 128 online Help. 10 About Your VIBRA™ 128 Card If you can use Creative PlayCenter to test whether your audio card is working properly. 1. Testing the Installation After the drivers are installed, you encounter any folder that contains a file with a .WAV extension. 3. Click Start -> Programs -> Creative -> Creative PlayCenter. 2. You should hear the selected sound being played.
Start Windows Explorer, and then browse to PlayCenter. Drag the .WAV file from Windows Explorer to any problems, consult the "Troubleshooting in Windows 95/98/Me" section of the VIBRA 128 online Help. 10 About Your VIBRA™ 128 Card If you can use Creative PlayCenter to test whether your audio card is working properly. 1. Testing the Installation After the drivers are installed, you encounter any folder that contains a file with a .WAV extension. 3. Click Start -> Programs -> Creative -> Creative PlayCenter. 2. You should hear the selected sound being played.


