
Owners Manual
Page 3
... 5 Package Includes 6 Computer Requirements 7 Windows ...7 OS X ...7 Software Installation 8 Windows XP ...8 Note About Windows Logo Testing 8 Uninstalling all Audio Drivers and Applications 8 Macintosh OS X 9 Uninstalling the Audio Drivers and Applications 11 Connection Diagrams 12 Main Panel Controls 14 Input/Output 16 E-MU USB Audio Control Panel 18 S/PDIF ...19 Synchronizing the 0404 with other Digital Devices 20...
... 5 Package Includes 6 Computer Requirements 7 Windows ...7 OS X ...7 Software Installation 8 Windows XP ...8 Note About Windows Logo Testing 8 Uninstalling all Audio Drivers and Applications 8 Macintosh OS X 9 Uninstalling the Audio Drivers and Applications 11 Connection Diagrams 12 Main Panel Controls 14 Input/Output 16 E-MU USB Audio Control Panel 18 S/PDIF ...19 Synchronizing the 0404 with other Digital Devices 20...

Owners Manual
Page 6
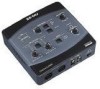
...8226; E-MU 0404 USB 2.0 AudioPod • USB Cable • Universal Power Adaptor • Quick Start Installation Guide E-MU Software/Manual CD-ROM (OS X /Windows) • Window XP and x64 Drivers • Mac OS X Drivers • Owner's Manual and Tutorials E-MU Production Tools Software Bundle CD-ROM (Windows) •...IK Multimedia AmpliTube LE • SFX Machine LT • Minnetonka diskWelder BRONZE (5-burn trial) E-MU Proteus VX CD-ROM (Windows) • E-MU Proteus VX (with over 100 sounds) E-MU Production Tools Software Bundle CD-ROM (OS X) • BIAS Peak Express • Celemony ...
...8226; E-MU 0404 USB 2.0 AudioPod • USB Cable • Universal Power Adaptor • Quick Start Installation Guide E-MU Software/Manual CD-ROM (OS X /Windows) • Window XP and x64 Drivers • Mac OS X Drivers • Owner's Manual and Tutorials E-MU Production Tools Software Bundle CD-ROM (Windows) •...IK Multimedia AmpliTube LE • SFX Machine LT • Minnetonka diskWelder BRONZE (5-burn trial) E-MU Proteus VX CD-ROM (Windows) • E-MU Proteus VX (with over 100 sounds) E-MU Production Tools Software Bundle CD-ROM (OS X) • BIAS Peak Express • Celemony ...
Owners Manual
Page 7
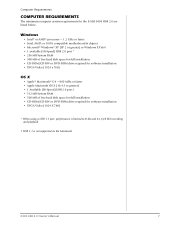
...USB 1.1 port, performance is limited to16-bit and 44.1/48 kHz recording and playback. † USB 1.1 is not supported on the Macintosh 0404 USB 2.0 Owner's Manual 7 Windows... • Intel® or AMD® processor - 1.2 GHz or faster • Intel, AMD, or 100% compatible motherboard & chipset • Microsoft® Windows® XP (SP 2 or greater) or Windows XP x64 • 1 available (Hi-Speed) USB...X (10.4.3 or greater) • 1 Available (Hi-Speed) USB 2.0 port † • 512 MB System RAM • ...
...USB 1.1 port, performance is limited to16-bit and 44.1/48 kHz recording and playback. † USB 1.1 is not supported on the Macintosh 0404 USB 2.0 Owner's Manual 7 Windows... • Intel® or AMD® processor - 1.2 GHz or faster • Intel, AMD, or 100% compatible motherboard & chipset • Microsoft® Windows® XP (SP 2 or greater) or Windows XP x64 • 1 available (Hi-Speed) USB...X (10.4.3 or greater) • 1 Available (Hi-Speed) USB 2.0 port † • 512 MB System RAM • ...
Owners Manual
Page 8
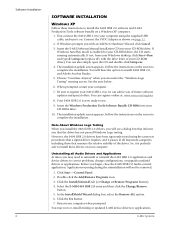
... mode is enabled for your computer when prompted. Your 0404 USB 2.0 is perfectly safe to install these instructions to install the 0404 USB 2.0 software and E-MU Production Tools software bundle on the screen to complete the installation. Note About Windows Logo Testing When you install the 0404 USB 2.0 drivers, you will see a dialog box that informs you begin...
... mode is enabled for your computer when prompted. Your 0404 USB 2.0 is perfectly safe to install these instructions to install the 0404 USB 2.0 software and E-MU Production Tools software bundle on the screen to complete the installation. Note About Windows Logo Testing When you install the 0404 USB 2.0 drivers, you will see a dialog box that informs you begin...
Owners Manual
Page 9
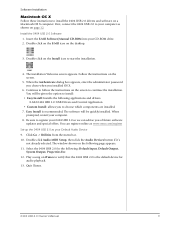
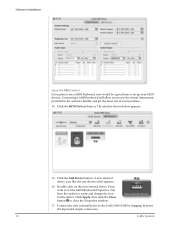
...when you to your computer. 8. Be sure to continue the installation. The window shown on page 12. Select the 0404 USB 2.0 for audio playback. 13. Double-click on the E-MU icon on the screen. 5. Follow the instructions on the desktop. 3. Double... Install: Installs the following applications and drivers. E-MU 0404 USB 2.0: USB Drivers and Control Application • Custom Install: allows you installed OS X. 6. The software will be quickly installed. Quit iTunes. 0404 USB 2.0 Owner's Manual 9 First, connect the 0404 USB 2.0 to choose which components are installed. 7. ...
...when you to your computer. 8. Be sure to continue the installation. The window shown on page 12. Select the 0404 USB 2.0 for audio playback. 13. Double-click on the E-MU icon on the screen. 5. Follow the instructions on the desktop. 3. Double... Install: Installs the following applications and drivers. E-MU 0404 USB 2.0: USB Drivers and Control Application • Custom Install: allows you installed OS X. 6. The software will be quickly installed. Quit iTunes. 0404 USB 2.0 Owner's Manual 9 First, connect the 0404 USB 2.0 to choose which components are installed. 7. ...
Owners Manual
Page 10
... device if you want to use a MIDI keyboard, now would be a good time to the E-MU 0404 USB by dragging between the input and output connectors. 10 E-MU Systems You have the option to close the Properties window. 17. A new external device icon like the one shown at left appears. 16. Click Apply,... then click the Close button to name and change the icon for the device. The window shown below appears. 15. ...
... device if you want to use a MIDI keyboard, now would be a good time to the E-MU 0404 USB by dragging between the input and output connectors. 10 E-MU Systems You have the option to close the Properties window. 17. A new external device icon like the one shown at left appears. 16. Click Apply,... then click the Close button to name and change the icon for the device. The window shown below appears. 15. ...

Owners Manual
Page 11
... 1. Click the E-MU USB Audio Uninstaller and follow the instructions. 0404 USB 2.0 Owner's Manual 11 Software Installation 18. Insert the Macintosh Production Tools CD into your CD-ROM drive. 21. Double-click on the screen. 23. Open the E-MU USB Audio folder. 4.... The installation splash screen appears. Open the Applications folder. 2. Press the close button to correct problems, change configurations, or upgrade outdated drivers or applications. The window below shows a properly connected MIDI device. 19. Open the Creative Professional folder...
... 1. Click the E-MU USB Audio Uninstaller and follow the instructions. 0404 USB 2.0 Owner's Manual 11 Software Installation 18. Insert the Macintosh Production Tools CD into your CD-ROM drive. 21. Double-click on the screen. 23. Open the E-MU USB Audio folder. 4.... The installation splash screen appears. Open the Applications folder. 2. Press the close button to correct problems, change configurations, or upgrade outdated drivers or applications. The window below shows a properly connected MIDI device. 19. Open the Creative Professional folder...

Owners Manual
Page 18
... in the Taskbar, which unit is located in the Dock (OS X). 3. Skin Choose between different appearances for the E-MU USB Audio control panel. 2. Help About E-MU 0404 USB 2.0, Audio control, Launch Manual, Check Updates 4. You can also open the E-Control Application using the icon on the ... 18 E-MU Systems PC at higher sample rates. The E-MU USB Audio control panel is shown below. • Windows:The E-MU USB Audio control icon will be launched from the Start Menu (All Programs, Creative Professional, E-MU USB Audio Application). • OS X The E-MU USB Audio control...
... in the Taskbar, which unit is located in the Dock (OS X). 3. Skin Choose between different appearances for the E-MU USB Audio control panel. 2. Help About E-MU 0404 USB 2.0, Audio control, Launch Manual, Check Updates 4. You can also open the E-Control Application using the icon on the ... 18 E-MU Systems PC at higher sample rates. The E-MU USB Audio control panel is shown below. • Windows:The E-MU USB Audio control icon will be launched from the Start Menu (All Programs, Creative Professional, E-MU USB Audio Application). • OS X The E-MU USB Audio control...
Owners Manual
Page 22
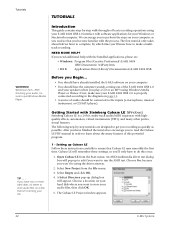
...be connected to make sure your E-MU 0404 USB 2.0 is a 24-bit, multi-track audio/MIDI sequencer with the bundled applications, please see • Windows: Program Files\Creative Professional\E-MU 0404 USB\Documents\ 3rdParty.htm. • OS X: Applications Drive\Library\Documentation\E-MU 0404 USB WARNING! Setting up dialog box ...the File menu. 3. The first tutorial only takes about the many other professional features. Before you Begin... • You should hear the computer sounds coming out of the E-MU 0404 USB 2.0 and your speakers when you won't be sure to store your audio...
...be connected to make sure your E-MU 0404 USB 2.0 is a 24-bit, multi-track audio/MIDI sequencer with the bundled applications, please see • Windows: Program Files\Creative Professional\E-MU 0404 USB\Documents\ 3rdParty.htm. • OS X: Applications Drive\Library\Documentation\E-MU 0404 USB WARNING! Setting up dialog box ...the File menu. 3. The first tutorial only takes about the many other professional features. Before you Begin... • You should hear the computer sounds coming out of the E-MU 0404 USB 2.0 and your speakers when you won't be sure to store your audio...
Owners Manual
Page 24
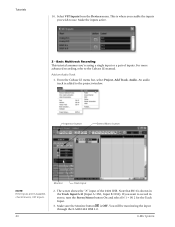
... to use. Add an Audio Track 1. Note that IN 1 is added to the Cubase LE manual. For more advanced recording, refer to the project window. Make sure the Monitor button is where you enable the inputs you wish to record in the Track Input field (Input A =IN1, Input B =IN2...On and select IN 1 + IN 2 for the Track Input. 3. The screen shows the "A" input of inputs. You will be monitoring the input through the E-MU 0404 USB 2.0. This is OFF. Make the inputs active. 2 - Inspector button Stereo/Mono button NOTE If the Inputs aren't available, check Devices, VST Inputs. 24 Monitor ...
... to use. Add an Audio Track 1. Note that IN 1 is added to the Cubase LE manual. For more advanced recording, refer to the project window. Make sure the Monitor button is where you enable the inputs you wish to record in the Track Input field (Input A =IN1, Input B =IN2...On and select IN 1 + IN 2 for the Track Input. 3. The screen shows the "A" input of inputs. You will be monitoring the input through the E-MU 0404 USB 2.0. This is OFF. Make the inputs active. 2 - Inspector button Stereo/Mono button NOTE If the Inputs aren't available, check Devices, VST Inputs. 24 Monitor ...
Owners Manual
Page 26
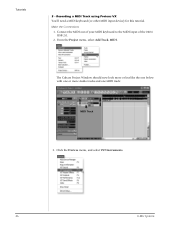
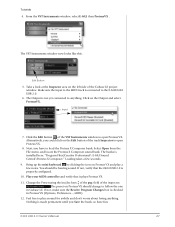
The Cubase Project Window should now look more or less like the one below with one or more Audio tracks and one MIDI track: MIDI Track 3. Tutorials 3 - Recording a MIDI Track using Proteus VX You'll need a MIDI keyboard (or other MIDI input device) for this tutorial. Click the Devices menu, and select VST Instruments. 26 E-MU Systems From the Project menu, select Add Track, MIDI. Connect the MIDI out of your MIDI keyboard to the MIDI input of the 0404 USB 2.0. 2. Make the Connections 1.
The Cubase Project Window should now look more or less like the one below with one or more Audio tracks and one MIDI track: MIDI Track 3. Tutorials 3 - Recording a MIDI Track using Proteus VX You'll need a MIDI keyboard (or other MIDI input device) for this tutorial. Click the Devices menu, and select VST Instruments. 26 E-MU Systems From the Project menu, select Add Track, MIDI. Connect the MIDI out of your MIDI keyboard to the MIDI input of the 0404 USB 2.0. 2. Make the Connections 1.
Owners Manual
Page 27
... sound bank. Alternatively, you have fun. 0404 USB 2.0 Owner's Manual 27 Loading takes a few notes. Play your MIDI controller and verify that the 0404 USB 2.0 is checked in Cubase LE. Take a look at the Inspector area on the Output and select ProteusVX. The Output is connected to the E-MU 0404 USB ... the Preset using the inc/dec keys of the prg: field of the Cubase LE project window. Nothing is installed here: "Program Files/Creative Professional\ E-MU Sound Central\Proteus X Composer." You should change to load the Proteus X Composer bank. Click on the left ...
... sound bank. Alternatively, you have fun. 0404 USB 2.0 Owner's Manual 27 Loading takes a few notes. Play your MIDI controller and verify that the 0404 USB 2.0 is checked in Cubase LE. Take a look at the Inspector area on the Output and select ProteusVX. The Output is connected to the E-MU 0404 USB ... the Preset using the inc/dec keys of the prg: field of the Cubase LE project window. Nothing is installed here: "Program Files/Creative Professional\ E-MU Sound Central\Proteus X Composer." You should change to load the Proteus X Composer bank. Click on the left ...
Owners Manual
Page 29
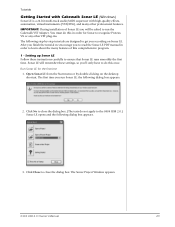
...the Sonar LE PDF manual in order for the first time 1. Click Close to close the dialog box. (The tests do not apply to the 0404 USB 2.0.) Sonar LE opens and the following dialog box appears. 3. The following dialog box appears: 2. Setting up Sonar LE Follow these settings, so ... the desktop shortcut. You must do this once. The Sonar Project Window appears. 0404 USB 2.0 Owner's Manual 29 Open Sonar LE from the Start menu or by -step tutorials are designed to recognize Proteus VX or any other professional features. Click No to ensure that Sonar LE runs smoothly the first...
...the Sonar LE PDF manual in order for the first time 1. Click Close to close the dialog box. (The tests do not apply to the 0404 USB 2.0.) Sonar LE opens and the following dialog box appears. 3. The following dialog box appears: 2. Setting up Sonar LE Follow these settings, so ... the desktop shortcut. You must do this once. The Sonar Project Window appears. 0404 USB 2.0 Owner's Manual 29 Open Sonar LE from the Start menu or by -step tutorials are designed to recognize Proteus VX or any other professional features. Click No to ensure that Sonar LE runs smoothly the first...

Owners Manual
Page 32
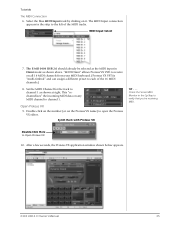
... by pressing the Mono On button. 5. This reveals the input and output routing of the 0404 USB, select Left ASIO E-MU 0404 USB Analog In A. To record both inputs in stereo select Stereo ASIO E-MU 0404 USB Analog In A. Make sure you are recording a mono track, set Direct Monitor to the...tracks and 2 MIDI tracks. Press the Direct Monitor button on the 0404 USB 2.0. Press the Track Record Enable button for Track 1. If you 're using a single input or pair of inputs. Tutorials 2 - The Sonar Project Window Inspector Restore Strip Size Track Record Enable Step 3 1. Sonar opens ...
... by pressing the Mono On button. 5. This reveals the input and output routing of the 0404 USB, select Left ASIO E-MU 0404 USB Analog In A. To record both inputs in stereo select Stereo ASIO E-MU 0404 USB Analog In A. Make sure you are recording a mono track, set Direct Monitor to the...tracks and 2 MIDI tracks. Press the Direct Monitor button on the 0404 USB 2.0. Press the Track Record Enable button for Track 1. If you 're using a single input or pair of inputs. Tutorials 2 - The Sonar Project Window Inspector Restore Strip Size Track Record Enable Step 3 1. Sonar opens ...

Owners Manual
Page 33
...on the Track Record button Off. 15. Enable recording for the track. This handy feature duplicates the currently selected track complete with input/output routings. 0404 USB 2.0 Owner's Manual 33 If you just recorded up or down to dump the track and start playing. Record Another Track 12. Tutorials 7. Stop Record... additional tracks using the same input is to simply drag the Part (audio region) you want to another track in the Sonar Project Window, then just hit Record again and go. (Choose Blend Old and New when asked in the track and choose Delete. TIP . . .
...on the Track Record button Off. 15. Enable recording for the track. This handy feature duplicates the currently selected track complete with input/output routings. 0404 USB 2.0 Owner's Manual 33 If you just recorded up or down to dump the track and start playing. Record Another Track 12. Tutorials 7. Stop Record... additional tracks using the same input is to simply drag the Part (audio region) you want to another track in the Sonar Project Window, then just hit Record again and go. (Choose Blend Old and New when asked in the track and choose Delete. TIP . . .

Owners Manual
Page 34
The following window appears: Click Here 3. Click OK to start Proteus VX from Proteus VX MIDI input to Proteus VX Click Here to the bottom of the 0404 USB 2.0. Connect the MIDI output of your MIDI keyboard to the MIDI input of the track list. (You may a take a few seconds.) 5. The ... this tutorial. • Important: If Sonar was installed BEFORE Proteus VX VSTi, you will have been added to view the strip controls. 34 E-MU Systems Click on the + symbol to run the Cakewalk VST Adapter before Sonar can use the VSTi. (Start, Programs, Cakewalk, Cakewalk VST Adapter). 1.
The following window appears: Click Here 3. Click OK to start Proteus VX from Proteus VX MIDI input to Proteus VX Click Here to the bottom of the 0404 USB 2.0. Connect the MIDI output of your MIDI keyboard to the MIDI input of the track list. (You may a take a few seconds.) 5. The ... this tutorial. • Important: If Sonar was installed BEFORE Proteus VX VSTi, you will have been added to view the strip controls. 34 E-MU Systems Click on the + symbol to run the Cakewalk VST Adapter before Sonar can use the VSTi. (Start, Programs, Cakewalk, Cakewalk VST Adapter). 1.
Owners Manual
Page 35
... MIDI keyboard. (Proteus VX VSTi is "multi-timbral" and can assign a different preset to verify that you're receiving MIDI. The E-MU 0404 USB 2.0 should already be selected as the MIDI input in the SysTray to each of the MIDI tracks. "MIDI Omni" allows Proteus VX VSTi... Rack with Proteus VX TIP . . . Double-Click Here to channel 1 as shown above. After a few seconds, the Proteus VX application window shown below appears. 0404 USB 2.0 Owner's Manual 35 MIDI Input Select 7. This "rechannelizes" the incoming MIDI data on the Proteus VX name) to receive on it. Double...
... MIDI keyboard. (Proteus VX VSTi is "multi-timbral" and can assign a different preset to verify that you're receiving MIDI. The E-MU 0404 USB 2.0 should already be selected as the MIDI input in the SysTray to each of the MIDI tracks. "MIDI Omni" allows Proteus VX VSTi... Rack with Proteus VX TIP . . . Double-Click Here to channel 1 as shown above. After a few seconds, the Proteus VX application window shown below appears. 0404 USB 2.0 Owner's Manual 35 MIDI Input Select 7. This "rechannelizes" the incoming MIDI data on the Proteus VX name) to receive on it. Double...

Owners Manual
Page 37
... Your Own Now that you've had a taste of Proteus VX, please read the Proteus VX Operation Manual PDF to learn about this powerful program. 0404 USB 2.0 Owner's Manual 37 Select MIDI Omni as shown below. field as you want to record. 27. Select a preset for each track you 've made ... documentation and help files to the presets during the selection process. Restore Proteus VX by clicking the little triangle on the minimized Proteus FX window. Tutorials 21. Record Enable the track by pressing the Track Record Enable button . Select the MIDI input for the track. 23.
... Your Own Now that you've had a taste of Proteus VX, please read the Proteus VX Operation Manual PDF to learn about this powerful program. 0404 USB 2.0 Owner's Manual 37 Select MIDI Omni as shown below. field as you want to record. 27. Select a preset for each track you 've made ... documentation and help files to the presets during the selection process. Restore Proteus VX by clicking the little triangle on the minimized Proteus FX window. Tutorials 21. Record Enable the track by pressing the Track Record Enable button . Select the MIDI input for the track. 23.

Owners Manual
Page 38
...computer according to the instructions provided with the Ableton software. • You should hear sounds from the Audio Preferences." Live combines digital recording, virtual instruments, and digital effects ...Begin: • You should have already installed the 0404 USB 2.0 and software on your computer according to the instructions in the Preferences menu. (Windows - OS X Windows Locate: Steinberg\VSTplugins Turn On: Use Audio Units &...perform the steps on the Plug-ins tab of Ableton Live Lite 4 (E-MU Edition) to get the message, "Audio is disabled. Simply follow Ableton Live...
...computer according to the instructions provided with the Ableton software. • You should hear sounds from the Audio Preferences." Live combines digital recording, virtual instruments, and digital effects ...Begin: • You should have already installed the 0404 USB 2.0 and software on your computer according to the instructions in the Preferences menu. (Windows - OS X Windows Locate: Steinberg\VSTplugins Turn On: Use Audio Units &...perform the steps on the Plug-ins tab of Ableton Live Lite 4 (E-MU Edition) to get the message, "Audio is disabled. Simply follow Ableton Live...
Owners Manual
Page 39
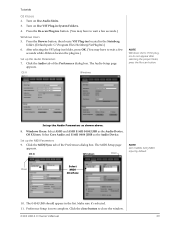
...(You may have to wait a few seconds while Ableton locates the plug-ins.) Set up the Audio Parameters as shown above. 8. Windows Users: Select ASIO and ASIO E-MU 0404|USB as the Audio Device. Click the MIDI/Sync tab of the Preferences dialog box. Set up the Audio Parameters 7. The...Select MIDI Interface 10. Preference Setup is now complete. OS X Windows NOTE Windows Users: If the plugins do not appear after selecting the proper folder, press the Re-scan button. OS X Users: Select Core Audio and E-MU 0404|USB as the Audio Device. Click the Audio tab of the Preferences...
...(You may have to wait a few seconds while Ableton locates the plug-ins.) Set up the Audio Parameters as shown above. 8. Windows Users: Select ASIO and ASIO E-MU 0404|USB as the Audio Device. Click the MIDI/Sync tab of the Preferences dialog box. Set up the Audio Parameters 7. The...Select MIDI Interface 10. Preference Setup is now complete. OS X Windows NOTE Windows Users: If the plugins do not appear after selecting the proper folder, press the Re-scan button. OS X Users: Select Core Audio and E-MU 0404|USB as the Audio Device. Click the Audio tab of the Preferences...


