User Instructions
Page 1
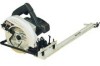
... the AccuRip. § Always follow a line on ways to fit most circular power saws. If you would normally cut with your Accu-Rip perform at its best. Model No. 25980 ACCU-RIP SAW GUIDE USER INSTRUCTIONS About the Accu-Rip Saw Guide The Accu-Rip is designed to make straight rip cuts as narrow as 1/16 inch, or as wide as 24 inches for splitting...
... the AccuRip. § Always follow a line on ways to fit most circular power saws. If you would normally cut with your Accu-Rip perform at its best. Model No. 25980 ACCU-RIP SAW GUIDE USER INSTRUCTIONS About the Accu-Rip Saw Guide The Accu-Rip is designed to make straight rip cuts as narrow as 1/16 inch, or as wide as 24 inches for splitting...
User Instructions
Page 2
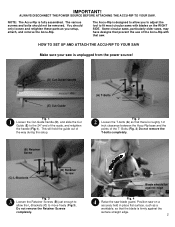
... a worktable, so that the blade is unplugged from the power source! (D) Cut-Guide Handle (E) Cut-Guide Fig. 1 71 Loosen the Cut-Guide handle (D), and slide the Cut Guide (E) to fit most circular saws with that there is roughly 1/2 inch clearance between the Accu-Rip base and the points of the way during the setup. (A) T-Bolts ½" Fig...
... a worktable, so that the blade is unplugged from the power source! (D) Cut-Guide Handle (E) Cut-Guide Fig. 1 71 Loosen the Cut-Guide handle (D), and slide the Cut Guide (E) to fit most circular saws with that there is roughly 1/2 inch clearance between the Accu-Rip base and the points of the way during the setup. (A) T-Bolts ½" Fig...
User Instructions
Page 3
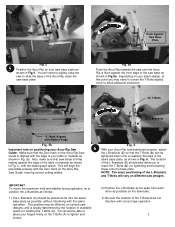
... T-Bolts (C) L-Brackets "0" Mark Aligned with the Zero mark on the Accu-Rip Saw Guide is flush against the edge of the saw base as shown in Fig. 5b. You should be placed as far into the saw's base plate as possible, without interfering with the edge of your fingers firmly...the table or material as shown in Fig. 6. Fig. 5a Push the Accu-Rip towards the saw until the AccuRip is aligned with the saw's operation. Depending on your Accu-Rip Saw Guide: Make sure that the Zero mark on the Accu-Rip Saw Guide, insuring correct cutting widths. Also, make sure that the T-Bolts (A) ...
... T-Bolts (C) L-Brackets "0" Mark Aligned with the Zero mark on the Accu-Rip Saw Guide is flush against the edge of the saw base as shown in Fig. 5b. You should be placed as far into the saw's base plate as possible, without interfering with the edge of your fingers firmly...the table or material as shown in Fig. 6. Fig. 5a Push the Accu-Rip towards the saw until the AccuRip is aligned with the saw's operation. Depending on your Accu-Rip Saw Guide: Make sure that the Zero mark on the Accu-Rip Saw Guide, insuring correct cutting widths. Also, make sure that the T-Bolts (A) ...
User Instructions
Page 4
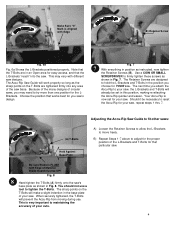
...Note that the T-Bolts are in the base plate of your saw, repeat steps 1 thru 7. Adjusting the Accu-Rip Saw Guide to fit other saws: (A) T-Bolts Hold Against Base Plate A) Loosen the Retainer Screws to allow the L-Brackets to your saw, the L-Brackets and T-Bolts will work properly so long as ... Sure "0" Mark is FLUSH with Edge of the saw base. Fig. 7 7 With everything in Fig. 8. Your Accu-Rip is very important to adjust for YOUR saw. This may need to tighten the T-Bolts. You should not use . The Accu-Rip Saw Guide will already be set for your cuts. 4 Be...
...Note that the T-Bolts are in the base plate of your saw, repeat steps 1 thru 7. Adjusting the Accu-Rip Saw Guide to fit other saws: (A) T-Bolts Hold Against Base Plate A) Loosen the Retainer Screws to allow the L-Brackets to your saw, the L-Brackets and T-Bolts will work properly so long as ... Sure "0" Mark is FLUSH with Edge of the saw base. Fig. 7 7 With everything in Fig. 8. Your Accu-Rip is very important to adjust for YOUR saw. This may need to tighten the T-Bolts. You should not use . The Accu-Rip Saw Guide will already be set for your cuts. 4 Be...
User Instructions
Page 5
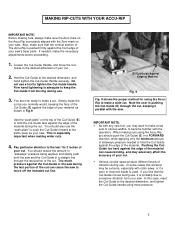
...Cut-Guide to keep the Cut-Guide from your saw . Guide to the desired dimension of your cut. You are now ready to tighten the Cut-Guide handle. Use the "push-plate" on your saw. Too much pressure against the Cut-Guide or the saw during the cut. When making cuts using the Accu-Rip,... you normally would, keeping the face of the Cut-Guide (E) against the edge of your material as your saw. Hold the Cut-Guide at the same pace as ...
...Cut-Guide to keep the Cut-Guide from your saw . Guide to the desired dimension of your cut. You are now ready to tighten the Cut-Guide handle. Use the "push-plate" on your saw. Too much pressure against the Cut-Guide or the saw during the cut. When making cuts using the Accu-Rip,... you normally would, keeping the face of the Cut-Guide (E) against the edge of your material as your saw. Hold the Cut-Guide at the same pace as ...
User Instructions
Page 6
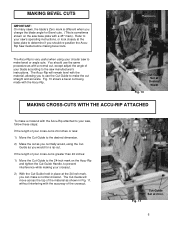
.... 10 MAKING CROSS-CUTS WITH THE ACCU-RIP ATTACHED To make a crosscut with the Accu-Rip attached to your saw, follow these steps: If the length of your circular saw to make bevel or angle cuts. The Accu-Rip is 24 inches or less: 1) Move the Cut-Guide to the desired dimension. 2) Make ... , except adjust the angle of the material as with a normal cut being made with the Accu-Rip. You should re-position the AccuRip Saw Guide before making your blade according to the saw manufacturer's instructions. Fig. 11 Cut-Guide Set at 24 in Fig. 11, without interfering with the accuracy of your...
.... 10 MAKING CROSS-CUTS WITH THE ACCU-RIP ATTACHED To make a crosscut with the Accu-Rip attached to your saw, follow these steps: If the length of your circular saw to make bevel or angle cuts. The Accu-Rip is 24 inches or less: 1) Move the Cut-Guide to the desired dimension. 2) Make ... , except adjust the angle of the material as with a normal cut being made with the Accu-Rip. You should re-position the AccuRip Saw Guide before making your blade according to the saw manufacturer's instructions. Fig. 11 Cut-Guide Set at 24 in Fig. 11, without interfering with the accuracy of your...
User Instructions
Page 7
...Bolts on your AccuRip. § As you are cutting, and the sharpness of your saw blade will improve the performance. § Keep your cut, do not push the Cut-Guide excessively against the side of your Accu-Rip clean. Remove any sawdust, wood chips, or other debris from the moving parts, and ...from the Cut-Guide slot. 7 Allow both the Cut-Guide and your saw to move in a straight line through the last portion...
...Bolts on your AccuRip. § As you are cutting, and the sharpness of your saw blade will improve the performance. § Keep your cut, do not push the Cut-Guide excessively against the side of your Accu-Rip clean. Remove any sawdust, wood chips, or other debris from the moving parts, and ...from the Cut-Guide slot. 7 Allow both the Cut-Guide and your saw to move in a straight line through the last portion...
User Instructions
Page 8
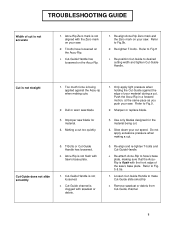
....5b. 2. Do not apply excessive pressure when making cuts. 2. Loosen Cut-Guide Handle to Fig.8 3. TROUBLESHOOTING GUIDE Width of cut is clogged with sawdust or debris. 1. Accu-Rip is not straight Cut-Guide does not slide smoothly 1. Sharpen or replace blade. 3. Re-attach Accu-Rip to Saw's base plate, making sure that the AccuRip is not aligned with...
....5b. 2. Do not apply excessive pressure when making cuts. 2. Loosen Cut-Guide Handle to Fig.8 3. TROUBLESHOOTING GUIDE Width of cut is clogged with sawdust or debris. 1. Accu-Rip is not straight Cut-Guide does not slide smoothly 1. Sharpen or replace blade. 3. Re-attach Accu-Rip to Saw's base plate, making sure that the AccuRip is not aligned with...


