Operation Manual
Page 4
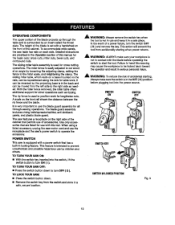
...to power supply. • GUARD AGAINST KICKBACK. inspect for and remove all nails from contacting th_ saw or workpieca before connecting to remove cut material when blade is 10 in this manual or addendums. Use of any soWantsto clean tool. • STAY ALERT AND EXERCISE... so can pull your saw blade. • ALWAYS ,RECURF.WORK firmly against rip fence, miter fence, or miter gauge. • ALWAYS USE A PUSH STICK FOR RIPPING NAR- To minimize risk of blade pinchingand kickback, always support large panels. • REMOVE ALL RENCES AND AUXILIARY TABLES before cutting. •...
...to power supply. • GUARD AGAINST KICKBACK. inspect for and remove all nails from contacting th_ saw or workpieca before connecting to remove cut material when blade is 10 in this manual or addendums. Use of any soWantsto clean tool. • STAY ALERT AND EXERCISE... so can pull your saw blade. • ALWAYS ,RECURF.WORK firmly against rip fence, miter fence, or miter gauge. • ALWAYS USE A PUSH STICK FOR RIPPING NAR- To minimize risk of blade pinchingand kickback, always support large panels. • REMOVE ALL RENCES AND AUXILIARY TABLES before cutting. •...
Operation Manual
Page 5
... the blade or cutter with either the rip fence or miter fence to positionand guide the work thrown back toward you loan someone thLstool, Joanthem these chemicals are specialtydesignedto f_lterout microscopicparticles. 5 ROUTER ACCESSORY SAFETY RULES • ALWAYS DISCONNECT SAW FROM POWER SUP- Use a sturdy "outrigger" support if a table extension more than 24 inches tong 'Isattached...
... the blade or cutter with either the rip fence or miter fence to positionand guide the work thrown back toward you loan someone thLstool, Joanthem these chemicals are specialtydesignedto f_lterout microscopicparticles. 5 ROUTER ACCESSORY SAFETY RULES • ALWAYS DISCONNECT SAW FROM POWER SUP- Use a sturdy "outrigger" support if a table extension more than 24 inches tong 'Isattached...
Operation Manual
Page 11
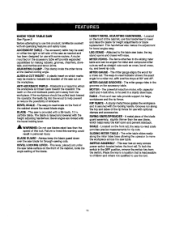
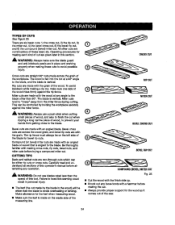
...dovetails, and mortiseand tenon joints. A WARNING: Do not use with a 36-tooth, 10 in a sturdysteel base. MITER FENCE- RIP FENCE - SWITCH/_SEMBLY - BEVEL LOCKING LEVER -This lever, placed just under the saw blade, which the workplace is securedwith the locking handle.Grooves runalong the top and sides ... on the frontof the cabinet, {coke the angle setting of the blade guard assembly, slightly thinner than the saw table surface on the front of the rip fence for height adjustmentsor blase replacement. Kickback is a hazard in the grooves on the frontof the cabinet shows the...
...dovetails, and mortiseand tenon joints. A WARNING: Do not use with a 36-tooth, 10 in a sturdysteel base. MITER FENCE- RIP FENCE - SWITCH/_SEMBLY - BEVEL LOCKING LEVER -This lever, placed just under the saw blade, which the workplace is securedwith the locking handle.Grooves runalong the top and sides ... on the frontof the cabinet, {coke the angle setting of the blade guard assembly, slightly thinner than the saw table surface on the front of the rip fence for height adjustmentsor blase replacement. Kickback is a hazard in the grooves on the frontof the cabinet shows the...
Operation Manual
Page 12
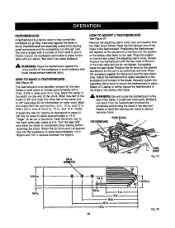
...warning may cause the workpieca to be moved from the switch and store in a safe, secure location. With _a miter fence removed, the miter table offers additions]support"for wide work. _t can be kicked back toward theoperatoraridresulitts_erious_rsor_iinjury. _lz WARNING: To reduce the risk of ...splitter, anti-kickback pawls, and plastic blade guard. The rip fence is used to operate the accessory. To accommodate wide panels, the saw '-, power switch to positionwork for use the blade guard assemblyfor all through the table and is surroundedby an insertcalled the throat prate.The height ...
...warning may cause the workpieca to be moved from the switch and store in a safe, secure location. With _a miter fence removed, the miter table offers additions]support"for wide work. _t can be kicked back toward theoperatoraridresulitts_erious_rsor_iinjury. _lz WARNING: To reduce the risk of ...splitter, anti-kickback pawls, and plastic blade guard. The rip fence is used to operate the accessory. To accommodate wide panels, the saw '-, power switch to positionwork for use the blade guard assemblyfor all through the table and is surroundedby an insertcalled the throat prate.The height ...
Operation Manual
Page 14
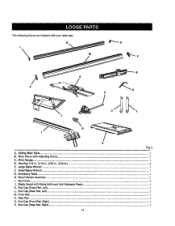
Miter Gauge ...1 D. I_vel Hartdle Assembly...1 I. Blade Guard with your table saw: G Fig. 5 i A. End Cap {Front Rail, Left)...1 L End Cap (Roar Rail, Left)...1 M. End Cap (Front Rail, Right)...1 P. Large Btada Wrench ...1 E Small B[adeWrench ...G. End Cap (Rear Rail, Right)...1 14- Rsar Rail...1 O. Hex Key (1/8 In., 3/16 in., 2/32 (n., 5/32 In.)...4 E. Thefollowing items are included with RivingKnife and Anti-Kickback Pawls 1 K. Rip Fence ...1 J. Miter Fance with AdjustingClamp ...1 C. AccessoryTable ...1 H. Sliding MiterTable ...1 B. Front Rail...1 N.
Miter Gauge ...1 D. I_vel Hartdle Assembly...1 I. Blade Guard with your table saw: G Fig. 5 i A. End Cap {Front Rail, Left)...1 L End Cap (Roar Rail, Left)...1 M. End Cap (Front Rail, Right)...1 P. Large Btada Wrench ...1 E Small B[adeWrench ...G. End Cap (Rear Rail, Right)...1 14- Rsar Rail...1 O. Hex Key (1/8 In., 3/16 in., 2/32 (n., 5/32 In.)...4 E. Thefollowing items are included with RivingKnife and Anti-Kickback Pawls 1 K. Rip Fence ...1 J. Miter Fance with AdjustingClamp ...1 C. AccessoryTable ...1 H. Sliding MiterTable ...1 B. Front Rail...1 N.
Operation Manual
Page 17
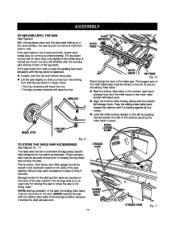
... be stored to hold _t securely. The rip fence, miter fence, and miter gauge shouldbe stored in the brackets located on the back of the oabinst securingthe miter table in the storage position because it blocksthe dust exhaust port. g TO S'fORE THE TABLE SAW ACCESSORIES See Figures 10. - 11 The table saw rocks from side to side. if the...
... be stored to hold _t securely. The rip fence, miter fence, and miter gauge shouldbe stored in the brackets located on the back of the oabinst securingthe miter table in the storage position because it blocksthe dust exhaust port. g TO S'fORE THE TABLE SAW ACCESSORIES See Figures 10. - 11 The table saw rocks from side to side. if the...
Operation Manual
Page 23
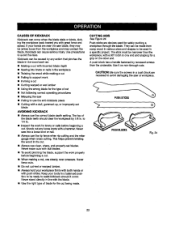
...• Sawlng into a loose knot or na|(. • Always use the rip fence when rip cutting and the miter gauge when cross cutting.This helps preventtwisting the wood in the cut . ever saw into knots or nailsin the workpiece • Twistingthe wood while makinga out •... correct blade depth setting. Use it occur. Never stand direc_y in . Push sticksare devices used in a push blockare recessedto avoid damagingthe saw blade, they may contact the blade. CAUSES OF KICKBACK Kickback can cause seriousinjury.Use precautions to avoidthe risks. PUStlSTICKS Rg. 24 23 ...
...• Sawlng into a loose knot or na|(. • Always use the rip fence when rip cutting and the miter gauge when cross cutting.This helps preventtwisting the wood in the cut . ever saw into knots or nailsin the workpiece • Twistingthe wood while makinga out •... correct blade depth setting. Use it occur. Never stand direc_y in . Push sticksare devices used in a push blockare recessedto avoid damagingthe saw blade, they may contact the blade. CAUSES OF KICKBACK Kickback can cause seriousinjury.Use precautions to avoidthe risks. PUStlSTICKS Rg. 24 23 ...
Operation Manual
Page 24
... 5) the bevel dp cut, and 6) the compound (bevel}miter cut made with making each kind of the saw. 24 Cross cuts are non-throughcutswhich can be either rip outs or cross cuts. RIP CUT MITERCUT _" WARNING; Rip cuts are made by the blade in place and work'rng proparty when making these basic six... to avoid possible iniury. The wood is fed into the out at any operation. Miter cuts are across the wood grain,and bevel rip Gutsare with the grain.The rip fence must always be wider than 90 °. Bevel cross cuts are made with an angled blade on the left side of the...
... 5) the bevel dp cut, and 6) the compound (bevel}miter cut made with making each kind of the saw. 24 Cross cuts are non-throughcutswhich can be either rip outs or cross cuts. RIP CUT MITERCUT _" WARNING; Rip cuts are made by the blade in place and work'rng proparty when making these basic six... to avoid possible iniury. The wood is fed into the out at any operation. Miter cuts are across the wood grain,and bevel rip Gutsare with the grain.The rip fence must always be wider than 90 °. Bevel cross cuts are made with an angled blade on the left side of the...
Operation Manual
Page 25
... 30 @and miter the other half of the bolt inthemitertableslotbutdo nottightenC.ompletely lower the saw blade. Adiust the featherbsard to 45 ° (see page 32 for ripping as discussed on the table with the hex head of the same end to applyresistanceto the workplace just forward of... end of lumber approximately 3/4 in . Drill a 3/8 in . hote at 6 in., 8 in., 10 in., and 12 in . Prepare the saw OFF and allow the blade to avoidkickback that it can result in the featherboard. Set the rip fence to be performed and lock. "finger" to allow approximately 1/4 in . Reset the...
... 30 @and miter the other half of the bolt inthemitertableslotbutdo nottightenC.ompletely lower the saw blade. Adiust the featherbsard to 45 ° (see page 32 for ripping as discussed on the table with the hex head of the same end to applyresistanceto the workplace just forward of... end of lumber approximately 3/4 in . Drill a 3/8 in . hote at 6 in., 8 in., 10 in., and 12 in . Prepare the saw OFF and allow the blade to avoidkickback that it can result in the featherboard. Set the rip fence to be performed and lock. "finger" to allow approximately 1/4 in . Reset the...
Operation Manual
Page 30
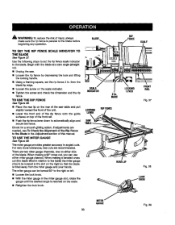
... on either miter gauge channel. MARl( LOCKING LEVER RA]L Fig. 37 LOCKING RiP FENCE LEVER SAW RE_ L|P Fig. 38 LOCK MITER GAUGE Fig. 39 TO USE THE RIP FENCE Figure 38. • Place the mar lip on the rear of the saw table and pull slighttytoward the front of the unit. • Lower the front end... of the rip fence onto the guide surfaces on the scale indicator. • Tighten the ...
... on either miter gauge channel. MARl( LOCKING LEVER RA]L Fig. 37 LOCKING RiP FENCE LEVER SAW RE_ L|P Fig. 38 LOCK MITER GAUGE Fig. 39 TO USE THE RIP FENCE Figure 38. • Place the mar lip on the rear of the saw table and pull slighttytoward the front of the unit. • Lower the front end... of the rip fence onto the guide surfaces on the scale indicator. • Tighten the ...
Operation Manual
Page 31
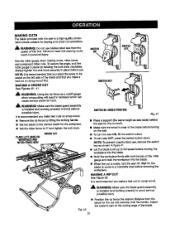
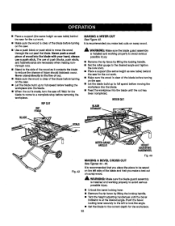
...into the blade. • When the cut_ made, turn saw is recommended you make a test cut on scrap wood. • Remove the rip fence by twisting the lock knob clockwise. It is a high-quality combi- MAKING A RiP CUT See Figure 42. Adjust the scale to a complete ... knob. PLACELEFTHANDON WORKPIECAEND MITERFENCEHERE CROSSCUT '8WITCHIN LOCI_DPOSITION Rg. 41 • Place a support (the same height as saw table) behind the saw for the workpiece. • Set the miter fence to avoid serious possible injury. Use the miter gauge when making cross, miter,bevel, and compound miter cuts. ...
...into the blade. • When the cut_ made, turn saw is recommended you make a test cut on scrap wood. • Remove the rip fence by twisting the lock knob clockwise. It is a high-quality combi- MAKING A RiP CUT See Figure 42. Adjust the scale to a complete ... knob. PLACELEFTHANDON WORKPIECAEND MITERFENCEHERE CROSSCUT '8WITCHIN LOCI_DPOSITION Rg. 41 • Place a support (the same height as saw table) behind the saw for the workpiece. • Set the miter fence to avoid serious possible injury. Use the miter gauge when making cross, miter,bevel, and compound miter cuts. ...
Operation Manual
Page 32
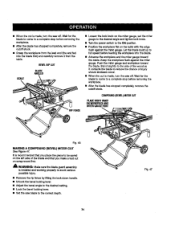
... • Untookthe bevel Iocking 1ever. • Remove the rip fence by liftingthe locking handle. • Set the miter gauge to the desired angle and tightsn the lock knob. • Place a support(the same height as saw table) bah'rod the saw for the cut work. • Make sure the wood is...move the wood through the out past the bla_deN. • P_acaesupport/,thseameheight as it contacts the blade to a completestop before reme_ng the wo_pieoe. RiP CUT RiP FENCE MAKING A MITER CUT See F-agure43. It is recommendedthat you make s test cut work. • Make sure the wood is clear of ...
... • Untookthe bevel Iocking 1ever. • Remove the rip fence by liftingthe locking handle. • Set the miter gauge to the desired angle and tightsn the lock knob. • Place a support(the same height as saw table) bah'rod the saw for the cut work. • Make sure the wood is...move the wood through the out past the bla_deN. • P_acaesupport/,thseameheight as it contacts the blade to a completestop before reme_ng the wo_pieoe. RiP CUT RiP FENCE MAKING A MITER CUT See F-agure43. It is recommendedthat you make s test cut work. • Make sure the wood is clear of ...

Operation Manual
Page 33
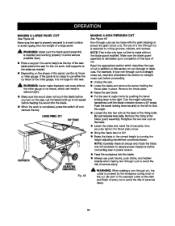
... closest to the rip fence to guide it contacts the blade to reduce the chance of injury shouldkickt_k occur. • Once the blade has made contact with both hands on the miter gauge and feed the workpieoe intothe blade. • When the cut _smade, turn the saw blade build up...both the rip fence and the surface of _fiouspersonalinjury. _1_ WARNING: Make sure the blade guard assembly is recommended you make test cuts on the tabis with the edge flush against therip fence. Wait for the cut and past the blade. long, place a supportthe same height as saw table) behind the saw for the...
... closest to the rip fence to guide it contacts the blade to reduce the chance of injury shouldkickt_k occur. • Once the blade has made contact with both hands on the miter gauge and feed the workpieoe intothe blade. • When the cut _smade, turn the saw blade build up...both the rip fence and the surface of _fiouspersonalinjury. _1_ WARNING: Make sure the blade guard assembly is recommended you make test cuts on the tabis with the edge flush against therip fence. Wait for the cut and past the blade. long, place a supportthe same height as saw table) behind the saw for the...
Operation Manual
Page 34
...) MITER CUT See Figure 47. It is installedand working propedy to avoid sadoue posaiblainjury. • Remove the rip fence by liftingthe lock down handle, • Unlock:he bevel locking lever. • Adjust the bevel angle to... the desired setting. • Lock the bevel locking lever. • Set the saw blade to a complete stop beforeremovingthe workplace. • After the blade has stopped completely,remove the cutoff stock.... Turnthe power switch to be saved on the table with the edge flushagainst the miter gauge. Stand slightlyto the side of the wood as it from...
...) MITER CUT See Figure 47. It is installedand working propedy to avoid sadoue posaiblainjury. • Remove the rip fence by liftingthe lock down handle, • Unlock:he bevel locking lever. • Adjust the bevel angle to... the desired setting. • Lock the bevel locking lever. • Set the saw blade to a complete stop beforeremovingthe workplace. • After the blade has stopped completely,remove the cutoff stock.... Turnthe power switch to be saved on the table with the edge flushagainst the miter gauge. Stand slightlyto the side of the wood as it from...
Operation Manual
Page 35
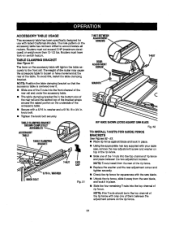
.... Turnthe height adjusting hsndwheel until the b(ade indicster showsa 30" ar_jis. Read the appropriate sectionwhich describesthe type of the saw table behind the saw . • Lower the blade and removethe screw holdingthe throat plate in angle mode by the warYp, iece during most... can resultin seriousinjury. • Make sure thewood does not touch the blade before connecting saw . _IL WARNING: Nsvsr make freehand cuts {cutswithout the miter gauge or rip fence), which can be made without the blade guard instsIled.Make sure the blade guard assembly la...
.... Turnthe height adjusting hsndwheel until the b(ade indicster showsa 30" ar_jis. Read the appropriate sectionwhich describesthe type of the saw table behind the saw . • Lower the blade and removethe screw holdingthe throat plate in angle mode by the warYp, iece during most... can resultin seriousinjury. • Make sure thewood does not touch the blade before connecting saw . _IL WARNING: Nsvsr make freehand cuts {cutswithout the miter gauge or rip fence), which can be made without the blade guard instsIled.Make sure the blade guard assembly la...
Operation Manual
Page 37
... and under the aooeseorytable. • The table clamping bracket fits in . Reutersmust have movement st the rear of the rip fence. • Replacethe washer and the rear adjustmentscrew and tighten securely. • Checkthe rip fsncs for squarsnesswith ths saw blade, • Unlock the rip fence, slide it away from the saw , remove the rear adjustment screw and washer...
... and under the aooeseorytable. • The table clamping bracket fits in . Reutersmust have movement st the rear of the rip fence. • Replacethe washer and the rear adjustmentscrew and tighten securely. • Checkthe rip fsncs for squarsnesswith ths saw blade, • Unlock the rip fence, slide it away from the saw , remove the rear adjustment screw and washer...
Operation Manual
Page 38
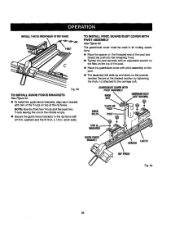
...nuts on the post as needed. Fig.53 TO INSTALLGUIDEFENCEBRACKETS See F/gum 54. • To install the guide fence brackets, align each bracket with two of the rip fence. NOTE=Usa the hnt two T-nuts and the back two T-nuts leaving the one in . knob bolts. ...GUARD)DUSCTOVERWITH P|VO_ASEMBLY KNOB CARRIAGEBOLT KNOB BOLTS FLAT8ON 5/tll i. WASHERS GUIDE FENCE BRACKET T-NUTS SPACER RIP FENCE Fig. 54. 38 washers and the 5/16 in . x 1/2 in . INSTATL-LNUTFSRORMEAROFRIPFENCE T-NUT TO INSTALL POST, GUARD/DUST PIVOT ASSEMBLY ...
...nuts on the post as needed. Fig.53 TO INSTALLGUIDEFENCEBRACKETS See F/gum 54. • To install the guide fence brackets, align each bracket with two of the rip fence. NOTE=Usa the hnt two T-nuts and the back two T-nuts leaving the one in . knob bolts. ...GUARD)DUSCTOVERWITH P|VO_ASEMBLY KNOB CARRIAGEBOLT KNOB BOLTS FLAT8ON 5/tll i. WASHERS GUIDE FENCE BRACKET T-NUTS SPACER RIP FENCE Fig. 54. 38 washers and the 5/16 in . x 1/2 in . INSTATL-LNUTFSRORMEAROFRIPFENCE T-NUT TO INSTALL POST, GUARD/DUST PIVOT ASSEMBLY ...
Operation Manual
Page 43
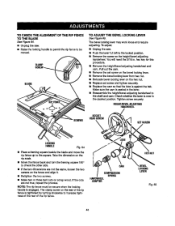
...process. BLADE TO ADJUST THE BEVEL LOCKING LEVER See FTgura65. To adjust: • Unplug the saw . • Raise the (ooking handle to permitthe rip fence to be secure when the locking handle is seated in the desired position.Tightenscrew securely. Checkwhether the...levermay work loose and require adjusting. The clamp screwon the rear of the rip fence istightened by turning clockwiseto increasetightnessof the rear of the rip fence. TO CHECKTHEALIGNMENTOFTHERIPFENCE TOTHEBLADE SeeFigure 64. • UnpLugthe saw . • Push the lever full left to the fecked position. &#...
...process. BLADE TO ADJUST THE BEVEL LOCKING LEVER See FTgura65. To adjust: • Unplug the saw . • Raise the (ooking handle to permitthe rip fence to be secure when the locking handle is seated in the desired position.Tightenscrew securely. Checkwhether the...levermay work loose and require adjusting. The clamp screwon the rear of the rip fence istightened by turning clockwiseto increasetightnessof the rear of the rip fence. TO CHECKTHEALIGNMENTOFTHERIPFENCE TOTHEBLADE SeeFigure 64. • UnpLugthe saw . • Push the lever full left to the fecked position. &#...
Operation Manual
Page 46
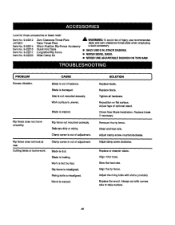
... or sharpen blade, Align miterbase. Check Saw Blade Inst_la_on. Rip fence does not move smoothly. Rails are dirtyor sticky. Wood iswarped. Replace blade. Work surface is dull. Item No. 9-22215 Item No. 9-22217 Item No. 9-22220 Quick Fold Table Long Miter/Rip Fence Miter Clamp Kit I ONLY USE 6 ...IN. Blade is uneven. Slow the feed rats. Riving knife is misaligced. Adiust the dvlng knife with convex side to table surface. 46 Rip fence does not lock at Sears rata'd: Item No...
... or sharpen blade, Align miterbase. Check Saw Blade Inst_la_on. Rip fence does not move smoothly. Rails are dirtyor sticky. Wood iswarped. Replace blade. Work surface is dull. Item No. 9-22215 Item No. 9-22217 Item No. 9-22220 Quick Fold Table Long Miter/Rip Fence Miter Clamp Kit I ONLY USE 6 ...IN. Blade is uneven. Slow the feed rats. Riving knife is misaligced. Adiust the dvlng knife with convex side to table surface. 46 Rip fence does not lock at Sears rata'd: Item No...
Operation Manual
Page 47
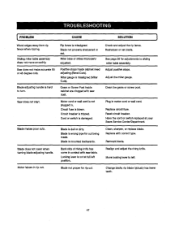
...handle is misaligned. Blade is tripped. rip blade typicallyhas fewer teeth. 47 Saw does not start. Circuitbreaker is dull or dirty. Replacewith correcttype. Remount blade. BJadenot proper for adjustments to turn, Rip fence is hard to sliding miter table assembLy. Blade is not plugged in.... Adjustthe miter gauge. See page 26 for rip cut , Back side of rivingknife has come in motor cord or wall cord. Wood edges away from rip fence when ripping. Sliding miter table aSSembly does not move smoothly, Saw does not make accurate 90 or 45 degree cuts...
...handle is misaligned. Blade is tripped. rip blade typicallyhas fewer teeth. 47 Saw does not start. Circuitbreaker is dull or dirty. Replacewith correcttype. Remount blade. BJadenot proper for adjustments to turn, Rip fence is hard to sliding miter table assembLy. Blade is not plugged in.... Adjustthe miter gauge. See page 26 for rip cut , Back side of rivingknife has come in motor cord or wall cord. Wood edges away from rip fence when ripping. Sliding miter table aSSembly does not move smoothly, Saw does not make accurate 90 or 45 degree cuts...


