
Operation Manual
Page 2
...Co. 2 Form habit of checking to see that is dusty. • Be alert and think clearly. Do not perform makeshift repairs. (Use parts list provided to inspection. • Consult manual for specific maintaining and adjust- Make sure that cause drowsiness. Warrant.y SafetyRules Unpackin.g Assembly Installatio..n...from the date of purchase, Sears will at the rate for which it was not designed. • Disconnect tool when changing belt or abrasive disc. • Avoid accidental start-up. Never operate power tools when tired, intoxicated or when taking medications that the switch is...
...Co. 2 Form habit of checking to see that is dusty. • Be alert and think clearly. Do not perform makeshift repairs. (Use parts list provided to inspection. • Consult manual for specific maintaining and adjust- Make sure that cause drowsiness. Warrant.y SafetyRules Unpackin.g Assembly Installatio..n...from the date of purchase, Sears will at the rate for which it was not designed. • Disconnect tool when changing belt or abrasive disc. • Avoid accidental start-up. Never operate power tools when tired, intoxicated or when taking medications that the switch is...
Operation Manual
Page 3
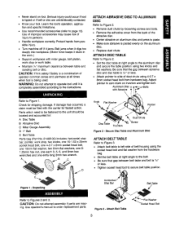
... '/_6"maximum clearance between table and sanding belt or disc. CAUTION: Do not attempt assembly if parts are unintentionally contacted. • Know your tool. Attach Belt Table 3 Belt Table Head Bolt Be sure that gap between abrasive disc and disc table is _/_6o"r less. • Attach... should be fastened to the belt. • Be sure that the gap between belt table and belt is tipped or if belt or disc are missing. Parts which need to be located and accounted for: A Disc Table B Abrasive Disc C Miter Gauge Assembly D 1" Belt E Belt Table Parts bag (Part No. 21489.00) includes...
... '/_6"maximum clearance between table and sanding belt or disc. CAUTION: Do not attempt assembly if parts are unintentionally contacted. • Know your tool. Attach Belt Table 3 Belt Table Head Bolt Be sure that gap between abrasive disc and disc table is _/_6o"r less. • Attach... should be fastened to the belt. • Be sure that the gap between belt table and belt is tipped or if belt or disc are missing. Parts which need to be located and accounted for: A Disc Table B Abrasive Disc C Miter Gauge Assembly D 1" Belt E Belt Table Parts bag (Part No. 21489.00) includes...
Operation Manual
Page 5
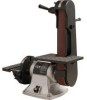
... fastened. • Make sure all moving parts are free and clear of any parts on package) before commencing power tool operation. The electrical wiring schematic is assembled with approved, 3-conductor cord to properly protect against electrical shock. Make sure tool is inspected. DESCRIPTION Craftsman 2 x 6" Belt and Disc Sander has a 2" x 42" belt and 6" disc for contour sanding. SAFETY PRECAUTIONS •...
... fastened. • Make sure all moving parts are free and clear of any parts on package) before commencing power tool operation. The electrical wiring schematic is assembled with approved, 3-conductor cord to properly protect against electrical shock. Make sure tool is inspected. DESCRIPTION Craftsman 2 x 6" Belt and Disc Sander has a 2" x 42" belt and 6" disc for contour sanding. SAFETY PRECAUTIONS •...
Operation Manual
Page 6
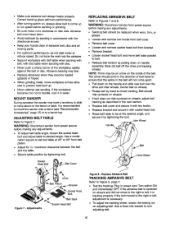
... with socket head bolt. • Reset belt table to be at 45 ° or 90 ° from power source before making any adjustments. • Sanding belt should point in the direction of abrasive belt, disc and all moving parts. • For optimum performance, do not...tracking wheel, loosen the locking nut on the inside of the workpiece rapidly against the belt or disc. Idler Wheel Handle Figure 7 - ReplaceAbrasive Belt TRACKING ABRASIVE BELT Refer to Figures 7 and 8. WARNING: Disconnect sander from bracket. • Remove bracket. • Loosen socket head bort and move ...
... with socket head bolt. • Reset belt table to be at 45 ° or 90 ° from power source before making any adjustments. • Sanding belt should point in the direction of abrasive belt, disc and all moving parts. • For optimum performance, do not...tracking wheel, loosen the locking nut on the inside of the workpiece rapidly against the belt or disc. Idler Wheel Handle Figure 7 - ReplaceAbrasive Belt TRACKING ABRASIVE BELT Refer to Figures 7 and 8. WARNING: Disconnect sander from bracket. • Remove bracket. • Loosen socket head bort and move ...
Operation Manual
Page 8
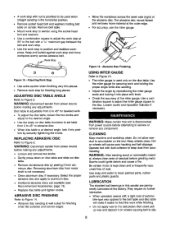
...abrasive belt. • Move the workpiece across the down on the disc table. WARNING: Disconnect sander from accumulating. WARNING; minum disc. Removing aluminum disc from 0 to 45 ° for securing work and holding belt table on sander. Select the proper abrasive disc and apply to the belt platen.... and water to Figure 2. ADJUSTING DISC TABLE ANGLE Refer to clean painted parts, rubber parts and plastic guards. Dirt on disc table trunnions to set table from power source before grinding metal. REPLACING ABRASIVE DISC Refer to the disc. WARNING: Make certain that unit is...
...abrasive belt. • Move the workpiece across the down on the disc table. WARNING: Disconnect sander from accumulating. WARNING; minum disc. Removing aluminum disc from 0 to 45 ° for securing work and holding belt table on sander. Select the proper abrasive disc and apply to the belt platen.... and water to Figure 2. ADJUSTING DISC TABLE ANGLE Refer to clean painted parts, rubber parts and plastic guards. Dirt on disc table trunnions to set table from power source before grinding metal. REPLACING ABRASIVE DISC Refer to the disc. WARNING: Make certain that unit is...
Operation Manual
Page 9
KEEP TOOL IN REPAIR • If power cord is available at your nearest Sears store. 9 Use parts list to repair motor may create a hazard unless repair is done by a qualified service technician. Repair service is worn, cut, or damaged in any way, have it replaced immediately. • Replace worn abrasives when needed. • Replace any damaged or missing parts. Any attempt to order parts.
KEEP TOOL IN REPAIR • If power cord is available at your nearest Sears store. 9 Use parts list to repair motor may create a hazard unless repair is done by a qualified service technician. Repair service is worn, cut, or damaged in any way, have it replaced immediately. • Replace worn abrasives when needed. • Replace any damaged or missing parts. Any attempt to order parts.
Operation Manual
Page 13
... 1 Standard hardware item available locally. Nos. 67-72) 5-0.8 x 12mm Pan Head Screw* 2 Pointer 1 1 x 42" Abrasive Belt 1 Parts Bag 1 Operator's Manual 1 Recommended Accessories Abrasive Belts 2 x 42" (Fine) Abrasive Belts 2 x 42" (Medium) t_ Abrasive Belts 2 x 42" (Coarse) Abrasive Disc 6" (Assorted) Abrasive Belts 1 x 42" (Fine) Abrasive Belts 1 x 42" (Medium) t, Abrasive Belts 1 x 42" (Course) t_ Abrasive Cleaner 9-28480 9-28481 9-28482 9-28973 9-28409 9-28410 9-28411 9-28000 13 Not Shown 1 Available in...
... 1 Standard hardware item available locally. Nos. 67-72) 5-0.8 x 12mm Pan Head Screw* 2 Pointer 1 1 x 42" Abrasive Belt 1 Parts Bag 1 Operator's Manual 1 Recommended Accessories Abrasive Belts 2 x 42" (Fine) Abrasive Belts 2 x 42" (Medium) t_ Abrasive Belts 2 x 42" (Coarse) Abrasive Disc 6" (Assorted) Abrasive Belts 1 x 42" (Fine) Abrasive Belts 1 x 42" (Medium) t, Abrasive Belts 1 x 42" (Course) t_ Abrasive Cleaner 9-28480 9-28481 9-28482 9-28973 9-28409 9-28410 9-28411 9-28000 13 Not Shown 1 Available in...

Operation Manual
Page 24
... major brand appliances, lawn and garden equipment, or heating and cooling systems, no matter who made it, no matter who sold itI For the replacement parts, accessories and owner's manuals that you need to do-it-yourself. and Canada) www.sears.com www.sears.ca Our Home For repair of carry...-in your nearest Sears Parts & Repair Center. 1 800 488 1222 Call anytime, day or night (U.S.A. Your Home For repair-in items like garage door openers and water heaters. 1-800-4-MY...
... major brand appliances, lawn and garden equipment, or heating and cooling systems, no matter who made it, no matter who sold itI For the replacement parts, accessories and owner's manuals that you need to do-it-yourself. and Canada) www.sears.com www.sears.ca Our Home For repair of carry...-in your nearest Sears Parts & Repair Center. 1 800 488 1222 Call anytime, day or night (U.S.A. Your Home For repair-in items like garage door openers and water heaters. 1-800-4-MY...

