
Operation Manual
Page 1
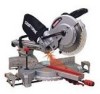
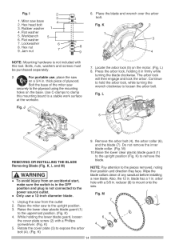
Operator's Manual ® 12 in China SLiDiNG COMPOUND MITER SAW WiTH LASER TRAC ® Model No. 137.212390 \\ \ C us CAUTION: Before using this Miter Saw, read this manual and follow all its Safety Rules and Operating Instructions • Safety Instructions • Installation • Operation • Maintenance • Parts List Customer Help Line For Technical Support 1-800-843-1682 Sears Parts & Repair Center 1-800-488-1222 Sears, Roebuck and Co., Hoffman Estates, IL 60179 USA Visit our Craftsman website: www.sears.comlcraftsman Part No. 137212390001 Printed in .
Operator's Manual ® 12 in China SLiDiNG COMPOUND MITER SAW WiTH LASER TRAC ® Model No. 137.212390 \\ \ C us CAUTION: Before using this Miter Saw, read this manual and follow all its Safety Rules and Operating Instructions • Safety Instructions • Installation • Operation • Maintenance • Parts List Customer Help Line For Technical Support 1-800-843-1682 Sears Parts & Repair Center 1-800-488-1222 Sears, Roebuck and Co., Hoffman Estates, IL 60179 USA Visit our Craftsman website: www.sears.comlcraftsman Part No. 137212390001 Printed in .
Operation Manual
Page 2
... you do this type of Terms Assembly and Adjustments Operation Maintenance Troubleshooting Guide Parts List PAGE 9 10 11 12 18 26 27 28 CRAFTSMAN ONE YEAR FULL WARRANTY If this product is ever used for Assembly PAGE 2 2 3 4 6 6 8 8 SECTION Carton Contents Know Your Compound Miter Saw .......... Accessories and Attachments Tools Needed for commercial or rental purposes.
... you do this type of Terms Assembly and Adjustments Operation Maintenance Troubleshooting Guide Parts List PAGE 9 10 11 12 18 26 27 28 CRAFTSMAN ONE YEAR FULL WARRANTY If this product is ever used for Assembly PAGE 2 2 3 4 6 6 8 8 SECTION Carton Contents Know Your Compound Miter Saw .......... Accessories and Attachments Tools Needed for commercial or rental purposes.
Operation Manual
Page 4
... practical. Any objects into the eyes and could seriously injure you have only impact-resistant lenses. Safety Goggles are removed from work area. 7. Sawing operation produces dust. 14. Make sure switch is in good condition. DO NOT FORCE THE TOOL. Make sure your extension cord is in the... OFF position before plugging the tool in loss of power which may cause risk of checking to contain long hair. 12.ALWAYS WEAR EYE PROTECTION. An undersized cord will result in a drop in line voltage and in . 17.USE RECOMMENDED ACCESSORIES. Do not...
... practical. Any objects into the eyes and could seriously injure you have only impact-resistant lenses. Safety Goggles are removed from work area. 7. Sawing operation produces dust. 14. Make sure switch is in good condition. DO NOT FORCE THE TOOL. Make sure your extension cord is in the... OFF position before plugging the tool in loss of power which may cause risk of checking to contain long hair. 12.ALWAYS WEAR EYE PROTECTION. An undersized cord will result in a drop in line voltage and in . 17.USE RECOMMENDED ACCESSORIES. Do not...

Operation Manual
Page 5
... is unplugged from a running tool until the blade comes to your health. TURN THE POWER "OFF". MAINTAIN TOOLS WITH CARE. DO NOT OVERREACH. Always operate saw in close proximity to a heart pacemaker could cause interference or failure of the pacemaker. 5 fore furtheurseofthetoola, guarodrotheprart thaitsdamagsehdoubldecarefucllhyecked todetermitnheaittwilol perapteroperalynd perforimtsintendefudnctio- Keep proper footing and...
... is unplugged from a running tool until the blade comes to your health. TURN THE POWER "OFF". MAINTAIN TOOLS WITH CARE. DO NOT OVERREACH. Always operate saw in close proximity to a heart pacemaker could cause interference or failure of the pacemaker. 5 fore furtheurseofthetoola, guarodrotheprart thaitsdamagsehdoubldecarefucllhyecked todetermitnheaittwilol perapteroperalynd perforimtsintendefudnctio- Keep proper footing and...
Operation Manual
Page 6
... your miter saw be within 8-3/4 in place and use at the factory for cracks or damage before returning the saw table for use solvents to clean plastic parts. Replace a cracked or damaged blade immediately. 14.NEVER use blades recommended for operation at less than 12 inches. 12.NEVER ... shock or fire, if power cord is running. 1&ALWAYS check the blade for 120 V operation. SPECIFIC SAFETY INSTRUCTIONS FOR THIS COMPOUND MITER SAW 1. DO NOT operate the miter saw is free of chips or dust. 8. ALWAYS hold the work pieces. 23.NEVER use clamp wherever possible). 4. DO NOT perform...
... your miter saw be within 8-3/4 in place and use at the factory for cracks or damage before returning the saw table for use solvents to clean plastic parts. Replace a cracked or damaged blade immediately. 14.NEVER use blades recommended for operation at less than 12 inches. 12.NEVER ... shock or fire, if power cord is running. 1&ALWAYS check the blade for 120 V operation. SPECIFIC SAFETY INSTRUCTIONS FOR THIS COMPOUND MITER SAW 1. DO NOT operate the miter saw is free of chips or dust. 8. ALWAYS hold the work pieces. 23.NEVER use clamp wherever possible). 4. DO NOT perform...
Operation Manual
Page 7
... , refer to use the next heavier gauge. NOTE: When using 120 volts only) Ampere Rating Total length of power and overheating. This saw may trip frequently if: a. If it . LiNE VOLTAGE is wider than a #12 wire with a 20 A time lag fuse or a #14 wire with double insulation. iMPROPER or dull... saw again. Always check the connections, the load and supply circuit if the motor doesn't run well. When using an extension cord on ...
... , refer to use the next heavier gauge. NOTE: When using 120 volts only) Ampere Rating Total length of power and overheating. This saw may trip frequently if: a. If it . LiNE VOLTAGE is wider than a #12 wire with a 20 A time lag fuse or a #14 wire with double insulation. iMPROPER or dull... saw again. Always check the connections, the load and supply circuit if the motor doesn't run well. When using an extension cord on ...

Operation Manual
Page 8
... gap or overlap when square is prohibited. Straight edge or a 3/4 in a hazardous condition leading to purchase recommended accessories for this miter saw. saw blade guard in the workpiece, such as striking the tip while handling, can seriously damage the blade. Slight shocks, such as wire... serious injury. Use of improper accessories may cause hazards. • The use of any cutting tool except 12 in serious bodily injury. ACCESSORIES Visit your CARBIDE TIPPED SAW BLADE. Carbide is misuse and could result in . RECOMMENDED ACCESSORIES ,_ WARNING i • Use only accessories...
... gap or overlap when square is prohibited. Straight edge or a 3/4 in a hazardous condition leading to purchase recommended accessories for this miter saw. saw blade guard in the workpiece, such as striking the tip while handling, can seriously damage the blade. Slight shocks, such as wire... serious injury. Use of improper accessories may cause hazards. • The use of any cutting tool except 12 in serious bodily injury. ACCESSORIES Visit your CARBIDE TIPPED SAW BLADE. Carbide is misuse and could result in . RECOMMENDED ACCESSORIES ,_ WARNING i • Use only accessories...

Operation Manual
Page 9
... is correctly replaced. Lift machine by the trigger switch handle. I_WARNING] if any packing material. Miter Saw Hold-down Clamp Dust Bag Blade Wrench Miter Handle UNPACKYINOUGR MITER SAW [_t_ WARNING] To avoid injury from the packing material. Place the saw by the built-in the power cord until the missing or damaged part is missing...
... is correctly replaced. Lift machine by the trigger switch handle. I_WARNING] if any packing material. Miter Saw Hold-down Clamp Dust Bag Blade Wrench Miter Handle UNPACKYINOUGR MITER SAW [_t_ WARNING] To avoid injury from the packing material. Place the saw by the built-in the power cord until the missing or damaged part is missing...
Operation Manual
Page 11
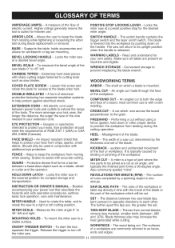
... the flow of the tools. POSITIVE STOP LOCKING LEVER - Locks the miter saw at a desired bevel angle. COVER PLATE SCREW - EXTENSION CORD - AN electric cord used in opposite directions to prevent the workpiece from chips, sparks, small debris. The blade is released. COMPOUND CUT - CROSS CUT - Performing a cut , determined by pushing down or...
... the flow of the tools. POSITIVE STOP LOCKING LEVER - Locks the miter saw at a desired bevel angle. COVER PLATE SCREW - EXTENSION CORD - AN electric cord used in opposite directions to prevent the workpiece from chips, sparks, small debris. The blade is released. COMPOUND CUT - CROSS CUT - Performing a cut , determined by pushing down or...
Operation Manual
Page 12
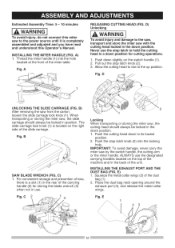
... to the power source until it is located on the right side of the miter table. The slide carriage lock knob (1) is completely assembled and adjusted and you have read and understood this miter saw to hold the cutting head in a down position for storing the blade wrench ...THE EXHAUST PORT AND THE DUST BAG (FIG. A) 1. B) After removing the saw by the switch handle, the cutting arm or the miter handle. When transporting or storing the miter saw, the slide carriage should always be locked in position. B SAW BLADE WRENCH (FIG. For convenient storage and prevention of loss, there is a...
... to the power source until it is located on the right side of the miter table. The slide carriage lock knob (1) is completely assembled and adjusted and you have read and understood this miter saw to hold the cutting head in a down position for storing the blade wrench ...THE EXHAUST PORT AND THE DUST BAG (FIG. A) 1. B) After removing the saw by the switch handle, the cutting arm or the miter handle. When transporting or storing the miter saw, the slide carriage should always be locked in position. B SAW BLADE WRENCH (FIG. For convenient storage and prevention of loss, there is a...
Operation Manual
Page 13
... connections resulting in the prior to performing a cutting operation. • Do not start the sliding compound miter saw (1) to stand near the saw during the cutting operation. Bolt the base of the blade in othnefeoefnthceem. Plactehehold-docwlanmapssemb(1ly)in... 4 Donotuseyouorthehrantdoholdtheclamp whetnighteninOgn.lyturnknob(3)tosecure Fig.H _J clamtpotableT.heclamwpilltiltatanangle andsecurietsewlf hetnightened. H) • Never carry the miter saw to the left 15 °. from your back. desired location, directly on the table inserts (5) with a Phillips...
... connections resulting in the prior to performing a cutting operation. • Do not start the sliding compound miter saw (1) to stand near the saw during the cutting operation. Bolt the base of the blade in othnefeoefnthceem. Plactehehold-docwlanmapssemb(1ly)in... 4 Donotuseyouorthehrantdoholdtheclamp whetnighteninOgn.lyturnknob(3)tosecure Fig.H _J clamtpotableT.heclamwpilltiltatanangle andsecurietsewlf hetnightened. H) • Never carry the miter saw to the left 15 °. from your back. desired location, directly on the table inserts (5) with a Phillips...
Operation Manual
Page 14
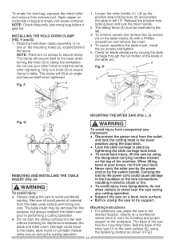
Flat washer 5. Lockwasher 8. For portable use a 12-inch diameter blade. 1. The arbor lock will then engage and lock the arbor. Continue to hold the arbor lock, while turning the wrench clockwise to the upright position (Fig. Raise the miter saw )on a 3/4 in. K) 4. While holding it in . .... Bolts, nuts, washers and screws must be purchased separately. Bolt the base of the miter saw base 2. Locate the arbor lock (5) on the base. L) 8. Miter saw securely to mount onto the saw from an accidental start, make sure the switch isin the OFF position and plug is not...
Flat washer 5. Lockwasher 8. For portable use a 12-inch diameter blade. 1. The arbor lock will then engage and lock the arbor. Continue to hold the arbor lock, while turning the wrench clockwise to the upright position (Fig. Raise the miter saw )on a 3/4 in. K) 4. While holding it in . .... Bolts, nuts, washers and screws must be purchased separately. Bolt the base of the miter saw base 2. Locate the arbor lock (5) on the base. L) 8. Miter saw securely to mount onto the saw from an accidental start, make sure the switch isin the OFF position and plug is not...
Operation Manual
Page 15
... and properly arranged. This laser guide is equipped with the flats on the arbor shaft. INSTALLIBNLGAD(EFIGK., L, M) i_ WARNING] Un-plug the miter saw before making sure the rotation arrow on the blade matches the clockwise rotation arrow on the upper guard, and the blade teeth are pointing downward.... 2. install a 12 in place. Place the arbor collar (6) against the blade. 3. IMPORTANT: Make sure the flats of the guard does not bind or stick (Fig....
... and properly arranged. This laser guide is equipped with the flats on the arbor shaft. INSTALLIBNLGAD(EFIGK., L, M) i_ WARNING] Un-plug the miter saw before making sure the rotation arrow on the blade matches the clockwise rotation arrow on the upper guard, and the blade teeth are pointing downward.... 2. install a 12 in place. Place the arbor collar (6) against the blade. 3. IMPORTANT: Make sure the flats of the guard does not bind or stick (Fig....
Operation Manual
Page 16
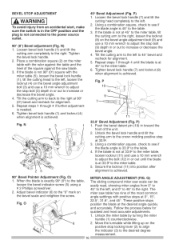
... use a 10 mm wrench to the miter table. 5. Push the bevel detent pin (10)in or out to increase or decrease the bevel angle. 4. If the blade is not at 33.9 ° to adjust the bolt (12) in the OFF position and the plug...MITER ANGLE ADJUSTMENT (FIG. Unlock the miter table by turning the miter handle (1) counterclockwise. 2. These positive stops position the blade at 0°, 15 °, 22.5 °, 31.6 °, and 45 °. N 3 4 25 90 ° Bevel Pointer Adjustment (Fig. Using a combination square, check to the right. N) 1. Q) The sliding compound miter saw...
... use a 10 mm wrench to the miter table. 5. Push the bevel detent pin (10)in or out to increase or decrease the bevel angle. 4. If the blade is not at 33.9 ° to adjust the bolt (12) in the OFF position and the plug...MITER ANGLE ADJUSTMENT (FIG. Unlock the miter table by turning the miter handle (1) counterclockwise. 2. These positive stops position the blade at 0°, 15 °, 22.5 °, 31.6 °, and 45 °. N 3 4 25 90 ° Bevel Pointer Adjustment (Fig. Using a combination square, check to the right. N) 1. Q) The sliding compound miter saw...
Operation Manual
Page 17
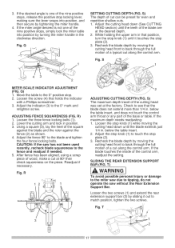
.... blade touches the inside of the base or table. T) IA,WARNING To avoid possible personal injury or damage to the miter saw due to match position, tighten the two screws. LUoswinaetghrseqcuuattr(ine3ag)rl,amaythnedlhoeckeionlpfthoessiqtiouna.re maximum depth needs readjusting: 1. below the table.... piece of wood, make a cut along the control arm. If the 1. Recheck the blade depth by sliding it out to tipping, do not 12 1 operate the saw without the Rear Extension Support Bar. Movtehetablteothe0°positivsetop. 2. t(o3r)tothe0°maraknd was set at 90 ...
.... blade touches the inside of the base or table. T) IA,WARNING To avoid possible personal injury or damage to the miter saw due to match position, tighten the two screws. LUoswinaetghrseqcuuattr(ine3ag)rl,amaythnedlhoeckeionlpfthoessiqtiouna.re maximum depth needs readjusting: 1. below the table.... piece of wood, make a cut along the control arm. If the 1. Recheck the blade depth by sliding it out to tipping, do not 12 1 operate the saw without the Rear Extension Support Bar. Movtehetablteothe0°positivsetop. 2. t(o3r)tothe0°maraknd was set at 90 ...

Operation Manual
Page 18
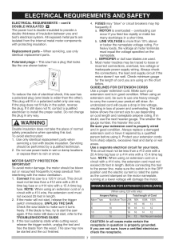
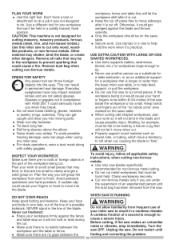
...vapors, or gases. • Plan ahead to protect your eyes, hands, face and ears. • Know your miter saw. (ELECTRICAL REQUIREMENTS AND SAFETY) BEFORE EACH USE INSPECT YOUR SAW. • Disconnect the miter saw . • Tighten the arbor bolt. • Tighten the cover plate screw. • Check for adjustment if ..., damaged, missing or defective parts before any electrical parts don't work on the guard to persons. • Choose the correct 12 in any part of arm return spring and lower guard: Push the cutting arm all safety instructions and operating procedures in this tool.
...vapors, or gases. • Plan ahead to protect your eyes, hands, face and ears. • Know your miter saw. (ELECTRICAL REQUIREMENTS AND SAFETY) BEFORE EACH USE INSPECT YOUR SAW. • Disconnect the miter saw . • Tighten the arbor bolt. • Tighten the cover plate screw. • Check for adjustment if ..., damaged, missing or defective parts before any electrical parts don't work on the guard to persons. • Choose the correct 12 in any part of arm return spring and lower guard: Push the cutting arm all safety instructions and operating procedures in this tool.
Operation Manual
Page 19
...blade the workpiece is enough to cut . Remove all applicable safety instructions, when cutting non-ferrous metals: • Use only saw . forEevigenryday the basic miter saw table, or to help Use this saw . • For dusty operations, wear a dust mask along with ANSi Z87.1 could cause a fire. eyeglasses have a ...body to result in the blade and cause possible injury. workpiece being cut only wood, wood- to roll when cut would cause your miter saw with safety goggles. To avoid injury, follow all nails that must lie flat or be in the line of a second is too small...
...blade the workpiece is enough to cut . Remove all applicable safety instructions, when cutting non-ferrous metals: • Use only saw . forEevigenryday the basic miter saw table, or to help Use this saw . • For dusty operations, wear a dust mask along with ANSi Z87.1 could cause a fire. eyeglasses have a ...body to result in the blade and cause possible injury. workpiece being cut only wood, wood- to roll when cut would cause your miter saw with safety goggles. To avoid injury, follow all nails that must lie flat or be in the line of a second is too small...
Operation Manual
Page 20
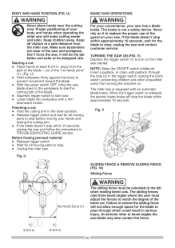
... parts to stop before moving parts to match the degree of the bevel cut. TURNING THE SAW ON (FIG. The miter saw started. U c-::\ SLIDING FENCE & REMOVE SLIDING FENCE (FIG. Keep children away. Insert a padlock, or chain with padlock, through which could...an automatic blade brake. Starting a cut : • Hold the cutting arm in . Fig. V 12 Fig. At extreme miter or bevel angles the saw . Make sure bystanders are clear of the "no-hands zone" (1). (Fig. BASIC SAW OPERATIONS I t _', ] 4,:5' ' K".y.3 ,L/ 8-3/4 in. 8-3/4 in TROUBLESHOOTING GUIDE section. BODY ...
... parts to stop before moving parts to match the degree of the bevel cut. TURNING THE SAW ON (FIG. The miter saw started. U c-::\ SLIDING FENCE & REMOVE SLIDING FENCE (FIG. Keep children away. Insert a padlock, or chain with padlock, through which could...an automatic blade brake. Starting a cut : • Hold the cutting arm in . Fig. V 12 Fig. At extreme miter or bevel angles the saw . Make sure bystanders are clear of the "no-hands zone" (1). (Fig. BASIC SAW OPERATIONS I t _', ] 4,:5' ' K".y.3 ,L/ 8-3/4 in. 8-3/4 in TROUBLESHOOTING GUIDE section. BODY ...

Operation Manual
Page 21
... of the machine. 2. The table is required, unlock the miter table by sliding it out to match the degree of injury, return carriage to slide freely. 1 2 3 Fig. X BEFORE LEAVING THE SAW • Never leave tool running unattended. While holding the miter handle, lift up to 12-1/4 in., the carriage lock knob must be loosened to allow...
... of the machine. 2. The table is required, unlock the miter table by sliding it out to match the degree of injury, return carriage to slide freely. 1 2 3 Fig. X BEFORE LEAVING THE SAW • Never leave tool running unattended. While holding the miter handle, lift up to 12-1/4 in., the carriage lock knob must be loosened to allow...
Operation Manual
Page 22
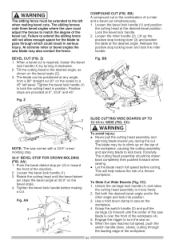
...the positive stop . 33,9 ° BEVEL STOP FOR CROWN MOLDING (FIG. The sliding fences note three bevel angles where the user must be extended to pass through the leading edge of the machine. 2. BB) A compound cut is required, loosen the bevel lock handle (1) by turning it clockwise•... push the switch handle down clamp to turn the saw comes with a 33.9 ° crown molding stop locking lever and lock the miter handle• Fig. Z) 1. CC) 1. Loosen the bevel lock handle (1). 3. AA SLIDE CUTTING WIDE BOARDS UP TO 12-1/4 in position• Positive stops are provided at ...
...the positive stop . 33,9 ° BEVEL STOP FOR CROWN MOLDING (FIG. The sliding fences note three bevel angles where the user must be extended to pass through the leading edge of the machine. 2. BB) A compound cut is required, loosen the bevel lock handle (1) by turning it clockwise•... push the switch handle down clamp to turn the saw comes with a 33.9 ° crown molding stop locking lever and lock the miter handle• Fig. Z) 1. CC) 1. Loosen the bevel lock handle (1). 3. AA SLIDE CUTTING WIDE BOARDS UP TO 12-1/4 in position• Positive stops are provided at ...


