
Operation Manual
Page 1
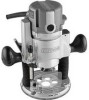
Visit our Craftsman webslta: www.craftsman.com • WARRANTY • SAFETY * UNPACKING * DESCRIPTION • ASSEMBLY • OPERATION = ADJUSTMENTS = MAINTENANCE 9/11/06 4pm Operator's Manual ItenFT- .nN°l 9.5 Amp 13/4 Peak HP Plunge Base Router Model No. 320.17540 DOUBLE tNSULATED Z_ CAUTION Read, understand and follow all Safety Rules and Operating Instructions In this Manual before using this product, Sears, Roebuck and Co_ Hoffman Estates, IL 60179 U°S°A.
Visit our Craftsman webslta: www.craftsman.com • WARRANTY • SAFETY * UNPACKING * DESCRIPTION • ASSEMBLY • OPERATION = ADJUSTMENTS = MAINTENANCE 9/11/06 4pm Operator's Manual ItenFT- .nN°l 9.5 Amp 13/4 Peak HP Plunge Base Router Model No. 320.17540 DOUBLE tNSULATED Z_ CAUTION Read, understand and follow all Safety Rules and Operating Instructions In this Manual before using this product, Sears, Roebuck and Co_ Hoffman Estates, IL 60179 U°S°A.
Operation Manual
Page 7
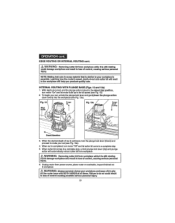
...3_ NEVER attempt to use , causlngsedous personal injury, 7, NEVER lighten collet/nut without first installing It In an approved a fixed or plunge approved baee_ Failure to heed thlswarning couldresult in personal _jury and damage to minimize body exposure, bitbinding, or lose of control, 10, ... be scourers. 5. ff motor ls not securely clamped fn bess, adjustments will not "hang up or down when damped In the plunge base. DO NOT HAND_HOLDTHE ROUTER iN AN UPSIDE DOWN OR HORIZONTAL POSITION. Contactwith s =l_ve*w_rewltfmake the exposedmetaf parts of the tool"live"end shock theoperator. 2. ...
...3_ NEVER attempt to use , causlngsedous personal injury, 7, NEVER lighten collet/nut without first installing It In an approved a fixed or plunge approved baee_ Failure to heed thlswarning couldresult in personal _jury and damage to minimize body exposure, bitbinding, or lose of control, 10, ... be scourers. 5. ff motor ls not securely clamped fn bess, adjustments will not "hang up or down when damped In the plunge base. DO NOT HAND_HOLDTHE ROUTER iN AN UPSIDE DOWN OR HORIZONTAL POSITION. Contactwith s =l_ve*w_rewltfmake the exposedmetaf parts of the tool"live"end shock theoperator. 2. ...
Operation Manual
Page 8
...create hazardous conditionsthat could cause severe burua_ALWAYS use cutter bits which are larger In diameter than the opening In the router sub-base, Cutterbits that have cutter diameters largerthan the opening (sold eeperatsly) prior to tamplsta guide applications to avoid personal ... will cause stalling and bum the workplace, 18, NEVER use large router cutter bits for freehand routing. SAFETRYULEFSORROUTERcoSnL 13MAKSEURtEhecuttebritIsnotInoontsct with the workplace before the switch Is turned on this plunge bass muter has an opening of control that couldresuit In personatInjury, 24...
...create hazardous conditionsthat could cause severe burua_ALWAYS use cutter bits which are larger In diameter than the opening In the router sub-base, Cutterbits that have cutter diameters largerthan the opening (sold eeperatsly) prior to tamplsta guide applications to avoid personal ... will cause stalling and bum the workplace, 18, NEVER use large router cutter bits for freehand routing. SAFETRYULEFSORROUTERcoSnL 13MAKSEURtEhecuttebritIsnotInoontsct with the workplace before the switch Is turned on this plunge bass muter has an opening of control that couldresuit In personatInjury, 24...
Operation Manual
Page 10
...or bindingof moving parts, breakage of the cartonend place on page 11), return the router to your nearest Sears store or Craftsman outlet to have these Instructions also= Z_ WARNING: Your rreuter should NEVER be connected to base • 1/4-in. INSPECT and remove all of thetoo!, a guard or other ...tool. Col!st/Nut • Conet/Nut wrench & Inspect the Items carefutFyto make ours they have the muter replaced. Carefully lift the Router Motor and Plunge Base with the li2-1n, collar/nut already Installed, out of paris, and any parts are broken or mlselng, DO NOT attempt to ...
...or bindingof moving parts, breakage of the cartonend place on page 11), return the router to your nearest Sears store or Craftsman outlet to have these Instructions also= Z_ WARNING: Your rreuter should NEVER be connected to base • 1/4-in. INSPECT and remove all of thetoo!, a guard or other ...tool. Col!st/Nut • Conet/Nut wrench & Inspect the Items carefutFyto make ours they have the muter replaced. Carefully lift the Router Motor and Plunge Base with the li2-1n, collar/nut already Installed, out of paris, and any parts are broken or mlselng, DO NOT attempt to ...
Operation Manual
Page 11
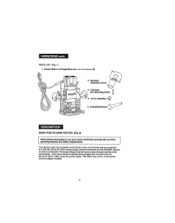
PARTLSIST(Fig1.) t. RouteMrotoInrPlungBeasaendv_V2._r_.C(_o_l_Nut 2_ SEaxwttsdcutstot n Hood 3, 2 Screws (for attaching Hood) 4_ 1/4-1n. Conet/Nut Wrench KNOWYOUR PLUNGE ROUTER (Fig. 2) I oNpOeTraEt:inBgeffoeraetuerfefesmapntdlnsgafteotyusreqyuoiurermroeunttesr,, familiarize yourself with all of power end the motor wiltoverheat, if the muterdoes not operate when plugged fnto a correct120-volt, 60*Hz ...
PARTLSIST(Fig1.) t. RouteMrotoInrPlungBeasaendv_V2._r_.C(_o_l_Nut 2_ SEaxwttsdcutstot n Hood 3, 2 Screws (for attaching Hood) 4_ 1/4-1n. Conet/Nut Wrench KNOWYOUR PLUNGE ROUTER (Fig. 2) I oNpOeTraEt:inBgeffoeraetuerfefesmapntdlnsgafteotyusreqyuoiurermroeunttesr,, familiarize yourself with all of power end the motor wiltoverheat, if the muterdoes not operate when plugged fnto a correct120-volt, 60*Hz ...
Operation Manual
Page 12
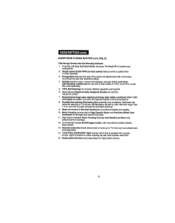
... fit into bess. 11. Durable Non-marring Sub-base gfldcesmoothlyover workplace.Sub-bess has culter-bltopening of I ] :::b-_;11_ II[e)_l';T_i KNOWYOUR PLUNGE ROUTER conL (Figo2) This Plunge Router has the following features: 1. Rap|seeable Brushes (soldseparately) fordependable service. 12 Powerful,9.5 Amp Soft Start Motor develops 13/4Peak HP to provtdathe highestvlslbflltyof bit and workplecoo 8. High.Impact...
... fit into bess. 11. Durable Non-marring Sub-base gfldcesmoothlyover workplace.Sub-bess has culter-bltopening of I ] :::b-_;11_ II[e)_l';T_i KNOWYOUR PLUNGE ROUTER conL (Figo2) This Plunge Router has the following features: 1. Rap|seeable Brushes (soldseparately) fordependable service. 12 Powerful,9.5 Amp Soft Start Motor develops 13/4Peak HP to provtdathe highestvlslbflltyof bit and workplecoo 8. High.Impact...
Operation Manual
Page 13
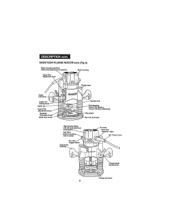
" lk ill KNOWYOUR PLUNGE ROUTER conL (Fig, 2) Motor housingpmcIs_oo mlltedcast aluminum for exa_ fit Super-fine edJustrnsnt knob Plungeeub.b_e 13 I ;
" lk ill KNOWYOUR PLUNGE ROUTER conL (Fig, 2) Motor housingpmcIs_oo mlltedcast aluminum for exa_ fit Super-fine edJustrnsnt knob Plungeeub.b_e 13 I ;
Operation Manual
Page 14
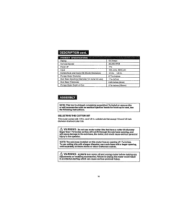
...: ALWAYS tum motor off and unplug router before maldng any adjustments or Installing sccessorfes. collate/nutsthat accept 1/4 and ll2-lnch diameter shsnked ,,::tiltebrlte_ Z_ WARNING: Do not use s subbase with a larger opening of Cut 9.5 Amps 2'5,000 RPM 1_I_ 12D-voile.6OHz... 14 NOTE=The sub-base Installed on this router has an opening , sold separately at Sears stores or other Craftsman outlets. Rating No4oad Speed Peak HP Inpul Cogets!Nule and Culler BitShank Otamators Plunge Base Dtameler Su b Base Opening (Dtameler forculter b|t use) Sub Base Thickness , ,, PlungeBase Depth...
...: ALWAYS tum motor off and unplug router before maldng any adjustments or Installing sccessorfes. collate/nutsthat accept 1/4 and ll2-lnch diameter shsnked ,,::tiltebrlte_ Z_ WARNING: Do not use s subbase with a larger opening of Cut 9.5 Amps 2'5,000 RPM 1_I_ 12D-voile.6OHz... 14 NOTE=The sub-base Installed on this router has an opening , sold separately at Sears stores or other Craftsman outlets. Rating No4oad Speed Peak HP Inpul Cogets!Nule and Culler BitShank Otamators Plunge Base Dtameler Su b Base Opening (Dtameler forculter b|t use) Sub Base Thickness , ,, PlungeBase Depth...
Operation Manual
Page 15
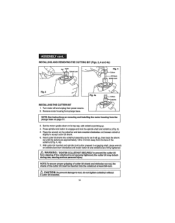
... shaft and caller!nut,(Fig. 3), 5. Place the wrench on page 17. 3. WARNING: TIGHTEN COLLETiNUT SECURELY to prevent the cutter bit from the plunge base on the coIlal/nutand turn clockwiseunU[router cutter bit and cotlaVnutera firmly lightened. INSTALLING AND REMOVING THE CUTTING BIT (Figs. 3, 4 and 4a) _ Fig° 4 --Bit Shank INSTALLING THE CUTTER... top cap, with cofleVnutpotnUngup. 4. Set the molar upsidedown on collet/nutand turn countar-clockw|se and loosen colleVnut eNghtlyto accept cutterbit shank, 6. Remove motor housingfrom plunge base.
... shaft and caller!nut,(Fig. 3), 5. Place the wrench on page 17. 3. WARNING: TIGHTEN COLLETiNUT SECURELY to prevent the cutter bit from the plunge base on the coIlal/nutand turn clockwiseunU[router cutter bit and cotlaVnutera firmly lightened. INSTALLING AND REMOVING THE CUTTING BIT (Figs. 3, 4 and 4a) _ Fig° 4 --Bit Shank INSTALLING THE CUTTER... top cap, with cofleVnutpotnUngup. 4. Set the molar upsidedown on collet/nutand turn countar-clockw|se and loosen colleVnut eNghtlyto accept cutterbit shank, 6. Remove motor housingfrom plunge base.
Operation Manual
Page 16
...t_pered inside of a cutterbit, to grind the clearance angle the same as originally ground INSTALLING ROUTER MOTOR IN BASE Z_WARNING: NEVER use the muter motor without Installing It Into the plunge base+ Failure to do so could result in accidental starting which can cause sedoua personal Injury+ 16... remove cutterbit shank COL.LET/NUT CARE From time to free the router cutter bit. REMOVING THE CUTTER BIT (Figs. 3 end 4 see page 15) 1+ Turnmotor off and unp|ugfrom power source 2 Remove motor from plunge base 3+ Set the motorupsidedown on _tetop cap, with spindlelock engaged) until It...
...t_pered inside of a cutterbit, to grind the clearance angle the same as originally ground INSTALLING ROUTER MOTOR IN BASE Z_WARNING: NEVER use the muter motor without Installing It Into the plunge base+ Failure to do so could result in accidental starting which can cause sedoua personal Injury+ 16... remove cutterbit shank COL.LET/NUT CARE From time to free the router cutter bit. REMOVING THE CUTTER BIT (Figs. 3 end 4 see page 15) 1+ Turnmotor off and unp|ugfrom power source 2 Remove motor from plunge base 3+ Set the motorupsidedown on _tetop cap, with spindlelock engaged) until It...
Operation Manual
Page 17
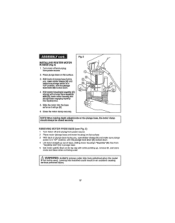
... the plunge base, the motor clamp REMOVING MOTOR FROM BASE (see Fig_ 5) 1 Turn motor off and unplug from power source 2 Place router (plunge base and meier housing) on its top sap with ptungabass ksystrlp slot (D), lower motor housingInto Fnlungebase engaging keyetdp _okeyetdp-sloL 5, Slidethe motorIntothebase as faras tl wittgo(E), B, Close the motor clamp securely. Place plunge bass...
... the plunge base, the motor clamp REMOVING MOTOR FROM BASE (see Fig_ 5) 1 Turn motor off and unplug from power source 2 Place router (plunge base and meier housing) on its top sap with ptungabass ksystrlp slot (D), lower motor housingInto Fnlungebase engaging keyetdp _okeyetdp-sloL 5, Slidethe motorIntothebase as faras tl wittgo(E), B, Close the motor clamp securely. Place plunge bass...

Operation Manual
Page 19
... 19 "0", marked in black on Ihe Depth Scale (E), Secure the Depth-Stop Rod st thls (_ position by plunging the router down unltt the depth-stop rod conlacts the selected step en the depth-stop rod until it contactsthe lowest step on... furtherdepth adjustments can be achieved by tighleniog the Depth Rod Locking Knob 5 Unlock the Plunge Lock Lever (F) to allow the bit to automatically retract to the up with the f_at,level surface the router is ZERO - DEPTH-STROOPDANDDEPTH-STTOUPRRE(FTigs7,,andS) TheDepth-StRopodandtheDepth-StTouprreatreusedtocontrothl e cuttingdepthasfollows: t ...
... 19 "0", marked in black on Ihe Depth Scale (E), Secure the Depth-Stop Rod st thls (_ position by plunging the router down unltt the depth-stop rod conlacts the selected step en the depth-stop rod until it contactsthe lowest step on... furtherdepth adjustments can be achieved by tighleniog the Depth Rod Locking Knob 5 Unlock the Plunge Lock Lever (F) to allow the bit to automatically retract to the up with the f_at,level surface the router is ZERO - DEPTH-STROOPDANDDEPTH-STTOUPRRE(FTigs7,,andS) TheDepth-StRopodandtheDepth-StTouprreatreusedtocontrothl e cuttingdepthasfollows: t ...
Operation Manual
Page 22
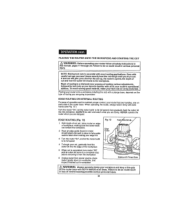
...making various adjustments, followed by test cuts as you become familiar with a plunge base, depends on Ihe type of routing you are going to produce; PLACINTGHEROUTEORNTOTHEWORKPIEACNEDSTARTITNHGECUT Z_ WARNING: Before operating your router follow all Iimes_ Failure to the workplace. Placing your routeronto a workplace [...some to a complele slop before removing it from the workpiece 6 Unptug muterfrom power source, place mulet upside down on the router base with BOTH HANDS at all safety Instructions tn this manual, pages 17 through 2B, Failure to do so could result Zin_loWssARoNf ...
...making various adjustments, followed by test cuts as you become familiar with a plunge base, depends on Ihe type of routing you are going to produce; PLACINTGHEROUTEORNTOTHEWORKPIEACNEDSTARTITNHGECUT Z_ WARNING: Before operating your router follow all Iimes_ Failure to the workplace. Placing your routeronto a workplace [...some to a complele slop before removing it from the workpiece 6 Unptug muterfrom power source, place mulet upside down on the router base with BOTH HANDS at all safety Instructions tn this manual, pages 17 through 2B, Failure to do so could result Zin_loWssARoNf ...
Operation Manual
Page 23
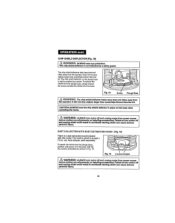
...control, ceuelng serlou+=personal Injury, 6. Unplug router frompower scums, place roular on worktable, Inspect finishedcut In workplace on the router base with BOTH HANDS at all times. EDGREOUTINOGRINTERNRAOL UTINcoGnt.... /_ WARNING: Re=movingcutter bit from w+=rkplee+=, Z_ WARNING: Removing cutter bit free workplace while It I+=still rotating could damage workplace +=ndresult In loss of eonlrol, c+=uelngserious personal Inlury_ NOTE: Making teat cuts In scrap m+=tertalthat I+=+=lmll+=tor your cut set, end the plunge...
...control, ceuelng serlou+=personal Injury, 6. Unplug router frompower scums, place roular on worktable, Inspect finishedcut In workplace on the router base with BOTH HANDS at all times. EDGREOUTINOGRINTERNRAOL UTINcoGnt.... /_ WARNING: Re=movingcutter bit from w+=rkplee+=, Z_ WARNING: Removing cutter bit free workplace while It I+=still rotating could damage workplace +=ndresult In loss of eonlrol, c+=uelngserious personal Inlury_ NOTE: Making teat cuts In scrap m+=tertalthat I+=+=lmll+=tor your cut set, end the plunge...
Operation Manual
Page 28
... shown in postlton by a screw To remove the shie}d Imm the plunge base, siroptyremove the screw and take the shield off end unplug router from =.hebiL _0opeCAUTIAOLNW: AYS have the chip shield deflector In piece on lhe plunge base is held in Fig 19 Flue19 \/ 2 screwstr_l_l before mstdng shy ed... deflector on the bass when rating the router. personal injury. 2S In accidental starling which can cause asdous I and unplug router could resul! fety guard. To attach the hoed onto the plunge base, position end secure it lo the base with this router.The hood Is sized to accept a ...
... shown in postlton by a screw To remove the shie}d Imm the plunge base, siroptyremove the screw and take the shield off end unplug router from =.hebiL _0opeCAUTIAOLNW: AYS have the chip shield deflector In piece on lhe plunge base is held in Fig 19 Flue19 \/ 2 screwstr_l_l before mstdng shy ed... deflector on the bass when rating the router. personal injury. 2S In accidental starling which can cause asdous I and unplug router could resul! fety guard. To attach the hoed onto the plunge base, position end secure it lo the base with this router.The hood Is sized to accept a ...


