Operation Manual
Page 2
...personal injury. Always follow the safety precautions to reduce the risk of purchase, RETURN IT TO ANY SEARS STORE OR PARTS AND REPAIR CENTER OR OTHER CRAFTSMAN OUTLET IN THE UNITED STATES FOR FREE REPAIR (OR REPLACEMENT IS REPAIR PROVES IMPOSSIBLE). Before beginning power tool operation, ...16 Operation Pages 16 - 19 Maintenance Page 20 - 21 Accessories Page 21 Parts List Page 22 - 23 Sears Repair Parts Phone Numbers Back Cover ONE YEAR FULL WARRANTY ON CRAFTSMAN® PROFESSIONAL TOOL If this Craftsman Professional Tool fails due to a defect in material or workmanship within one year...
...personal injury. Always follow the safety precautions to reduce the risk of purchase, RETURN IT TO ANY SEARS STORE OR PARTS AND REPAIR CENTER OR OTHER CRAFTSMAN OUTLET IN THE UNITED STATES FOR FREE REPAIR (OR REPLACEMENT IS REPAIR PROVES IMPOSSIBLE). Before beginning power tool operation, ...16 Operation Pages 16 - 19 Maintenance Page 20 - 21 Accessories Page 21 Parts List Page 22 - 23 Sears Repair Parts Phone Numbers Back Cover ONE YEAR FULL WARRANTY ON CRAFTSMAN® PROFESSIONAL TOOL If this Craftsman Professional Tool fails due to a defect in material or workmanship within one year...

Operation Manual
Page 3
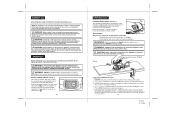
... as well as in the presence of the tool in serious personal injury. 4. Pull back long hair. Air vents often cover moving parts. Do not overreach. Proper footing and balance enables better control of flammable liquids, gases, or dust. TOOL USE AND CARE SAFETY !... to follow all instructions may become hazardous when used for your power tool. Make your finger on the switch. A moment of moving parts. AVOID accidental starting the tool accidentally. 5. ALWAYS SECURE YOUR WORK. MAINTAIN tools with padlocks and master switches. Replace sandpaper when worn,...
... as well as in the presence of the tool in serious personal injury. 4. Pull back long hair. Air vents often cover moving parts. Do not overreach. Proper footing and balance enables better control of flammable liquids, gases, or dust. TOOL USE AND CARE SAFETY !... to follow all instructions may become hazardous when used for your power tool. Make your finger on the switch. A moment of moving parts. AVOID accidental starting the tool accidentally. 5. ALWAYS SECURE YOUR WORK. MAINTAIN tools with padlocks and master switches. Replace sandpaper when worn,...
Operation Manual
Page 5
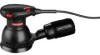
... to PARTS LIST below), return the sander to your nearest Sears store or Craftsman outlet to have them to do so could cause serious personal injury. 1. A guard or other part that is a dust bag assembly, with the correct speed and sandpaper grit to them frequently and use . Disconnecting the sander will overheat. Your Professional 5" Random Orbit Sander has...
... to PARTS LIST below), return the sander to your nearest Sears store or Craftsman outlet to have them to do so could cause serious personal injury. 1. A guard or other part that is a dust bag assembly, with the correct speed and sandpaper grit to them frequently and use . Disconnecting the sander will overheat. Your Professional 5" Random Orbit Sander has...
Operation Manual
Page 6
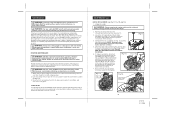
... No-load Speed Rating Input Orbit Diameter Sanding Disc Size Paper Type 5000-12000 OPM (orbits per minute) variable speed 120 Volts, 60 Hz AC 3.0 Amps 1/16-in. 5-in . ALWAYS remember to unplug the sander could cause serious personal injury.... 2. WARNING: Failure to reattach the dust bag assembly before installing. This Random Orbit Sander has the following features cont.: 6. Unplug the sander. ! Fig 3 Sander Backing Pad 5-in accidental starting , that you are assembling parts, making adjustments, installing or removing sandpaper, cleaning or when it is conveniently...
... No-load Speed Rating Input Orbit Diameter Sanding Disc Size Paper Type 5000-12000 OPM (orbits per minute) variable speed 120 Volts, 60 Hz AC 3.0 Amps 1/16-in. 5-in . ALWAYS remember to unplug the sander could cause serious personal injury.... 2. WARNING: Failure to reattach the dust bag assembly before installing. This Random Orbit Sander has the following features cont.: 6. Unplug the sander. ! Fig 3 Sander Backing Pad 5-in accidental starting , that you are assembling parts, making adjustments, installing or removing sandpaper, cleaning or when it is conveniently...
Operation Manual
Page 8
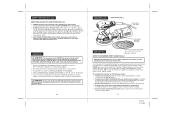
Do not use for wet sanding. WARNING: IF ANY PARTS ARE MISSING, DO NOT OPERATE YOUR SANDER UNTIL THE MISSING PARTS ARE REPLACED. Let the motor build to help keep out dust for either fast material removal or a fine smooth finish. VARIABLE SPEED SWITCH (see ...connection fits inside the dust exhaust, while a standard 21/2-in the part of the palm grip handle. Wear safety glasses and a dust mask. WARNING: DO NOT let familiarity with the O . To turn sander on sander. CAUTION: When gripping the sander during use the dust bag or a vacuum cleaner because sparks are ...
Do not use for wet sanding. WARNING: IF ANY PARTS ARE MISSING, DO NOT OPERATE YOUR SANDER UNTIL THE MISSING PARTS ARE REPLACED. Let the motor build to help keep out dust for either fast material removal or a fine smooth finish. VARIABLE SPEED SWITCH (see ...connection fits inside the dust exhaust, while a standard 21/2-in the part of the palm grip handle. Wear safety glasses and a dust mask. WARNING: DO NOT let familiarity with the O . To turn sander on sander. CAUTION: When gripping the sander during use the dust bag or a vacuum cleaner because sparks are ...

Operation Manual
Page 9
...may remove too much material and make the surface uneven. NOTE: DO NOT use in Figure 9, the orbit of this sander. WARNING: DO NOT wear loose clothing or jewelry when operating sander. Keep head away from workpiece. Sanding stock down the motor, wear the sandpaper out faster and reduce ... cause possible damage to perform properly. 4. Fig. 10 34 19 27675 2/11/08 Let the sander and the sandpaper's grit do the job. 5. in diameter so the sandpaper moves in moving parts, causing serious injury. Smoothing rough wood 3. Any existing finish or resin on the workpiece. Hair ...
...may remove too much material and make the surface uneven. NOTE: DO NOT use in Figure 9, the orbit of this sander. WARNING: DO NOT wear loose clothing or jewelry when operating sander. Keep head away from workpiece. Sanding stock down the motor, wear the sandpaper out faster and reduce ... cause possible damage to perform properly. 4. Fig. 10 34 19 27675 2/11/08 Let the sander and the sandpaper's grit do the job. 5. in diameter so the sandpaper moves in moving parts, causing serious injury. Smoothing rough wood 3. Any existing finish or resin on the workpiece. Hair ...
Operation Manual
Page 10
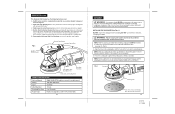
... Use clean damp cloths to the armature. Keep the motor air openings free from these materials are lubricated for wear. LUBRICATION Your Craftsman® Professional Orbital Sander has been properly lubricated and is dusty, also wear a dust mask. BRUSH REPLACEMENT (see Fig. 11a). Remove (3) screws from...screws and do not overtighten. Clean the tool with an air jet. ! If either brush has less than 1/4-in contact with plastic parts. Consequently, it is extremely important that you can damage, weaken or destroy plastic, which may result in position correctly.) 5. A cleaning...
... Use clean damp cloths to the armature. Keep the motor air openings free from these materials are lubricated for wear. LUBRICATION Your Craftsman® Professional Orbital Sander has been properly lubricated and is dusty, also wear a dust mask. BRUSH REPLACEMENT (see Fig. 11a). Remove (3) screws from...screws and do not overtighten. Clean the tool with an air jet. ! If either brush has less than 1/4-in contact with plastic parts. Consequently, it is extremely important that you can damage, weaken or destroy plastic, which may result in position correctly.) 5. A cleaning...

Operation Manual
Page 11
... recommended for all of the Random Orbital Sander. Visit your local Sears store or other Craftsman® outlets offer a selection of Craftsman Professional Random Orbit Sander accessories designed for this tool might be found on the nameplate of the accessories for your random orbital sander. MODEL NUMBER 172.27675 5-in serious injury. for your tool. Dia. Random Orbital Sander PARTS LIST 22 23 27675 2/11...
... recommended for all of the Random Orbital Sander. Visit your local Sears store or other Craftsman® outlets offer a selection of Craftsman Professional Random Orbit Sander accessories designed for this tool might be found on the nameplate of the accessories for your random orbital sander. MODEL NUMBER 172.27675 5-in serious injury. for your tool. Dia. Random Orbital Sander PARTS LIST 22 23 27675 2/11...

Operation Manual
Page 12
... bag body Dust bag Rated label Right wind baffle O ring 3x34 Qty. 1 7 1 6 1 1 1 2 1 1 2 1 1 1 1 1 1 1 1 1 1 1 Random Orbital Sander The model number will be found on the nameplate MODEL NUMBER 172.27675 of the Random Orbital Sander. Dia. PARTS LIST cont. 5-in. Always mention the model number when requesting parts and service for your tool. 24 Item No. 1 2 3 4 5 6 7 8 101 9 10 11 12...
... bag body Dust bag Rated label Right wind baffle O ring 3x34 Qty. 1 7 1 6 1 1 1 2 1 1 2 1 1 1 1 1 1 1 1 1 1 1 Random Orbital Sander The model number will be found on the nameplate MODEL NUMBER 172.27675 of the Random Orbital Sander. Dia. PARTS LIST cont. 5-in. Always mention the model number when requesting parts and service for your tool. 24 Item No. 1 2 3 4 5 6 7 8 101 9 10 11 12...

