

Operation Manual
Page 1
Operator's Manual ® P R O F E S S I O N A L 3.0 Amp/ 5-in this manual before using this product. Diameter Random Orbital Sander Model No. 172.27675 CAUTION: Read, understand and follow all Safety Rules and Operating Instructions in . Visit our Craftsman® website: www.sears.com/craftsman 3025736 Certified to CAN/CSAC22.2 No.745-1,745-2-4 Conforms to UL STD 745-1, 745-2-4 Double Insulated • WARRANTY • SAFETY • UNPACKING • DESCRIPTION • ASSEMBLY • OPERATION • MAINTENANCE Sears, Roebuck and Co., Hoffman Estates, IL 60179 U.S.A.
Operator's Manual ® P R O F E S S I O N A L 3.0 Amp/ 5-in this manual before using this product. Diameter Random Orbital Sander Model No. 172.27675 CAUTION: Read, understand and follow all Safety Rules and Operating Instructions in . Visit our Craftsman® website: www.sears.com/craftsman 3025736 Certified to CAN/CSAC22.2 No.745-1,745-2-4 Conforms to UL STD 745-1, 745-2-4 Double Insulated • WARRANTY • SAFETY • UNPACKING • DESCRIPTION • ASSEMBLY • OPERATION • MAINTENANCE Sears, Roebuck and Co., Hoffman Estates, IL 60179 U.S.A.
Operation Manual
Page 2
... FOR FREE REPAIR (OR REPLACEMENT IS REPAIR PROVES IMPOSSIBLE). WARNING: Some dust created by using this tool. TABLE OF CONTENTS Warranty Page 2 Safety Symbols Page 3 Safety Instructions Pages 4 - 10 Unpacking Page 10 - 11 Description Pages 11 - 12 Assembly Pages 13 - 16 Operation Pages 16 - 19 Maintenance Page 20 - 21 Accessories Page 21 Parts List Page 22 - 23 Sears Repair Parts Phone Numbers Back Cover ONE YEAR FULL WARRANTY ON CRAFTSMAN® PROFESSIONAL TOOL If this Craftsman Professional Tool fails...
... FOR FREE REPAIR (OR REPLACEMENT IS REPAIR PROVES IMPOSSIBLE). WARNING: Some dust created by using this tool. TABLE OF CONTENTS Warranty Page 2 Safety Symbols Page 3 Safety Instructions Pages 4 - 10 Unpacking Page 10 - 11 Description Pages 11 - 12 Assembly Pages 13 - 16 Operation Pages 16 - 19 Maintenance Page 20 - 21 Accessories Page 21 Parts List Page 22 - 23 Sears Repair Parts Phone Numbers Back Cover ONE YEAR FULL WARRANTY ON CRAFTSMAN® PROFESSIONAL TOOL If this Craftsman Professional Tool fails...

Operation Manual
Page 3
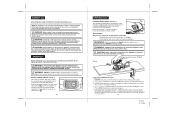
... flammable liquids, gases, or dust. WORK AREA SAFETY 1. DO NOT operate power tools in explosive atmospheres, such as the specific potential hazards related to follow all instructions may result in the "ON" position invites accidents. 6. Lock tools away when not in unexpected situations. 8. DO NOT carry tools with the switch is wider than using this tool. 2. A wrench that have the tool serviced before using your hair, clothing, and...
... flammable liquids, gases, or dust. WORK AREA SAFETY 1. DO NOT operate power tools in explosive atmospheres, such as the specific potential hazards related to follow all instructions may result in the "ON" position invites accidents. 6. Lock tools away when not in unexpected situations. 8. DO NOT carry tools with the switch is wider than using this tool. 2. A wrench that have the tool serviced before using your hair, clothing, and...
Operation Manual
Page 4
.... Vacuum filter bags should be changed frequently. • Plastic drop cloths should be used. Failure to reduce tracking of the tool wears. 9 27675 2/11/08 Wear a face mask or dust mask if the operation is being used by all instructions. Direct particles away from power sanding, sawing, grinding, drilling and other removal debris. To reduce risk, empty dust bag frequently and strictly follow all...
.... Vacuum filter bags should be changed frequently. • Plastic drop cloths should be used. Failure to reduce tracking of the tool wears. 9 27675 2/11/08 Wear a face mask or dust mask if the operation is being used by all instructions. Direct particles away from power sanding, sawing, grinding, drilling and other removal debris. To reduce risk, empty dust bag frequently and strictly follow all...
Operation Manual
Page 5
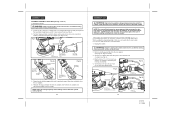
... the tool's operation. DO NOT operate on direct current (DC). This sander has a 10-ft, 2-wire power cord (no breakage or damage has occurred during shipping. 2. Included with all parts are damaged or missing (refer to PARTS LIST below), return the sander to the power source when you are assembling parts, making adjustments, installing or removing sandpaper, cleaning or when it will overheat. Your Professional 5" Random Orbit Sander has a precision-built electric motor and...
... the tool's operation. DO NOT operate on direct current (DC). This sander has a 10-ft, 2-wire power cord (no breakage or damage has occurred during shipping. 2. Included with all parts are damaged or missing (refer to PARTS LIST below), return the sander to the power source when you are assembling parts, making adjustments, installing or removing sandpaper, cleaning or when it will overheat. Your Professional 5" Random Orbit Sander has a precision-built electric motor and...
Operation Manual
Page 6
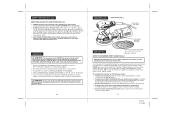
... of the sander to keep work surface through holes in Dust Collection System Dust bag assembly with dual dust ports collects dust from damage and reduces weight. 9. Unplug the sander. ! This Random Orbit Sander has the following features cont.: 6. Fig 2 Comfort Grip Handle Variable Speed Dial On/Off Rocker Switch Vac Adapter with holes in the backing pad in accidental starting , that you are assembling parts, making adjustments, installing or removing sandpaper...
... of the sander to keep work surface through holes in Dust Collection System Dust bag assembly with dual dust ports collects dust from damage and reduces weight. 9. Unplug the sander. ! This Random Orbit Sander has the following features cont.: 6. Fig 2 Comfort Grip Handle Variable Speed Dial On/Off Rocker Switch Vac Adapter with holes in the backing pad in accidental starting , that you are assembling parts, making adjustments, installing or removing sandpaper...
Operation Manual
Page 7
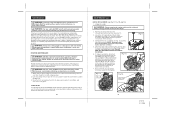
... efficient operation, we recommend that you can easily attach your sander to unplug the sander could result in . hose Fig. 5b Connect hose adapter to wet / dry vac. ASSEMBLY cont. Turn dust bag assembly counterclockwise (embossed arrows show unlock and lock rotation) and remove bag from vac adapter (see page 14, Fig. 4a and 4b). 3. Fig. 5a Fig. 5 Connect 11/4-in accidental starting causing...
... efficient operation, we recommend that you can easily attach your sander to unplug the sander could result in . hose Fig. 5b Connect hose adapter to wet / dry vac. ASSEMBLY cont. Turn dust bag assembly counterclockwise (embossed arrows show unlock and lock rotation) and remove bag from vac adapter (see page 14, Fig. 4a and 4b). 3. Fig. 5a Fig. 5 Connect 11/4-in accidental starting causing...
Operation Manual
Page 8
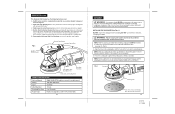
... to vacuum, always install dust bag back on and run it from 1 to 6, with your sander to a complete stop before starting sanding operation. Remove sanding disc, then turn sander off and wait until sanding disc comes to a complete stop , then remove it free without a load (off and wait until sanding disc comes to sand magnesium surfaces. Fig. 6 16 OPERATION cont. Fig. 7 ! WARNING: ALWAYS clamp the workpiece. vac hose connection fits inside...
... to vacuum, always install dust bag back on and run it from 1 to 6, with your sander to a complete stop before starting sanding operation. Remove sanding disc, then turn sander off and wait until sanding disc comes to a complete stop , then remove it free without a load (off and wait until sanding disc comes to sand magnesium surfaces. Fig. 6 16 OPERATION cont. Fig. 7 ! WARNING: ALWAYS clamp the workpiece. vac hose connection fits inside...

Operation Manual
Page 9
... required dimensions 4. OPERATION cont. CAUTION: To ensure proper brake operation after extended use in one spot for power sanding. 2. The backing pad should be sanded will determine which grit will do the work. • Applying additional pressure will only slow down to load-up faster. 3. SANDING TIPS 1. Coarse grit will remove the most material and finer grit will also result in all sanding operations. 4. NOTE...
... required dimensions 4. OPERATION cont. CAUTION: To ensure proper brake operation after extended use in one spot for power sanding. 2. The backing pad should be sanded will determine which grit will do the work. • Applying additional pressure will only slow down to load-up faster. 3. SANDING TIPS 1. Coarse grit will remove the most material and finer grit will also result in all sanding operations. 4. NOTE...
Operation Manual
Page 10
..., gasoline, petroleum- Fig. 11a 7. MAINTENANCE ! LUBRICATION Your Craftsman® Professional Orbital Sander has been properly lubricated and is needed under normal operating conditions. WARNING: Failure to brush off switch and unplug sander from oil, grease and sawdust or woodchips, and store tool in serious personal injury. To replace assemblies, disconnect the red wire lead terminals from top cover of the carbon brushes (see Fig. 11). 3. length of...
..., gasoline, petroleum- Fig. 11a 7. MAINTENANCE ! LUBRICATION Your Craftsman® Professional Orbital Sander has been properly lubricated and is needed under normal operating conditions. WARNING: Failure to brush off switch and unplug sander from oil, grease and sawdust or woodchips, and store tool in serious personal injury. To replace assemblies, disconnect the red wire lead terminals from top cover of the carbon brushes (see Fig. 11). 3. length of...

Operation Manual
Page 11
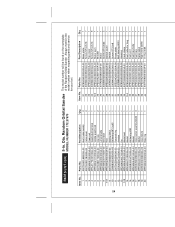
... of the accessories for your tool. Dia. Sears and other Craftsman outlets or shop sears.com/craftsman for all of Craftsman Professional Random Orbit Sander accessories designed for all your sanding applications. 5-inch, 8 Hole, Hook and Loop Sanding Discs come in very fine, fine, medium and coarse grit. for your random orbital sander. MODEL NUMBER 172.27675 5-in. Random Orbital Sander PARTS LIST 22 23 27675 2/11/08 model number when requesting parts and service The model number will be found...
... of the accessories for your tool. Dia. Sears and other Craftsman outlets or shop sears.com/craftsman for all of Craftsman Professional Random Orbit Sander accessories designed for all your sanding applications. 5-inch, 8 Hole, Hook and Loop Sanding Discs come in very fine, fine, medium and coarse grit. for your random orbital sander. MODEL NUMBER 172.27675 5-in. Random Orbital Sander PARTS LIST 22 23 27675 2/11/08 model number when requesting parts and service The model number will be found...
Operation Manual
Page 12
...-00 200W3200029000A-00 2PES02A0011000A-00 200W3000059000A-00 2PES04Q0006000A-00 Part Description Qty. PARTS LIST cont. 5-in. Brush holder ssembly 2 Carbon brush 2 Power cord 1 Speed adjustment knob 1 Variable speed board 1 Inner wire 2 Left wind baffle 1 Brand label 1 Rotor 1 Bearing sleeve 1 Ball bearing 607-2z-p63 1 Dust proof ring 1 Armature 1 Fan 1 Bracket seat 1 Bracket 1 Ball bearing 6202 1 Bracket 1 Screw washer assembly M4x20 3 Washer 1 Screw M4x16 1 Brake ring 1 Item No. 21 22 23...
...-00 200W3200029000A-00 2PES02A0011000A-00 200W3000059000A-00 2PES04Q0006000A-00 Part Description Qty. PARTS LIST cont. 5-in. Brush holder ssembly 2 Carbon brush 2 Power cord 1 Speed adjustment knob 1 Variable speed board 1 Inner wire 2 Left wind baffle 1 Brand label 1 Rotor 1 Bearing sleeve 1 Ball bearing 607-2z-p63 1 Dust proof ring 1 Armature 1 Fan 1 Bracket seat 1 Bracket 1 Ball bearing 6202 1 Bracket 1 Screw washer assembly M4x20 3 Washer 1 Screw M4x16 1 Brake ring 1 Item No. 21 22 23...


