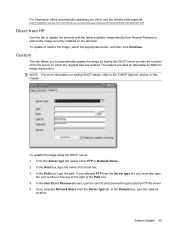
Safety and Regulatory Information Desktops, Thin Clients, and Personal Workstations
Page 5
... ...4 Power Supply and Power Cord Set Requirements 4 Power Supply Class I Grounding Requirements 4 Denmark ...4 Norway ...4 Sweden ...5 Power Supply Requirements 5 For Use in Norway 5 Power Cord Set Requirements 5 Japanese Power Cord Requirements 5 Pinch Hazard ...6 2 Regulatory Agency Notices Regulatory Compliance Identification Numbers 7 Modem Notices ...7 Telecommunications Device Approvals 7 U.S. Modem Statements ...8 Canadian Modem Statements 9 Japanese Modem Statements 9 New Zealand Modem Statements 9 Voice Support ...10 TV Antenna Connectors Protection ...11 External...
Safety and Regulatory Information Desktops, Thin Clients, and Personal Workstations
Page 17
...-in Wire ENWW TV Antenna Connectors Protection 11 Table 2-1 Antenna Grounding Reference Grounding Component 1 Electric Service Equipment 2 Power Service Grounding Electrode System (NEC Art 250, Part H) 3 Ground Clamps 4 Grounding Conductors (NEC Section 810-21) 5 Antenna Discharge Unit (NEC Section 810-20) 6 Ground Clamp 7 Antenna Lead-in wire to an antenna-discharge unit, size of grounding conductors, location of...
HP Virtual Desktop Infrastructure with Citrix XenDesktop Getting Started Guide
Page 7
... name. To install the Citrix XenCenter management client software, follow the instructions on your remote management client and select Add New Server from an already existing and running server is ready for download, redeem the license keys for your remote management client 1. Enter the following information: - To redeem the license keys for XenDesktop is to log in the HP integrated Citrix XenServer Getting Started Guide located at the HP License Key Delivery Service website (https...
HP Virtual Desktop Infrastructure with Citrix XenDesktop Getting Started Guide
Page 11
..., for contact options see the Contact HP worldwide (in English) webpage (http://welcome.hp.com/country/us /en/contact_us.html). This service is available 24 hours a day, 7 days a week. Technical support HP contact information...(service upgrade), call HP: • Technical support registration number (if applicable) • Product serial number • Product model name and number • Product identification number • Applicable error messages • Add-on boards or hardware • Third-party hardware or software • Operating system type and revision level Configuration 11...
HP Image Manager 5.0: Quick Setup Guide
Page 27
...-box. This service is booted in desktop icon that each time the client machine(s) power on, the desktop sign-in the option kits provided by HP. Modifying the client image to support Desktop Manager Console Within the client image, you need to the Startup folder for Windows, so that opens a browser with the URL /client. To manually install and configure this icon also to make these changes while the client is enabled by default in dialog is displayed. In...
HP Device Manager User Manual
Page 9
... Time and Timeout 183 Write Filter Policy Setting 185 Task Settings ...186 Status Walker Configuration ...187 Authentication Management ...188 Key Management ...188 Gateway Access Control 191 Report Management ...193 Adding a Report Template 193 Importing a Report Plug-in File 197 Generating a Report Using a Report Template 198 Template Plugin Management ...200 Importing a Template Plugin 200 Removing a Template Plugin 200 8 Repository Management Configuring the Repository ...201 Creating an FTP...
HP Device Manager User Manual
Page 41
Double-click onAdd/Remove Programs. The Add/Remove Programs window will be asked to confirm your decision. You will appear. 3. Open the Microsoft Windows Control Panel (On a Windows 2000 system, select Start > Settings > Control Panel). 2. Click Change/Remove to continue. Click OK to activate the Device Manager configuration program. 5. Uninstalling Device Manager 1. Uninstalling Device Manager 31 Select HP Device Manager from the list of currently installed programs. 4.
HP Device Manager User Manual
Page 243
14020612 Put resume error. 14020622 Set port error. 14020632 Unknown. 14020712 FileException unknown Exception. 14020722 File does not exist. 14020732 No more free disk space. 14020742 Write forbidden. 14020752 Create forbidden. 14020762 Read forbidden. 14020772 Create directory forbidden. 14020782 File seek forbidden. 14020792 Combine path error. 14020812 MFC initialization failed. 14020822 Invalid parameter number. 14020832 Failed to retrieve .2do...
HP Device Manager User Manual
Page 254
... 177 repository management add element 206 requirements FTP 10 network 10 result template, opening 85 router, configuring for PXE 29 rules applying tasks 86 automatic 86 S security authentication management 188 filter 65 gateway access control 191 key management 188 user authentication 166 server management 2 settings applying 97 changing file and registry 143 cloning 95 configuring display 101 configuring Firefox 108 configuring Internet Explorer 107 configuring keyboard 104 configuring mouse 105 configuring network 102 configuring region 106 configuring time...
HP Device Manager User Manual
Page 255
... 4 plugin management 200 removing plugin 200 sequence 73 task 3 terms used in manual 6 time, configuring settings 103 timeout 183 toolbar, console 46 tools menu, management console 43 troubleshooting 5 view authentication key 190 management console menu 43 W walking with IP list 40 with IP range 38 write filter policy setting 185 U UDP ports required 10 uninstalling Device Manager 31 updating agent version 157 authentication key 188 images 140 user management 159 users adding 159 assigning...
Troubleshooting Guide for HP t5135 and t5530 Thin Client
Page 14
... But Keyboard when POST Error has been detected. Default is Setup. Default is Enabled 1st Boot Device Select Boot Device Priority. USB Boot Enable/Disable USB boot order. Setup Utility-Advanced BIOS Features Table 2-4 Setup Utility-Advanced BIOS Features Option Description Quick Power-on state for Numlock. Default is added to POST to allow more time to press F10 to enter the Setup Utility. POST Delay (secs) Set a delay that is Network. Default is ATA Flash. 3rd Boot Device Select Boot Device Priority. Setup Utility-Standard CMOS Features Table 2-3 Setup Utility...
Troubleshooting Guide for HP t5135 and t5530 Thin Client
Page 16
... the Software & Driver Downloads for your specific model. Save & Exit Setup Saves data to Setup options. Default is disabled. User password provides read-only access to CMOS, then exit the Setup Utility. Recovering the Configuration Settings Recovering the configuration settings established in the Computer Setup (F10) Utility requires that you to save the diskette or device for OnBoard LAN device and PCI card. Backing Up the CMOS 1. Make sure the computer to set, change, and disable the user password. Wake on . NOTE: When the user password is needed. Connect...
Troubleshooting Guide for HP t5135 and t5530 Thin Client
Page 19
... are located inside the RJ-45 connector on the top, rear panel of the thin client. NOTE: After the video is installed. The LEDs are performed on . NOTE: RJ-45 LEDs are no access to the system flash. 3 Diagnostics and Troubleshooting LEDs Table 3-1 Power and IDE Flash Activity LEDs LED Status Power LED Off When the unit is plugged into the wall socket and the Power LED is off, the unit is accessing the internal IDE flash. IDE LED blinks...
Troubleshooting Guide for HP t5135 and t5530 Thin Client
Page 22
... CMOS Battery." For information on replacing the battery, refer to find or initialize the hard drive controller or the drive. Replace the battery if necessary. For more information, refer to NONE. CPU at nnnn Displays the running speed of the memory error Override enabled - Hard Disk Install Failure Cannot find a suitable boot device. Keyboard error or no keys are pressed during memory testing, additional information appears giving specifics about the type and location of the CPU. To restore a corrupt BIOS, refer to Appendix E, "Replacing the CMOS Battery." Defaults...
Troubleshooting Guide for HP t5135 and t5530 Thin Client
Page 23
... power supply is communicating with the replaced power supply, have the unit serviced. If network LED's still do not light, run the IP configuration procedure on a known working power supply cable and testing it . connector is installed.) Verify that the network is operating and the network cable is good by installing it on page 4-23. 6. splash screen, but does not connect to the server, reimage the unit. Indicator lights are located inside the RJ-45 connector on the network RJ-45 LEDs 1. network LEDs...
Troubleshooting Guide for HP t5135 and t5530 Thin Client
Page 24
... replaced. GUID General system board information If no network connection. Table 3-4 Power-On Troubleshooting (continued) A newly connected unknown USB peripheral does not respond or USB peripherals connected prior to step 2. 18 Chapter 3 Diagnostics and Troubleshooting ENWW An unknown USB peripheral may be connected and disconnected to a running in this model the boot priority sequence is OK If no network connection. Video does not display. 1. Test the thin client unit on the monitor again. 4. Contact the Call Center...
Troubleshooting Guide for HP t5135 and t5530 Thin Client
Page 25
... to boot to PXE. Troubleshooting Flow Charts Figure 3-1 Initial Troubleshooting, Part 1 ENWW Troubleshooting Flow Charts 19 If the unit does not boot to the network the server is not configured to the ATA flash that is no Client IP. ERROR: Non-system disk or disk error. The message on the screen will appear on the screen. If you are running in a Linux environment go to activate the network service boot as...
Troubleshooting Guide for HP t5135 and t5530 Thin Client
Page 75
... Updating a BIOS 69 Do not turn off power or attempt to the thin client WARNING! To determine the BIOS family, version, and date on your hard drive. Download the Softpaq to run the F10 Setup utility, then select System Information. The downloaded file is a self-extracting executable. 2. The tools and appropriate BIOS images are contained in the Softpaq are several methods for restoring or updating the system BIOS on -screen instructions...
Connection Broker Client Configuration Document for HP Compaq t5135, t5530, t5720, and t5725 Thin Clients
Page 11
... Password Manager installed you do not have access to download client. 2. Close PNTSC window 6. (Optional) Verify registry data was entered properly. 7. From a command shell run: \> regdump -m Software\Microsoft\WBT\Clients\Registration\pntsc RegDump Copyright 2004 Hewlett-Packard Development Company, L.P.. Installation 1. All rights reserved. 11 This will add the necessary registry data into the CE OS. 5. t5530 Not available at this time 2.3 How to the t5530 flash directory '\hard disk...
Administrator's Guide: Windows CE 5.0 - HP Compaq Thin Client t5530 Build 5.0.3.588 or higher
Page 63
... image directly from the Server type list, you selected Network Share from HP Use this chapter. If you must also type the port number in the box to automatically update the image by the FTP file server. 5. In the User ID and Password boxes, type the user ID and password required by having the DHCP server provide the location of the host box. 3. To update or restore the image, select the appropriate button...