
Worldwide Limited Warranty and Technical Support 2 year
Page 2
... OR REMOVABLE STORAGE MEDIA. YOU SHOULD MAKE REGULAR BACKUP COPIES OF THE DATA STORED ON YOUR HARD DRIVE OR OTHER STORAGE DEVICES AS A PRECAUTION AGAINST POSSIBLE FAILURES, ALTERATION, OR LOSS OF THE DATA. Compaq does not warrant that has been damaged or rendered defective (a) as a result of accident, misuse... removed part or product or the thirty (30) day Limited Warranty of your failure to your own installation of end-user replaceable Compaq or Compaq approved parts if available for defective products. BEFORE RETURNING ANY UNIT FOR SERVICE, BE SURE TO BACK UP DATA AND REMOVE ANY...
... OR REMOVABLE STORAGE MEDIA. YOU SHOULD MAKE REGULAR BACKUP COPIES OF THE DATA STORED ON YOUR HARD DRIVE OR OTHER STORAGE DEVICES AS A PRECAUTION AGAINST POSSIBLE FAILURES, ALTERATION, OR LOSS OF THE DATA. Compaq does not warrant that has been damaged or rendered defective (a) as a result of accident, misuse... removed part or product or the thirty (30) day Limited Warranty of your failure to your own installation of end-user replaceable Compaq or Compaq approved parts if available for defective products. BEFORE RETURNING ANY UNIT FOR SERVICE, BE SURE TO BACK UP DATA AND REMOVE ANY...
Hard Drive White Paper
Page 4
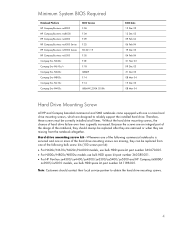
... and HP Compaq nx9000/ nx9005/nx9010 models, use bulk HDD spare kit part number 361188-001. Without the hard drive mounting screws, the chance of hard drive failure over time is serviced and one or more hard drive mounting screws, which are designed to obtain the hard drive mounting screws.... Hard Drive Mounting Screw All HP and Compaq branded commercial and SMB notebooks come equipped with one or more of the hard drive mounting screws are missing, they can be replaced from one of the notebook, they are missing from the notebook altogether. Therefore, these screws must be replaced ...
... and HP Compaq nx9000/ nx9005/nx9010 models, use bulk HDD spare kit part number 361188-001. Without the hard drive mounting screws, the chance of hard drive failure over time is serviced and one or more hard drive mounting screws, which are designed to obtain the hard drive mounting screws.... Hard Drive Mounting Screw All HP and Compaq branded commercial and SMB notebooks come equipped with one or more of the hard drive mounting screws are missing, they can be replaced from one of the notebook, they are missing from the notebook altogether. Therefore, these screws must be replaced ...

Maintenance and Service Guide
Page 3
......vii Product Information...1-1 Features ...1-8 Operation...1-14 Specifications ...1-18 Internal Design...1-24 Removal and Replacement 2-1 Disassembly Flowchart ...2-3 Removing the Battery ...2-4 Removing an SDRAM Module...2-5 Removing the Wireless LAN Mini PCI Card 2-7 Removing the Hard Disk Drive...2-9 Recovering the Factory Software...2-11 Replacing Small Parts ...2-12 Removing the Keyboard Cover...2-13 Removing the Speaker Assembly ...2-15...
......vii Product Information...1-1 Features ...1-8 Operation...1-14 Specifications ...1-18 Internal Design...1-24 Removal and Replacement 2-1 Disassembly Flowchart ...2-3 Removing the Battery ...2-4 Removing an SDRAM Module...2-5 Removing the Wireless LAN Mini PCI Card 2-7 Removing the Hard Disk Drive...2-9 Recovering the Factory Software...2-11 Replacing Small Parts ...2-12 Removing the Keyboard Cover...2-13 Removing the Speaker Assembly ...2-15...

Maintenance and Service Guide
Page 4
...Module Release 2-47 Figure 2-30. Back View ...1-9 Figure 1-3. Bottom View...1-13 Figure 1-7. Resetting the Notebook ...1-17 Figure 1-8. Removing the Battery ...2-4 Figure 2-3. Removing the Hard Disk Drive Tray 2-10 Figure 2-9. Removing the Top Case Screws 2-29 Figure 2-20. Removing the Top Case...Installation 2-39 Figure 2-32 Removing the CPU Module 2-39 Figure 2-33. Removing the Hard Disk Drive Guide 2-53 iv Service Manual Replaceable Module Diagram 1-24 Figure 2-1. Removing the CD/DVD Drive 2-21 Figure 2-16. Removing the Top Case...2-27 Figure 2-19. Front View...1-8 ...
...Module Release 2-47 Figure 2-30. Back View ...1-9 Figure 1-3. Bottom View...1-13 Figure 1-7. Resetting the Notebook ...1-17 Figure 1-8. Removing the Battery ...2-4 Figure 2-3. Removing the Hard Disk Drive Tray 2-10 Figure 2-9. Removing the Top Case Screws 2-29 Figure 2-20. Removing the Top Case...Installation 2-39 Figure 2-32 Removing the CPU Module 2-39 Figure 2-33. Removing the Hard Disk Drive Guide 2-53 iv Service Manual Replaceable Module Diagram 1-24 Figure 2-1. Removing the CD/DVD Drive 2-21 Figure 2-16. Removing the Top Case...2-27 Figure 2-19. Front View...1-8 ...
Maintenance and Service Guide
Page 31
... Cover, keyboard (page 2-16) • Door, Mini PCI (page 2-7) • Door, SDRAM (page 2-5) Doors, PCMCIA (page 2-60) Drive, CD/DVD (page 2-20) Drive, floppy (page 2-32) • Drive, hard disk (page 2-9) • Feet, rubber (page 2-12) Heat sink (with fan) (page 2-40) • Keyboard (page 2-16) &#... notes are the reverse of the removal steps. You can use these are user-replaceable. Service Manual Removal and Replacement 2-1 Installing a wrong-size screw can damage the notebook and its components. The items marked by • in the following table are displayed...
... Cover, keyboard (page 2-16) • Door, Mini PCI (page 2-7) • Door, SDRAM (page 2-5) Doors, PCMCIA (page 2-60) Drive, CD/DVD (page 2-20) Drive, floppy (page 2-32) • Drive, hard disk (page 2-9) • Feet, rubber (page 2-12) Heat sink (with fan) (page 2-40) • Keyboard (page 2-16) &#... notes are the reverse of the removal steps. You can use these are user-replaceable. Service Manual Removal and Replacement 2-1 Installing a wrong-size screw can damage the notebook and its components. The items marked by • in the following table are displayed...

Maintenance and Service Guide
Page 100
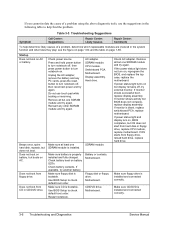
... start from floppy drive, reload hard drive, replace hard drive. 3-8 Troubleshooting and Diagnostics Service Manual If OS starts from hard disk or floppy drive, replace CPU module, replace motherboard. Startup Does not boot on . Do not use the suggestions in the system function and what roles they play. Reinsert any PC cards, press the reset button to turn notebook off, and reconnect...
... start from floppy drive, reload hard drive, replace hard drive. 3-8 Troubleshooting and Diagnostics Service Manual If OS starts from hard disk or floppy drive, replace CPU module, replace motherboard. Startup Does not boot on . Do not use the suggestions in the system function and what roles they play. Reinsert any PC cards, press the reset button to turn notebook off, and reconnect...

Maintenance and Service Guide
Page 101
...hard drive, use Recovery CDs to reinstall factory software onto hard drive, replace hard drive. Check for corrupt files on battery LEDs. Make sure CD/DVD is bootable. User must call Technical Support and provide proof of ownership. Symptom Does not boot on battery, but boots on AC Does not boot from floppy drive... Battery or contacts Motherboard Floppy disk or floppy drive Motherboard. If notebook boots from CD in floppy drive. Restart notebook. CD/DVD drive Motherboard Hard drive Hard drive contacts Hard drive Password forgotten Verify proper ownership, and then follow...
...hard drive, use Recovery CDs to reinstall factory software onto hard drive, replace hard drive. Check for corrupt files on battery LEDs. Make sure CD/DVD is bootable. User must call Technical Support and provide proof of ownership. Symptom Does not boot on battery, but boots on AC Does not boot from floppy drive... Battery or contacts Motherboard Floppy disk or floppy drive Motherboard. If notebook boots from CD in floppy drive. Restart notebook. CD/DVD drive Motherboard Hard drive Hard drive contacts Hard drive Password forgotten Verify proper ownership, and then follow...
Maintenance and Service Guide
Page 105
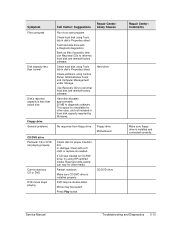
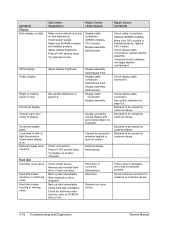
... Repair Center: Likely Causes Hard drive No response from floppy drive. Read and write quality can vary for proper insertion, dirt, or damage. Check partitions using Tools tab in disk's Properties sheet. Test hard disk drive with soft cloth or replace as needed. DVD may ... than normal Disk's reported capacity is unavailable for other media. Restart notebook. Back up files if possible, then use Recovery CDs to reformat hard disk and reinstall factory software. Check hard disk using Control Panel, Administrative Tools, and Computer Management under Storage....
... Repair Center: Likely Causes Hard drive No response from floppy drive. Read and write quality can vary for proper insertion, dirt, or damage. Check partitions using Tools tab in disk's Properties sheet. Test hard disk drive with soft cloth or replace as needed. DVD may ... than normal Disk's reported capacity is unavailable for other media. Restart notebook. Back up files if possible, then use Recovery CDs to reformat hard disk and reinstall factory software. Check hard disk using Control Panel, Administrative Tools, and Computer Management under Storage....

Maintenance and Service Guide
Page 111
... CMOS battery. If notebook's hard drive frequently runs (as virus scanning or file browsers) can affect performance. If notebook slows after period of notebook) while notebook appears to see previous symptom. Restart notebook. Delete temporary and unneeded files. Reset notebook (see previous symptom.... Motherboard Check notebook's power supply. Service Manual Troubleshooting and Diagnostics 3-19 Check settings in AC adapter for 24 hours to modify hard disk power settings. Port replicator Motherboard Repair Center: Comments Charge CMOS battery. Replace thermal pad ...
... CMOS battery. If notebook's hard drive frequently runs (as virus scanning or file browsers) can affect performance. If notebook slows after period of notebook) while notebook appears to see previous symptom. Restart notebook. Delete temporary and unneeded files. Reset notebook (see previous symptom.... Motherboard Check notebook's power supply. Service Manual Troubleshooting and Diagnostics 3-19 Check settings in AC adapter for 24 hours to modify hard disk power settings. Port replicator Motherboard Repair Center: Comments Charge CMOS battery. Replace thermal pad ...
Service Manual
Page 141
... and try again. Reinsert any PC cards, press the reset button to turn notebook off , try another battery. SDRAM module. Make sure at least one SDRAM module and try again. Check battery level on page 1-65. Motherboard. Remove all but OS does not start from floppy drive, reload hard drive, replace hard drive. If power status light turns...
... and try again. Reinsert any PC cards, press the reset button to turn notebook off , try another battery. SDRAM module. Make sure at least one SDRAM module and try again. Check battery level on page 1-65. Motherboard. Remove all but OS does not start from floppy drive, reload hard drive, replace hard drive. If power status light turns...

Service Manual
Page 142
...Use Tools tab in disk's Properties sheet to reinstall factory software onto hard drive, replace hard drive. Check for corrupt files on hard drive, use Recovery CDs to check hard disk. Remove and reinstall hard drive. Verify proper ownership, then follow removal procedure with owner and record ... if available. Motherboard. Error message such as "Invalid system disk" or "Auto IDE error". Hard drive. Repair Center: Comments If notebook boots from floppy drive, check for disk in BIOS Setup. Service Manual Troubleshooting and Diagnostics 3-7 Delete temporary and unneeded ...
...Use Tools tab in disk's Properties sheet to reinstall factory software onto hard drive, replace hard drive. Check for corrupt files on hard drive, use Recovery CDs to check hard disk. Remove and reinstall hard drive. Verify proper ownership, then follow removal procedure with owner and record ... if available. Motherboard. Error message such as "Invalid system disk" or "Auto IDE error". Hard drive. Repair Center: Comments If notebook boots from floppy drive, check for disk in BIOS Setup. Service Manual Troubleshooting and Diagnostics 3-7 Delete temporary and unneeded ...
Service Manual
Page 145
.... Depends on page 5-2. Declared to be caused by customer abuse. Motherboard. Remove and reinstall hard drive. Display assembly. Vertical crack near center of dark or light discoloration visible when display is installed properly, replace CPU module. Was notebook or drive dropped? Declared to be caused by customer abuse. Call Center: Suggestions Repair Center: Likely Causes...
.... Depends on page 5-2. Declared to be caused by customer abuse. Motherboard. Remove and reinstall hard drive. Display assembly. Vertical crack near center of dark or light discoloration visible when display is installed properly, replace CPU module. Was notebook or drive dropped? Declared to be caused by customer abuse. Call Center: Suggestions Repair Center: Likely Causes...

Service Manual
Page 146
... or DVD not playing properly. Back up files if possible, then use Recovery CDs to reformat hard disk and reinstall factory software. Floppy drive. Restart notebook. Disk's reported capacity is installed properly. Test hard disk drive with soft cloth or replace as needed. Read and write quality can vary for proper insertion, dirt, or damage. DVD...
... or DVD not playing properly. Back up files if possible, then use Recovery CDs to reformat hard disk and reinstall factory software. Floppy drive. Restart notebook. Disk's reported capacity is installed properly. Test hard disk drive with soft cloth or replace as needed. Read and write quality can vary for proper insertion, dirt, or damage. DVD...
Reference Guide
Page 9
Replacing the Hard Drive 62 To replace the hard drive 62 To replace the hard drive holder 63 To prepare a new hard drive 64 Troubleshooting and Maintenance 65 Troubleshooting Your Notebook 66 Audio problems 66 CD-ROM and DVD problems 67 Display problems 68 Hard drive problems 69 Heat problems 70 Infrared problems 70 ...Memory problems 73 Modem problems 73 PC Card problems 76 Performance problems 76 Power and battery problems 77 Printing problems 79 Serial, parallel, and USB problems 80 Startup problems 81 Wireless problems 82 Configuring Your Notebook 84 To run the BIOS ...
Replacing the Hard Drive 62 To replace the hard drive 62 To replace the hard drive holder 63 To prepare a new hard drive 64 Troubleshooting and Maintenance 65 Troubleshooting Your Notebook 66 Audio problems 66 CD-ROM and DVD problems 67 Display problems 68 Hard drive problems 69 Heat problems 70 Infrared problems 70 ...Memory problems 73 Modem problems 73 PC Card problems 76 Performance problems 76 Power and battery problems 77 Printing problems 79 Serial, parallel, and USB problems 80 Startup problems 81 Wireless problems 82 Configuring Your Notebook 84 To run the BIOS ...

Reference Guide
Page 71
..., then remove the two screws. 5. Use a pointed tool to make sure the connector seats properly. 7. Reinstall the hard drive screws and plugs. Gently pull the hard drive out of the notebook. Add-On Devices Replacing the Hard Drive Replacing the Hard Drive To replace the hard drive You will need a small Phillips screwdriver for this procedure. 1. Unplug the AC adapter, if connected. 2. Important 6. If...
..., then remove the two screws. 5. Use a pointed tool to make sure the connector seats properly. 7. Reinstall the hard drive screws and plugs. Gently pull the hard drive out of the notebook. Add-On Devices Replacing the Hard Drive Replacing the Hard Drive To replace the hard drive You will need a small Phillips screwdriver for this procedure. 1. Unplug the AC adapter, if connected. 2. Important 6. If...

Reference Guide
Page 72
.... Work alternately at one end. Reinstall the screws into the holder. 5. Carefully remove this procedure. 1. Add-On Devices Replacing the Hard Drive To replace the hard drive holder If you can remove the holder parts from the old hard drive. Work alternately at each end so that the connector slides off evenly without bending the connector pins. 4. Notice...
.... Work alternately at one end. Reinstall the screws into the holder. 5. Carefully remove this procedure. 1. Add-On Devices Replacing the Hard Drive To replace the hard drive holder If you can remove the holder parts from the old hard drive. Work alternately at each end so that the connector slides off evenly without bending the connector pins. 4. Notice...

Reference Guide
Page 73
If you also need to prepare it to be able to restore the Windows software and operating system that were originally installed on your notebook, use the QuickRestore System Recovery CD included with your notebook. 64 Reference Guide Add-On Devices Replacing the Hard Drive To prepare a new hard drive When you install a new hard drive, you want to work with your notebook.
If you also need to prepare it to be able to restore the Windows software and operating system that were originally installed on your notebook, use the QuickRestore System Recovery CD included with your notebook. 64 Reference Guide Add-On Devices Replacing the Hard Drive To prepare a new hard drive When you install a new hard drive, you want to work with your notebook.

Reference Guide
Page 87
...notebook is performing a task requiring a good deal of power (such as MS Word), disable this feature or increase the specified save time to reduce hard drive access. • If the operating time has gradually become shorter and the battery is more than you really have, since you may need to replace... the battery. • Heavy modem use can affect battery operating time. • PC Card use can affect battery...
...notebook is performing a task requiring a good deal of power (such as MS Word), disable this feature or increase the specified save time to reduce hard drive access. • If the operating time has gradually become shorter and the battery is more than you really have, since you may need to replace... the battery. • Heavy modem use can affect battery operating time. • PC Card use can affect battery...

Reference Guide
Page 97
To replace a damaged QuickRestore System Recovery CD If you to contact a Customer Care Center for help and support. 88 Reference Guide Troubleshooting and Maintenance Reinstalling and Updating Software Reinstalling and Updating Software Your notebook includes two features that allow you to ...install individual software applications or to restore the entire original contents of your hard drive: • QuickRestore System Recovery CD, included with your notebook, allows you to restore your hard drive to its original factory contents. • Application Recovery utility allows you lose ...
To replace a damaged QuickRestore System Recovery CD If you to contact a Customer Care Center for help and support. 88 Reference Guide Troubleshooting and Maintenance Reinstalling and Updating Software Reinstalling and Updating Software Your notebook includes two features that allow you to ...install individual software applications or to restore the entire original contents of your hard drive: • QuickRestore System Recovery CD, included with your notebook, allows you to restore your hard drive to its original factory contents. • Application Recovery utility allows you lose ...
Reference Guide
Page 119
... 9 Cardbus cards, 48 cards, PCMCIA, 48 CD-ROM drive creating or copying CDs, 23 inserting CD, 20, 22 location, 2, 3 removing CD, 20, 22 CDs copying/creating, 23 recommended media, 23 cleaning the notebook, 28 configuring BIOS settings, 84 modem, 38 connecting IEEE ... 34 dual display, 53 dual monitor, 53 extending life, 28 memory, 85 port, 5 secondary, 53 troubleshooting, 68 docking port, 6, 7 drives hard drive holder, 63 replacing hard drive, 62 DVD drive location, 2, 3 setting region code, 23 troubleshooting, 67 E encryption, 40 ergonomics, 10 Exit menu (BIOS), 87 extended memory, 85 external ...
... 9 Cardbus cards, 48 cards, PCMCIA, 48 CD-ROM drive creating or copying CDs, 23 inserting CD, 20, 22 location, 2, 3 removing CD, 20, 22 CDs copying/creating, 23 recommended media, 23 cleaning the notebook, 28 configuring BIOS settings, 84 modem, 38 connecting IEEE ... 34 dual display, 53 dual monitor, 53 extending life, 28 memory, 85 port, 5 secondary, 53 troubleshooting, 68 docking port, 6, 7 drives hard drive holder, 63 replacing hard drive, 62 DVD drive location, 2, 3 setting region code, 23 troubleshooting, 67 E encryption, 40 ergonomics, 10 Exit menu (BIOS), 87 extended memory, 85 external ...


