
End User License Agreement
Page 2
... formed the basis for which the recovery solution was originally purchased. This EULA is automatically terminated. ADDITIONAL SOFTWARE. You may not reverse engineer, decompile, or disassemble the Software Product, except and only to comply with /for your license is effective unless terminated or rejected. Any transfer must agree to the original...
... formed the basis for which the recovery solution was originally purchased. This EULA is automatically terminated. ADDITIONAL SOFTWARE. You may not reverse engineer, decompile, or disassemble the Software Product, except and only to comply with /for your license is effective unless terminated or rejected. Any transfer must agree to the original...

Maintenance and Service Guide
Page 3
Contents Introduction...vii Product Information...1-1 Features ...1-8 Operation...1-14 Specifications ...1-18 Internal Design...1-24 Removal and Replacement 2-1 Disassembly Flowchart ...2-3 Removing the Battery ...2-4 Removing an SDRAM Module...2-5 Removing the Wireless LAN Mini PCI Card 2-7 Removing the Hard Disk Drive...2-9 Recovering the Factory Software...2-11 ...
Contents Introduction...vii Product Information...1-1 Features ...1-8 Operation...1-14 Specifications ...1-18 Internal Design...1-24 Removal and Replacement 2-1 Disassembly Flowchart ...2-3 Removing the Battery ...2-4 Removing an SDRAM Module...2-5 Removing the Wireless LAN Mini PCI Card 2-7 Removing the Hard Disk Drive...2-9 Recovering the Factory Software...2-11 ...

Maintenance and Service Guide
Page 4
...2-7. Removing the Display Assembly 2-24 Figure 2-18. Removing the I/R PCA...2-37 Figure 2-25. Replaceable Module Diagram 1-24 Figure 2-1. Disassembly Flow...2-3 Figure 2-2. Removing an SDRAM Module 2-6 Figure 2-5. Removing an SDRAM Module 2-5 Figure 2-4. Removing the RJ11/1394 Connector Module ...Removing the Floppy Drive 2-33 Figure 2-23. Figures Figure 1-1. Front View...1-8 Figure 1-2. Bottom View...1-13 Figure 1-7. Resetting the Notebook ...1-17 Figure 1-8. Removing the Battery ...2-4 Figure 2-3. Removing the Switchboard PCA 2-18 Figure 2-14. Removing the CD/DVD ...
...2-7. Removing the Display Assembly 2-24 Figure 2-18. Removing the I/R PCA...2-37 Figure 2-25. Replaceable Module Diagram 1-24 Figure 2-1. Disassembly Flow...2-3 Figure 2-2. Removing an SDRAM Module 2-6 Figure 2-5. Removing an SDRAM Module 2-5 Figure 2-4. Removing the RJ11/1394 Connector Module ...Removing the Floppy Drive 2-33 Figure 2-23. Figures Figure 1-1. Front View...1-8 Figure 1-2. Bottom View...1-13 Figure 1-7. Resetting the Notebook ...1-17 Figure 1-8. Removing the Battery ...2-4 Figure 2-3. Removing the Switchboard PCA 2-18 Figure 2-14. Removing the CD/DVD ...
Maintenance and Service Guide
Page 33
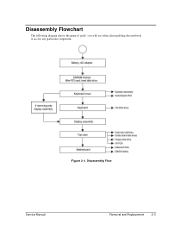
Disassembly Flow Service Manual Removal and Replacement 2-3 Disassembly Flowchart The following diagram shows the general "path" you will use when disassembling the notebook to access any particular component. Figure 2-1.
Disassembly Flow Service Manual Removal and Replacement 2-3 Disassembly Flowchart The following diagram shows the general "path" you will use when disassembling the notebook to access any particular component. Figure 2-1.

Service Manual
Page 3
Contents Product Information...1-1 Features ...1-48 Operation ...1-54 Specifications ...1-58 Internal Design ...1-64 Removal and Replacement 2-1 Disassembly Flowchart ...2-3 Removing the Battery...2-4 Removing a SDRAM Module...2-5 Removing the Wireless LAN Mini-PCI Card 2-7 Removing the Hard Disk Drive...2-9 Replacing Small Parts ...2-11 Removing the ...
Contents Product Information...1-1 Features ...1-48 Operation ...1-54 Specifications ...1-58 Internal Design ...1-64 Removal and Replacement 2-1 Disassembly Flowchart ...2-3 Removing the Battery...2-4 Removing a SDRAM Module...2-5 Removing the Wireless LAN Mini-PCI Card 2-7 Removing the Hard Disk Drive...2-9 Replacing Small Parts ...2-11 Removing the ...

Service Manual
Page 4
Bottom View ...1-50 Figure 1-4. Disassembly Flow ...2-3 Figure 2-2. Removing the Mini-PCI Card 2-7 Figure 2-6. Removing the Hard Disk Drive Tray 2-10 Figure 2-9. Removing the Display Assembly 2-24 Figure 2-18. ...38. Front View ...1-51 Figure 1-5. Removing the Speaker Assembly 2-15 Figure 2-12. Removing the I/R PCA 2-37 Figure 2-25. Front View ...1-48 Figure 1-2. Resetting the Notebook 1-57 Figure 1-8. Back View...1-49 Figure 1-3. Removing the Mini-PCI Card 2-8 Figure 2-7. Disconnecting the Speaker Cable 2-14 Figure 2-11. Removing the RJ11/1394 Connector Module...
Bottom View ...1-50 Figure 1-4. Disassembly Flow ...2-3 Figure 2-2. Removing the Mini-PCI Card 2-7 Figure 2-6. Removing the Hard Disk Drive Tray 2-10 Figure 2-9. Removing the Display Assembly 2-24 Figure 2-18. ...38. Front View ...1-51 Figure 1-5. Removing the Speaker Assembly 2-15 Figure 2-12. Removing the I/R PCA 2-37 Figure 2-25. Front View ...1-48 Figure 1-2. Resetting the Notebook 1-57 Figure 1-8. Back View...1-49 Figure 1-3. Removing the Mini-PCI Card 2-8 Figure 2-7. Disconnecting the Speaker Cable 2-14 Figure 2-11. Removing the RJ11/1394 Connector Module...

Service Manual
Page 74
Disassembly Flowchart The following diagram shows the general "path" you will use when disassembling the notebook to access any particular component. Disassembly Flow Service Manual Removal and Replacement 2-3 Figure 2-1.
Disassembly Flowchart The following diagram shows the general "path" you will use when disassembling the notebook to access any particular component. Disassembly Flow Service Manual Removal and Replacement 2-3 Figure 2-1.

Reference Guide
Page 2
... without prior written permission of Hewlett-Packard Company, except as allowed under the copyright laws. See the individual programs for a particular purpose. Reverse engineering or disassembly is also prohibited. registered trademarks of Adobe Systems Incorporated. Reproduction, adaptation, or translation of those programs without prior written permission of Hewlett-Packard Co. All...
... without prior written permission of Hewlett-Packard Company, except as allowed under the copyright laws. See the individual programs for a particular purpose. Reverse engineering or disassembly is also prohibited. registered trademarks of Adobe Systems Incorporated. Reproduction, adaptation, or translation of those programs without prior written permission of Hewlett-Packard Co. All...

Reference Guide
Page 107
... equivalent type battery pack recommended by reading and following precautions are certified as a Class 1 laser devices according to touch the battery contacts. • Do not disassemble the battery. Laser safety The CD-ROM and DVD drives used with the computer are recommended: • Ensure proper use by the manufacturer. • This...
... equivalent type battery pack recommended by reading and following precautions are certified as a Class 1 laser devices according to touch the battery contacts. • Do not disassemble the battery. Laser safety The CD-ROM and DVD drives used with the computer are recommended: • Ensure proper use by the manufacturer. • This...


