
Hard Drive White Paper
Page 3
HP recommends use an external keyboard and monitor, activating Standby upon lid closure in addition to the Evo N400 and Evo N600 series. Since the purpose of docking is to allow the user to connect to AC power, close the notebook display, and use of this scenario is operating... option. If no errors occur, the long test automatically runs. 2. Refer to the following : 1. The HP Notebook LidSwitch Policy is closed. The notebook must first be undocked or removed from AC power before the display lid is available from a docking device or external power supply running on an AC...
HP recommends use an external keyboard and monitor, activating Standby upon lid closure in addition to the Evo N400 and Evo N600 series. Since the purpose of docking is to allow the user to connect to AC power, close the notebook display, and use of this scenario is operating... option. If no errors occur, the long test automatically runs. 2. Refer to the following : 1. The HP Notebook LidSwitch Policy is closed. The notebook must first be undocked or removed from AC power before the display lid is available from a docking device or external power supply running on an AC...

Maintenance and Service Guide
Page 3
... Software...2-11 Replacing Small Parts ...2-12 Removing the Keyboard Cover...2-13 Removing the Speaker Assembly ...2-15 Removing the Keyboard ...2-16 Removing the Switchboard PCA ...2-19 Removing the CD/DVD Drive...2-20 Removing the Display Assembly...2-23 Removing the Top Case ...2-26 Removing the Floppy Drive...2-32 Removing the Infrared (I/R) PCA...2-36 Removing the Audio PCA ...2-38 Removing the Heat Sink (with Fan 2-40...
... Software...2-11 Replacing Small Parts ...2-12 Removing the Keyboard Cover...2-13 Removing the Speaker Assembly ...2-15 Removing the Keyboard ...2-16 Removing the Switchboard PCA ...2-19 Removing the CD/DVD Drive...2-20 Removing the Display Assembly...2-23 Removing the Top Case ...2-26 Removing the Floppy Drive...2-32 Removing the Infrared (I/R) PCA...2-36 Removing the Audio PCA ...2-38 Removing the Heat Sink (with Fan 2-40...

Maintenance and Service Guide
Page 4
... Figure 2-1. Removing an SDRAM Module 2-6 Figure 2-5. Removing the Mini PCI Card 2-8 Figure 2-7. Removing the Keyboard Cover 2-14 Figure 2-10. Removing the Heat Sink (with Fan 2-43 Figure 2-28. Removing the Heat Sink (with Fan 2-41 Figure 2-27. AMD CPU Module Removal 2-38 Figure 2-31. Front View...1-11 Figure 1-5. Back View ...1-12 Figure 1-6. Resetting the Notebook ...1-17 Figure 1-8. Removing the...
... Figure 2-1. Removing an SDRAM Module 2-6 Figure 2-5. Removing the Mini PCI Card 2-8 Figure 2-7. Removing the Keyboard Cover 2-14 Figure 2-10. Removing the Heat Sink (with Fan 2-43 Figure 2-28. Removing the Heat Sink (with Fan 2-41 Figure 2-27. AMD CPU Module Removal 2-38 Figure 2-31. Front View...1-11 Figure 1-5. Back View ...1-12 Figure 1-6. Resetting the Notebook ...1-17 Figure 1-8. Removing the...
Maintenance and Service Guide
Page 5
Removing the Motherboard 2-56 Figure 2-38. Exploded View ...4-2 Figure 4-2. Functional Structure Description 1-25 Table 2-1. Scope of notebook 1-15 Table 1-4. Sycard PCCtest Commands ...3-26 Table 3-7. Replaceable Parts ...4-4 Table 4-2. Recommended Screw Torque Values 2-2 Table 2-4. POST Messages ...3-24 Table 3-6. Main Status Lights (front of Diagnostic Tools...3-7 Table 3-3. Keyboard Status Lights...1-15 Table 1-5. Accessories ...1-22 Table 1-8. Part Number...
Removing the Motherboard 2-56 Figure 2-38. Exploded View ...4-2 Figure 4-2. Functional Structure Description 1-25 Table 2-1. Scope of notebook 1-15 Table 1-4. Sycard PCCtest Commands ...3-26 Table 3-7. Replaceable Parts ...4-4 Table 4-2. Recommended Screw Torque Values 2-2 Table 2-4. POST Messages ...3-24 Table 3-6. Main Status Lights (front of Diagnostic Tools...3-7 Table 3-3. Keyboard Status Lights...1-15 Table 1-5. Accessories ...1-22 Table 1-8. Part Number...
Maintenance and Service Guide
Page 26
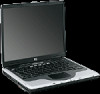
Mass Storage RAM Audio System Keyboard and Pointing Device LAN (certain models) Wireless LAN (certain models) 20- to 60-GB removable hard drive with Ultra-DMA 100 interface 1.44-MB floppy drive (certain models) 24x CD-ROM, 8x DVD, CD-RW, or CD-RW/DVD drive (...or higher) At least 128 MB SDRAM preinstalled HP Pavilion ze5x00, ze4x00, HP Compaq nx9010, nx9008, nx9005, Compaq Evo N1050v, Compaq Presario 2500, and Compaq Presario 2100...
Mass Storage RAM Audio System Keyboard and Pointing Device LAN (certain models) Wireless LAN (certain models) 20- to 60-GB removable hard drive with Ultra-DMA 100 interface 1.44-MB floppy drive (certain models) 24x CD-ROM, 8x DVD, CD-RW, or CD-RW/DVD drive (...or higher) At least 128 MB SDRAM preinstalled HP Pavilion ze5x00, ze4x00, HP Compaq nx9010, nx9008, nx9005, Compaq Evo N1050v, Compaq Presario 2500, and Compaq Presario 2100...
Maintenance and Service Guide
Page 31
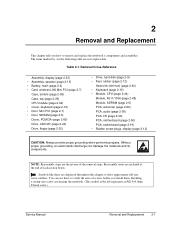
...2-1. Reassembly notes are displayed throughout this chapter to remove and replace the notebook's components and assemblies. Service Manual Removal and Replacement 2-1 The items marked by • in the following table are the reverse of the removal steps. Removal Cross-Reference Assembly, display (page 2-23) •..., floppy (page 2-32) • Drive, hard disk (page 2-9) • Feet, rubber (page 2-12) Heat sink (with fan) (page 2-40) • Keyboard (page 2-16) • Module, CPU (page 2-44) Module, RJ11/1394 (page 2-48) Module, SDRAM (page 2-5) PCA, antennas (page 2-60) PCA, audio...
...2-1. Reassembly notes are displayed throughout this chapter to remove and replace the notebook's components and assemblies. Service Manual Removal and Replacement 2-1 The items marked by • in the following table are the reverse of the removal steps. Removal Cross-Reference Assembly, display (page 2-23) •..., floppy (page 2-32) • Drive, hard disk (page 2-9) • Feet, rubber (page 2-12) Heat sink (with fan) (page 2-40) • Keyboard (page 2-16) • Module, CPU (page 2-44) Module, RJ11/1394 (page 2-48) Module, SDRAM (page 2-5) PCA, antennas (page 2-60) PCA, audio...
Maintenance and Service Guide
Page 43
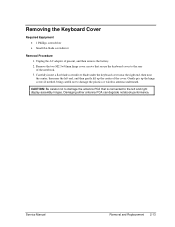
... 1. CAUTION: Be careful not to damage the antenna PCA that secure the keyboard cover to damage the plastics or wireless antenna underneath. Gently pry up the center of the notebook. 3. Unplug the AC adapter, if present, and then remove the battery. 2. Remove the two M2.5×4.0mm hinge cover screws that is connected to...
... 1. CAUTION: Be careful not to damage the antenna PCA that secure the keyboard cover to damage the plastics or wireless antenna underneath. Gently pry up the center of the notebook. 3. Unplug the AC adapter, if present, and then remove the battery. 2. Remove the two M2.5×4.0mm hinge cover screws that is connected to...
Maintenance and Service Guide
Page 44
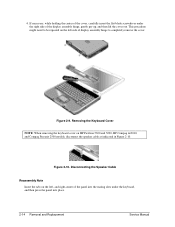
...and 5200, HP Compaq nx9010, and Compaq Presario 2500 models, disconnect the speaker cable as indicated in Figure 2-10. This procedure might need to completely remove the cover. If necessary, while holding the center of the cover, carefully insert the flat-blade screwdriver under the keyboard, and then ... the panel into the mating slots under the right side of the panel into place. 2-14 Removal and Replacement Service Manual Figure 2-10. Removing the Keyboard Cover NOTE: When removing the keyboard cover on the left - and right-center of the display assembly hinge, gently pry up, ...
...and 5200, HP Compaq nx9010, and Compaq Presario 2500 models, disconnect the speaker cable as indicated in Figure 2-10. This procedure might need to completely remove the cover. If necessary, while holding the center of the cover, carefully insert the flat-blade screwdriver under the keyboard, and then ... the panel into the mating slots under the right side of the panel into place. 2-14 Removal and Replacement Service Manual Figure 2-10. Removing the Keyboard Cover NOTE: When removing the keyboard cover on the left - and right-center of the display assembly hinge, gently pry up, ...
Maintenance and Service Guide
Page 45
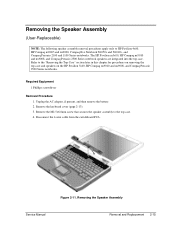
... Pavilion 5x00, HP Compaq nx9010 and nx9008, and Compaq Presario 2500 Series notebooks. Required Equipment 1 Phillips screwdriver Removal Procedure 1. Remove the keyboard cover (page 2-13). 3. Figure 2-11. The HP Pavilion ze5x00, HP Compaq nx9010 and nx9008, and Compaq Presario 2500 Series notebook speakers are integrated into the top case. Removing the Speaker Assembly Service Manual Removal and Replacement 2-15 Removing the Speaker Assembly (User...
... Pavilion 5x00, HP Compaq nx9010 and nx9008, and Compaq Presario 2500 Series notebooks. Required Equipment 1 Phillips screwdriver Removal Procedure 1. Remove the keyboard cover (page 2-13). 3. Figure 2-11. The HP Pavilion ze5x00, HP Compaq nx9010 and nx9008, and Compaq Presario 2500 Series notebook speakers are integrated into the top case. Removing the Speaker Assembly Service Manual Removal and Replacement 2-15 Removing the Speaker Assembly (User...

Maintenance and Service Guide
Page 46
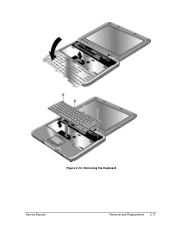
... end, and then pull it toward the display assembly to the top case. 4. Remove the keyboard. Remove the four M2.5×4.0mm screws that secure the keyboard to release the tabs from the top case. 5. Remove the keyboard cover (page 2-13). 3. Turn the keyboard over, and then disconnect the motherboard cable. 6. Reassembly Notes CAUTION: Do not excessively...
... end, and then pull it toward the display assembly to the top case. 4. Remove the keyboard. Remove the four M2.5×4.0mm screws that secure the keyboard to release the tabs from the top case. 5. Remove the keyboard cover (page 2-13). 3. Turn the keyboard over, and then disconnect the motherboard cable. 6. Reassembly Notes CAUTION: Do not excessively...
Maintenance and Service Guide
Page 47
Figure 2-12. Removing the Keyboard Service Manual Removal and Replacement 2-17
Figure 2-12. Removing the Keyboard Service Manual Removal and Replacement 2-17

Maintenance and Service Guide
Page 48
... then switchboard PCA to the top case (page 2-16). 5. Removing the Switchboard PCA HP Pavilion 4x00, HP Compaq nx9005 and nx9000, Compaq Evo Notebook N1050v and N1010v, and Compaq Presario 2100 and 1100 Models 2-18 Removal and Replacement Service Manual Remove the keyboard cover (page 2-13). 3. Remove the M2.5×4.0mm screw that connect the switchboard PCA to HP...
... then switchboard PCA to the top case (page 2-16). 5. Removing the Switchboard PCA HP Pavilion 4x00, HP Compaq nx9005 and nx9000, Compaq Evo Notebook N1050v and N1010v, and Compaq Presario 2100 and 1100 Models 2-18 Removal and Replacement Service Manual Remove the keyboard cover (page 2-13). 3. Remove the M2.5×4.0mm screw that connect the switchboard PCA to HP...

Maintenance and Service Guide
Page 49
... then remove the battery. 2. Remove the keyboard cover (page 2-13). 3. Gently lift up on the rear right edge of the switchboard PCA to HP Pavilion 5x00, HP Compaq nx9010 and nx9008, and Compaq Presario 2500 models. Removing the Switchboard PCA HP Pavilion 5x00, HP Compaw nx9010 and nx9008, and Compaq Presario 2500 Models Service Manual Removal and Replacement 2-19 Remove the...
... then remove the battery. 2. Remove the keyboard cover (page 2-13). 3. Gently lift up on the rear right edge of the switchboard PCA to HP Pavilion 5x00, HP Compaq nx9010 and nx9008, and Compaq Presario 2500 models. Removing the Switchboard PCA HP Pavilion 5x00, HP Compaw nx9010 and nx9008, and Compaq Presario 2500 Models Service Manual Removal and Replacement 2-19 Remove the...
Maintenance and Service Guide
Page 50
.... Make sure these additional assemblies: • Keyboard cover (page 2-13) • Keyboard (page 2-16) 3. Unplug the AC adapter, if present, and then remove the battery. 2. Removing the CD/DVD Drive HP Pavilion 4x00, HP Compaq nx9005 and nx9000, Compaq Evo Notebook N1050v and N1010v, and Compaq Presario 2100 and 1100 Models 2-20 Removal and Replacement Service Manual Figure 2-15.
.... Make sure these additional assemblies: • Keyboard cover (page 2-13) • Keyboard (page 2-16) 3. Unplug the AC adapter, if present, and then remove the battery. 2. Removing the CD/DVD Drive HP Pavilion 4x00, HP Compaq nx9005 and nx9000, Compaq Evo Notebook N1050v and N1010v, and Compaq Presario 2100 and 1100 Models 2-20 Removal and Replacement Service Manual Figure 2-15.

Maintenance and Service Guide
Page 51
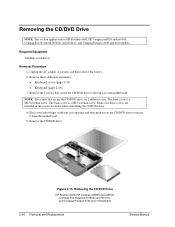
... assemblies: • Keyboard cover (page 2-13) • Keyboard (page 2-16) 3. Removing the CD/DVD Drive HP Pavilion 5x00, HP Compaq nx9010 and HP nx9008, and Compaq Presario 2500 Models Service Manual Removal and Replacement 2-21 Required Equipment 1 Phillips screwdriver Removal Procedure 1. Place your index finger in the top case opening and push out on the CD/DVD drive...
... assemblies: • Keyboard cover (page 2-13) • Keyboard (page 2-16) 3. Removing the CD/DVD Drive HP Pavilion 5x00, HP Compaq nx9010 and HP nx9008, and Compaq Presario 2500 Models Service Manual Removal and Replacement 2-21 Required Equipment 1 Phillips screwdriver Removal Procedure 1. Place your index finger in the top case opening and push out on the CD/DVD drive...
Maintenance and Service Guide
Page 52
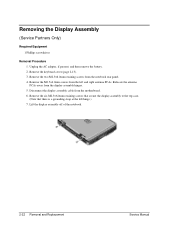
Lift the display assembly off of the notebook. 2-22 Removal and Replacement Service Manual Remove the keyboard cover (page 2-13). 3. Disconnect the display assembly cable from the display assembly hinges. 5. Relocate the antenna PCAs away from the motherboard. 6. Remove the M2.5×4.0mm screws from the notebook rear panel. 4. Remove the six M2.5×6.0mm retaining screws that...
Lift the display assembly off of the notebook. 2-22 Removal and Replacement Service Manual Remove the keyboard cover (page 2-13). 3. Disconnect the display assembly cable from the display assembly hinges. 5. Relocate the antenna PCAs away from the motherboard. 6. Remove the M2.5×4.0mm screws from the notebook rear panel. 4. Remove the six M2.5×6.0mm retaining screws that...

Maintenance and Service Guide
Page 54
..., HP Compaq nx9005 and nx9000, Compaq Evo Notebook N1050v and N1010v, and Compaq Presario 2100 and 1100 models. Turn the notebook bottom side up with the front facing forward. 4. Remove the remaining 14 M2.5×6.0mm screws. 6. Unplug the AC adapter, if present, and remove the battery. 2. Remove these additional assemblies: • Hard disk drive (page 2-9) • Keyboard cover...
..., HP Compaq nx9005 and nx9000, Compaq Evo Notebook N1050v and N1010v, and Compaq Presario 2100 and 1100 models. Turn the notebook bottom side up with the front facing forward. 4. Remove the remaining 14 M2.5×6.0mm screws. 6. Unplug the AC adapter, if present, and remove the battery. 2. Remove these additional assemblies: • Hard disk drive (page 2-9) • Keyboard cover...

Maintenance and Service Guide
Page 56
... section applies only to the notebook. 2-26 Removal and Replacement Service Manual Turn the notebook bottom side up with the front facing forward. 4. Remove these additional assemblies: • Hard disk drive (page 2-9) • Keyboard cover (page 2-13) • Speaker assembly (page 2-15) • Keyboard (page 2-16) •...the correct location. Be sure to note of the correct location of the notebook CAUTION: The 16 screws removed in damage to HP Pavilion 5x00, HP Compaq nx9010 and HP nx9008, and Compaq Presario 2500 models. Failure to follow this caution can result in step ...
... section applies only to the notebook. 2-26 Removal and Replacement Service Manual Turn the notebook bottom side up with the front facing forward. 4. Remove these additional assemblies: • Hard disk drive (page 2-9) • Keyboard cover (page 2-13) • Speaker assembly (page 2-15) • Keyboard (page 2-16) •...the correct location. Be sure to note of the correct location of the notebook CAUTION: The 16 screws removed in damage to HP Pavilion 5x00, HP Compaq nx9010 and HP nx9008, and Compaq Presario 2500 models. Failure to follow this caution can result in step ...

Maintenance and Service Guide
Page 59
... motherboard. (Note that secure the floppy drive to HP Pavilion ze4x00, HP Compaq nx9005 and nx9000, Compaq Evo Notebook N1050v and N1010v, and Compaq Presario 2100 and 1100 models. Remove these additional assemblies: • Hard disk drive (page 2-9) • Keyboard cover (page 2-13) • Keyboard (page 2-16) • Switchboard PCA (page 2-19) • Display assembly (page 2-23...
... motherboard. (Note that secure the floppy drive to HP Pavilion ze4x00, HP Compaq nx9005 and nx9000, Compaq Evo Notebook N1050v and N1010v, and Compaq Presario 2100 and 1100 models. Remove these additional assemblies: • Hard disk drive (page 2-9) • Keyboard cover (page 2-13) • Keyboard (page 2-16) • Switchboard PCA (page 2-19) • Display assembly (page 2-23...

Maintenance and Service Guide
Page 61
...• Keyboard cover (page 2-13) • Keyboard (page 2-16) • Switchboard PCA (page 2-19) • Display assembly (page 2-23) • Top case (page 2-26) 3. Unplug the AC adapter, if present, and then remove the battery. 2. Service Manual Removal and Replacement 2-31 Remove the floppy drive. 6. Remove the insulating....0×3.0mm screw that secure the floppy drive and floppy drive bezel to HP Pavilion 5x00, HP Compaq nx9010 and nx9008, and Compaq Presario 2500 models. Remove the four M2.5×6.0mm screws that secures the floppy drive bezel to the TouchPad bracket on the...
...• Keyboard cover (page 2-13) • Keyboard (page 2-16) • Switchboard PCA (page 2-19) • Display assembly (page 2-23) • Top case (page 2-26) 3. Unplug the AC adapter, if present, and then remove the battery. 2. Service Manual Removal and Replacement 2-31 Remove the floppy drive. 6. Remove the insulating....0×3.0mm screw that secure the floppy drive and floppy drive bezel to HP Pavilion 5x00, HP Compaq nx9010 and nx9008, and Compaq Presario 2500 models. Remove the four M2.5×6.0mm screws that secures the floppy drive bezel to the TouchPad bracket on the...


