Hard Drive White Paper
Page 5
... information: - HP Recommendations for Notebook Users • Install HP Notebook LidSwitch Policy, or as an alternative, place the notebook into Standby mode before transporting it from one location to another. • Upgrade to the latest system BIOS, as given in the "F10 Setup Hard Drive Self-Test" section. • Whenever possible, adjust power management settings (power schemes) in Control Panel to permit the hard drive to be turned off when it will...
... information: - HP Recommendations for Notebook Users • Install HP Notebook LidSwitch Policy, or as an alternative, place the notebook into Standby mode before transporting it from one location to another. • Upgrade to the latest system BIOS, as given in the "F10 Setup Hard Drive Self-Test" section. • Whenever possible, adjust power management settings (power schemes) in Control Panel to permit the hard drive to be turned off when it will...
Installing Microsoft Windows XP Service Pack 2 on HP Compaq Business Notebooks
Page 4
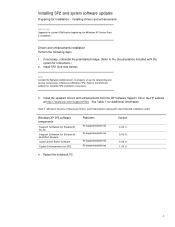
... website for complete SP2 installation instructions. 3. Table 1 Minimum Versions of Microsoft Windows SP2. Install SP2 (See note below). Installing SP2 and system software updates Preparing for additional information. See Table 1 for installation -- Restart the notebook PC. installing drivers and enhancements IMPORTANT Upgrade the system ROM before beginning the Windows XP Service Pack 2 installation. Refer to properly set up the networking and security components of Necessary Drivers and Enhancements (along with...
... website for complete SP2 installation instructions. 3. Table 1 Minimum Versions of Microsoft Windows SP2. Install SP2 (See note below). Installing SP2 and system software updates Preparing for additional information. See Table 1 for installation -- Restart the notebook PC. installing drivers and enhancements IMPORTANT Upgrade the system ROM before beginning the Windows XP Service Pack 2 installation. Refer to properly set up the networking and security components of Necessary Drivers and Enhancements (along with...

Maintenance and Service Guide
Page 3
... Operation...1-14 Specifications ...1-18 Internal Design...1-24 Removal and Replacement 2-1 Disassembly Flowchart ...2-3 Removing the Battery ...2-4 Removing an SDRAM Module...2-5 Removing the Wireless LAN Mini PCI Card 2-7 Removing the Hard Disk Drive...2-9 Recovering the Factory Software...2-11 Replacing Small Parts ...2-12 Removing the Keyboard Cover...2-13 Removing the Speaker Assembly ...2-15 Removing the Keyboard ...2-16 Removing the Switchboard PCA ...2-19 Removing the CD/DVD Drive...2-20 Removing the Display Assembly...2-23 Removing the Top Case ...2-26 Removing the Floppy Drive...
... Operation...1-14 Specifications ...1-18 Internal Design...1-24 Removal and Replacement 2-1 Disassembly Flowchart ...2-3 Removing the Battery ...2-4 Removing an SDRAM Module...2-5 Removing the Wireless LAN Mini PCI Card 2-7 Removing the Hard Disk Drive...2-9 Recovering the Factory Software...2-11 Replacing Small Parts ...2-12 Removing the Keyboard Cover...2-13 Removing the Speaker Assembly ...2-15 Removing the Keyboard ...2-16 Removing the Switchboard PCA ...2-19 Removing the CD/DVD Drive...2-20 Removing the Display Assembly...2-23 Removing the Top Case ...2-26 Removing the Floppy Drive...
Maintenance and Service Guide
Page 89
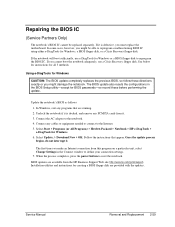
..., and remove any cables or equipment needed to connect to reprogram a malfunctioning BIOS IC using either e-DiagTools for creating a BIOS floppy disk are available from it . The first time you must replace the motherboard. BIOS updates are provided with the updates. Connect the AC adapter to reset the notebook. Installation utilities and instructions for Windows, a BIOS floppy disk, or a Crisis Recovery floppy disk. See below for instructions for Windows. 6. When the process completes, press the power button to the notebook. 4. In Windows...
..., and remove any cables or equipment needed to connect to reprogram a malfunctioning BIOS IC using either e-DiagTools for creating a BIOS floppy disk are available from it . The first time you must replace the motherboard. BIOS updates are provided with the updates. Connect the AC adapter to reset the notebook. Installation utilities and instructions for Windows, a BIOS floppy disk, or a Crisis Recovery floppy disk. See below for instructions for Windows. 6. When the process completes, press the power button to the notebook. 4. In Windows...
Maintenance and Service Guide
Page 103
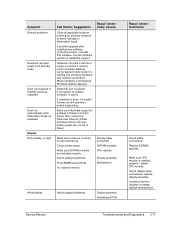
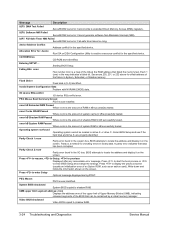
... additional support. If external monitor displays no light Call Center: Suggestions Close all applications before suspending. If notebook is installed. Make sure SDRAM modules are not set to Never. Adjust display brightness. Service Manual Troubleshooting and Diagnostics 3-11 Blinking cursor appears while system is installed properly, replace CPU module. Notebook won't suspend if connection to resume if network card is busy, it normally finishes current operation before entering (or allowing notebook to enter) Standby or Hibernation mode. Contact software vendor for...
... additional support. If external monitor displays no light Call Center: Suggestions Close all applications before suspending. If notebook is installed. Make sure SDRAM modules are not set to Never. Adjust display brightness. Service Manual Troubleshooting and Diagnostics 3-11 Blinking cursor appears while system is installed properly, replace CPU module. Notebook won't suspend if connection to resume if network card is busy, it normally finishes current operation before entering (or allowing notebook to enter) Standby or Hibernation mode. Contact software vendor for...
Maintenance and Service Guide
Page 107
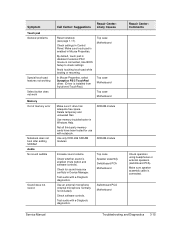
... General problems Special touch pad features not working Select button does not work Memory Out of memory error Notebook does not boot after adding SDRAM Audio No sound audible Sound does not record Call Center: Suggestions Repair Center: Likely Causes Reset notebook (see page 1-17). Check settings in Device Manager. By default, touch pad is disabled if external PS/2 mouse is enabled (mute button and software controls). Test audio with notebook. Make sure touch pad is enabled in Windows Help. In Mouse Properties, select Synaptics PS/2 TouchPad driver. (Driver is connected. Use...
... General problems Special touch pad features not working Select button does not work Memory Out of memory error Notebook does not boot after adding SDRAM Audio No sound audible Sound does not record Call Center: Suggestions Repair Center: Likely Causes Reset notebook (see page 1-17). Check settings in Device Manager. By default, touch pad is disabled if external PS/2 mouse is enabled (mute button and software controls). Test audio with notebook. Make sure touch pad is enabled in Windows Help. In Mouse Properties, select Synaptics PS/2 TouchPad driver. (Driver is connected. Use...
Maintenance and Service Guide
Page 113
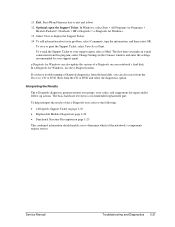
... replacement part. Service Manual Troubleshooting and Diagnostics 3-21 Exit. Press F3 and then any key to display the Support Ticket. 14. To add information about your notebook's hard disk. If you have trouble running e-Diagtools diagnostics from the hard disk, you can also update the version of e-Diagtools on page 1-25 This combined information should enable you make an e-mail connection from this program, select Change Settings in the Connect window and enter...
... replacement part. Service Manual Troubleshooting and Diagnostics 3-21 Exit. Press F3 and then any key to display the Support Ticket. 14. To add information about your notebook's hard disk. If you have trouble running e-Diagtools diagnostics from the hard disk, you can also update the version of e-Diagtools on page 1-25 This combined information should enable you make an e-mail connection from this program, select Change Settings in the Connect window and enter...
Maintenance and Service Guide
Page 115
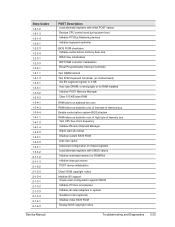
... 2-1-3-2 2-1-3-3 2-1-3-4 2-1-4-1 2-1-4-3 Service Manual POST Description Load alternate registers with CMOS values Initialize extended memory for ROMPilot Initialize interrupt vectors POST device initialization Check ROM copyright notice Initialize I20 support Check video configuration against CMOS Initialize PCI bus and devices Initialize all video adapters in system QuietBoot start (optional) Shadow video BIOS ROM Display BIOS copyright notice Troubleshooting and Diagnostics 3-23 or wrong type or no RAM installed Initialize POST Memory Manager Clear 512 KB base RAM RAM failure on address...
... 2-1-3-2 2-1-3-3 2-1-3-4 2-1-4-1 2-1-4-3 Service Manual POST Description Load alternate registers with CMOS values Initialize extended memory for ROMPilot Initialize interrupt vectors POST device initialization Check ROM copyright notice Initialize I20 support Check video configuration against CMOS Initialize PCI bus and devices Initialize all video adapters in system QuietBoot start (optional) Shadow video BIOS ROM Display BIOS copyright notice Troubleshooting and Diagnostics 3-23 or wrong type or no RAM installed Initialize POST Memory Manager Clear 512 KB base RAM RAM failure on address...
Maintenance and Service Guide
Page 122
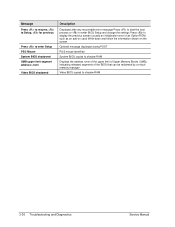
... to start the boot process or to enter BIOS Setup and change the settings Press to display the previous screen (usually an initialization error of an Option ROM, such as an add-on card) Write down and follow the information shown on the screen Optional message displayed during POST PS/2 mouse identified System BIOS copied to shadow RAM Displays the address nnnn of the upper limit of Upper Memory Blocks (UMB), indicating...
... to start the boot process or to enter BIOS Setup and change the settings Press to display the previous screen (usually an initialization error of an Option ROM, such as an add-on card) Write down and follow the information shown on the screen Optional message displayed during POST PS/2 mouse identified System BIOS copied to shadow RAM Displays the address nnnn of the upper limit of Upper Memory Blocks (UMB), indicating...
Service Manual
Page 66
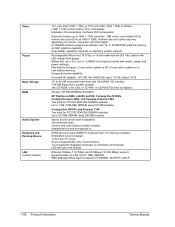
... MB) SDRAM using 256 MB modules. Up to 40-GB removable hard drive with LED charge-level gauge. Headphone-out and microphone-in speakers. 3D-enhanced audio. Touch pad with model, usage, and power settings). Suspend/resume capability. HP Pavilion ze5200, ze4200, ze4100, Compaq Evo N1050v, Compaq Presario 2500, and Compaq Presario 2100 Two slots for PC2100 DDR-266 SDRAM modules. Video Power Mass Storage RAM Audio System Keyboard and Pointing Device LAN (certain models) 14.1-inch...
... MB) SDRAM using 256 MB modules. Up to 40-GB removable hard drive with LED charge-level gauge. Headphone-out and microphone-in speakers. 3D-enhanced audio. Touch pad with model, usage, and power settings). Suspend/resume capability. HP Pavilion ze5200, ze4200, ze4100, Compaq Evo N1050v, Compaq Presario 2500, and Compaq Presario 2100 Two slots for PC2100 DDR-266 SDRAM modules. Video Power Mass Storage RAM Audio System Keyboard and Pointing Device LAN (certain models) 14.1-inch...
Service Manual
Page 132
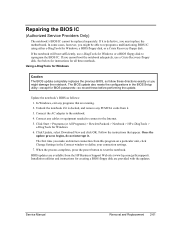
... remove any cables or equipment needed to connect to the Internet. 5. Installation utilities and instructions for Windows. 6. Service Manual Removal and Replacement 2-61 Undock the notebook if it . 3. Using e-DiagTools for Windows Caution The BIOS update completely replaces the previous BIOS, so follow these before performing the update. In Windows, exit any programs that appear. In some cases, however, you make an Internet connection from this program on a particular unit, click Change Settings in the BIOS Setup utility-except for BIOS passwords...
... remove any cables or equipment needed to connect to the Internet. 5. Installation utilities and instructions for Windows. 6. Service Manual Removal and Replacement 2-61 Undock the notebook if it . 3. Using e-DiagTools for Windows Caution The BIOS update completely replaces the previous BIOS, so follow these before performing the update. In Windows, exit any programs that appear. In some cases, however, you make an Internet connection from this program on a particular unit, click Change Settings in the BIOS Setup utility-except for BIOS passwords...
Service Manual
Page 141
... not boot from hard disk or floppy drive, replace CPU module, replace motherboard. Make sure at least one SDRAM module and try again. Make sure battery is bootable. Check battery contacts. If available, try external monitor. Make sure floppy disk is properly installed and fully charged. Make sure CD is installed and connected correctly. Use BIOS Setup to turn notebook off , then reconnect power and try again. Restart notebook. Battery or contacts. Motherboard. Floppy disk or floppy drive. CD/DVD drive. Motherboard. Check AC adapter. If the power status light...
... not boot from hard disk or floppy drive, replace CPU module, replace motherboard. Make sure at least one SDRAM module and try again. Make sure battery is bootable. Check battery contacts. If available, try external monitor. Make sure floppy disk is properly installed and fully charged. Make sure CD is installed and connected correctly. Use BIOS Setup to turn notebook off , then reconnect power and try again. Restart notebook. Battery or contacts. Motherboard. Floppy disk or floppy drive. CD/DVD drive. Motherboard. Check AC adapter. If the power status light...
Service Manual
Page 145
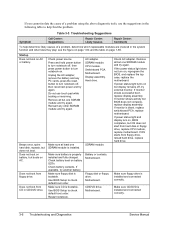
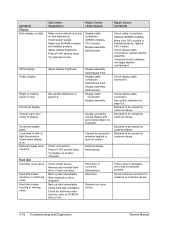
... on screen. If external monitor displays no light. Declared to be caused by customer abuse. Motherboard. Display cable connection. Display cable connection. Hard disk Hard disk never spins. Check power source. Back up disk immediately. External display. Hard drive or connector. Make sure CPU module is damaged, drive may not operate properly. Check notebook and drive for alternate noise sources, such as PCMCIA drive or fan. Check display cable connection. Motherboard. Repair Center: Comments Check cable connections. Replace SDRAM modules...
... on screen. If external monitor displays no light. Declared to be caused by customer abuse. Motherboard. Display cable connection. Display cable connection. Hard disk Hard disk never spins. Check power source. Back up disk immediately. External display. Hard drive or connector. Make sure CPU module is damaged, drive may not operate properly. Check notebook and drive for alternate noise sources, such as PCMCIA drive or fan. Check display cable connection. Motherboard. Repair Center: Comments Check cable connections. Replace SDRAM modules...
Service Manual
Page 148
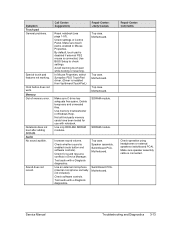
... drive has adequate free space. Increase sound volume. Check whether sound is connected. Notebook does not boot after adding SDRAM. Call Center: Suggestions Repair Center: Likely Causes Reset notebook (see page 1-57). Motherboard. Check for use with notebook. Speaker assembly. SDRAM module. Memory Out of memory error. Check settings in Device Manager. By default, touch pad is disabled if external PS/2 mouse is installed from \hp\drivers\TouchPad.) Top case. Symptom Touch pad General problems. Special touch pad features not working. Click button does not work. In...
... drive has adequate free space. Increase sound volume. Check whether sound is connected. Notebook does not boot after adding SDRAM. Call Center: Suggestions Repair Center: Likely Causes Reset notebook (see page 1-57). Motherboard. Check for use with notebook. Speaker assembly. SDRAM module. Memory Out of memory error. Check settings in Device Manager. By default, touch pad is disabled if external PS/2 mouse is installed from \hp\drivers\TouchPad.) Top case. Symptom Touch pad General problems. Special touch pad features not working. Click button does not work. In...
Service Manual
Page 154
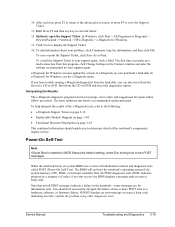
..., click Change Settings in BIOS Setup (the default setting), press Esc during boot to view the Support Ticket. 11. Service Manual Troubleshooting and Diagnostics 3-19 To save or print the Support Ticket, click Save As or Print. Power-On Self-Test Note If Quiet Boot is enabled in the Connect window and enter the settings recommended by a sequence of one or more POST tests as a hardware, software, or firmware failure. Optional: open the Support Ticket...
..., click Change Settings in BIOS Setup (the default setting), press Esc during boot to view the Support Ticket. 11. Service Manual Troubleshooting and Diagnostics 3-19 To save or print the Support Ticket, click Save As or Print. Power-On Self-Test Note If Quiet Boot is enabled in the Connect window and enter the settings recommended by a sequence of one or more POST tests as a hardware, software, or firmware failure. Optional: open the Support Ticket...
Service Manual
Page 155
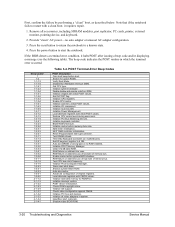
... configuration of memory bus. Initialize I20 support. Note that if the notebook fails to start the notebook. POST Terminal-Error Beep Codes POST Description One short beep before system BIOS shadow. Get CPU type. Reset Programmable Interrupt Controller. RAM failure on motherboard). Warm start (optional). Shadow video BIOS ROM. 3-20 Troubleshooting and Diagnostics Service Manual Set IN POST flag. Enable cache before boot. Initialize interrupt vectors. Provide "clean" AC power-no RAM installed. Disable shadow and execute code from ROM...
... configuration of memory bus. Initialize I20 support. Note that if the notebook fails to start the notebook. POST Terminal-Error Beep Codes POST Description One short beep before system BIOS shadow. Get CPU type. Reset Programmable Interrupt Controller. RAM failure on motherboard). Warm start (optional). Shadow video BIOS ROM. 3-20 Troubleshooting and Diagnostics Service Manual Set IN POST flag. Enable cache before boot. Initialize interrupt vectors. Provide "clean" AC power-no RAM installed. Disable shadow and execute code from ROM...
Service Manual
Page 156
... security engine (optional). Determine number of day. Enter SETUP. Clear Boot flag. prepare to UserPatch2. Prepare Boot. Initialize SMBIOS. Display CPU type and speed. Test extended memory. Jump to enter SETUP". Check for UMB recovery. Set up Power Management. Initialize coprocessor if present. Configure non-MCD IDE controllers. Configure Motherboard Configurable Devices (optional). Initialize BIOS Data Area. Initialize floppy controller. Initialize hard-disk controllers. Shadow option ROMs. Set up hardware interrupt vectors. Set time of ATA and SCSI drives. Beep Codes...
... security engine (optional). Determine number of day. Enter SETUP. Clear Boot flag. prepare to UserPatch2. Prepare Boot. Initialize SMBIOS. Display CPU type and speed. Test extended memory. Jump to enter SETUP". Check for UMB recovery. Set up Power Management. Initialize coprocessor if present. Configure non-MCD IDE controllers. Configure Motherboard Configurable Devices (optional). Initialize BIOS Data Area. Initialize floppy controller. Initialize hard-disk controllers. Shadow option ROMs. Set up hardware interrupt vectors. Set time of ATA and SCSI drives. Beep Codes...
Service Manual
Page 159
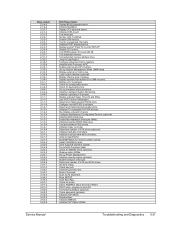
... the amount of system RAM in the I /O device IRQ conflict error. Operating system not found Operating system cannot be reclaimed by a virtual memory manager. Enter BIOS Setup and see if the hard disk and drive A: are properly identified. A parity error indicates that can be located on card). Video BIOS shadowed Video BIOS copied to enter BIOS Setup and change the settings. Each 1 (one) in kB successfully tested. Invalid System Configuration Data Problem with NVRAM (CMOS) data. Parity Check 1 nnnn...
... the amount of system RAM in the I /O device IRQ conflict error. Operating system not found Operating system cannot be reclaimed by a virtual memory manager. Enter BIOS Setup and see if the hard disk and drive A: are properly identified. A parity error indicates that can be located on card). Video BIOS shadowed Video BIOS copied to enter BIOS Setup and change the settings. Each 1 (one) in kB successfully tested. Invalid System Configuration Data Problem with NVRAM (CMOS) data. Parity Check 1 nnnn...

Reference Guide
Page 77
... of the keyboard to switch to its default setting of 1024 × 768 or higher, depending on your model: select Start > Control Panel > Appearance and Themes > Display. • Try adjusting the size of a double-sided DVD has a different format (standard or widescreen). Type C:\Program Files\Accessories in WordPad, but the screen is difficult to read • Try setting the display resolution to one display. Troubleshooting and Maintenance Troubleshooting Your Notebook •...
... of the keyboard to switch to its default setting of 1024 × 768 or higher, depending on your model: select Start > Control Panel > Appearance and Themes > Display. • Try adjusting the size of a double-sided DVD has a different format (standard or widescreen). Type C:\Program Files\Accessories in WordPad, but the screen is difficult to read • Try setting the display resolution to one display. Troubleshooting and Maintenance Troubleshooting Your Notebook •...
Reference Guide
Page 119
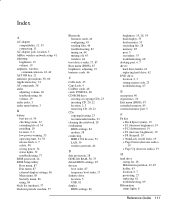
... BIOS password, 24 BIOS Setup utility Boot menu, 87 Exit menu, 87 external display settings, 86 Main menu, 85 Security menu, 86 using, 84 black list (modem), 37 blackout periods, modem, 37 Bluetooth business cards, 46 configuring, 45 sending files, 46 troubleshooting, 82 tuning on, 44 turning off, 45 wireless, 44 boot device order, 17, 87 Boot menu (BIOS), 87 brightness, adjusting, 19 business cards, 46 C Cable lock, 25 Caps Lock, 9 Cardbus cards, 48 cards, PCMCIA, 48 CD-ROM drive creating or copying CDs, 23 inserting CD, 20, 22 location, 2, 3 removing...
... BIOS password, 24 BIOS Setup utility Boot menu, 87 Exit menu, 87 external display settings, 86 Main menu, 85 Security menu, 86 using, 84 black list (modem), 37 blackout periods, modem, 37 Bluetooth business cards, 46 configuring, 45 sending files, 46 troubleshooting, 82 tuning on, 44 turning off, 45 wireless, 44 boot device order, 17, 87 Boot menu (BIOS), 87 brightness, adjusting, 19 business cards, 46 C Cable lock, 25 Caps Lock, 9 Cardbus cards, 48 cards, PCMCIA, 48 CD-ROM drive creating or copying CDs, 23 inserting CD, 20, 22 location, 2, 3 removing...


