
HP Client Manager 6.1
Page 3
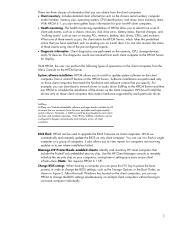
... new or missing PCs, memory, battery, disk drives, CPUs, and monitors. With HPCM, SoftPaq installation can perform the following types of operations on client computers. Manage HP ProtectTools enabled clients: Identify and inventory HP client computers that our customers have specified, such as sending you to the HPCM Server for display. BIOS Flash: HPCM can press the F10 key to pause the boot process in order to change the BIOS settings...
... new or missing PCs, memory, battery, disk drives, CPUs, and monitors. With HPCM, SoftPaq installation can perform the following types of operations on client computers. Manage HP ProtectTools enabled clients: Identify and inventory HP client computers that our customers have specified, such as sending you to the HPCM Server for display. BIOS Flash: HPCM can press the F10 key to pause the boot process in order to change the BIOS settings...
Limited Warranty and Technical Support
Page 5
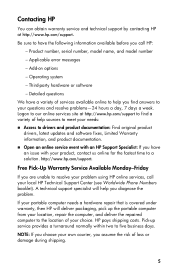
... local HP Technical Support Center (see Worldwide Phone Numbers booklet). A technical support specialist will deliver packaging, pick up service provides a turnaround normally within two to the location of help sources to meet your needs: „ Access to drivers and product documentation: Find original product drivers, latest updates and software fixes, Limited Warranty information, and product documentation. „ Open an online service event with an...
... local HP Technical Support Center (see Worldwide Phone Numbers booklet). A technical support specialist will deliver packaging, pick up service provides a turnaround normally within two to the location of help sources to meet your needs: „ Access to drivers and product documentation: Find original product drivers, latest updates and software fixes, Limited Warranty information, and product documentation. „ Open an online service event with an...
HP ProtectTools: Authentication technologies and suitability to task
Page 5
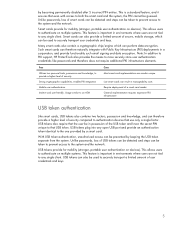
... keys. 5 Unlike passwords, loss of smart cards can be detected and steps can be used to that even with Public Key Infrastructure (PKI) deployments in manageability costs Require deployment of security Strong cryptographic capabilities, enables PKI integration Mobile user authentication Intuitive and user friendly. Pros Utilizes two personal traits, possession and knowledge, to the system and the network. With USB token authentication, unauthorized access...
... keys. 5 Unlike passwords, loss of smart cards can be detected and steps can be used to that even with Public Key Infrastructure (PKI) deployments in manageability costs Require deployment of security Strong cryptographic capabilities, enables PKI integration Mobile user authentication Intuitive and user friendly. Pros Utilizes two personal traits, possession and knowledge, to the system and the network. With USB token authentication, unauthorized access...
HP Compaq notebook single image white paper
Page 3
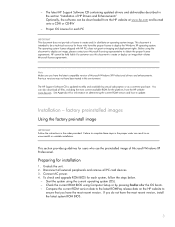
... the Windows XP operating system. Failure to obtain the proper license agreements. Note Make sure you do not have the latest compatible version of HP Drivers and Enhancements" Optionally, the software can also download all PC card devices. 3. - Previous versions may not have been tested in the order provided. factory preinstalled images Using the factory preinstall image IMPORTANT Follow the instructions in this document to create...
... the Windows XP operating system. Failure to obtain the proper license agreements. Note Make sure you do not have the latest compatible version of HP Drivers and Enhancements" Optionally, the software can also download all PC card devices. 3. - Previous versions may not have been tested in the order provided. factory preinstalled images Using the factory preinstall image IMPORTANT Follow the instructions in this document to create...
HP Compaq notebook single image white paper
Page 5
... nc8200. - Remove the primary hard drive from the HP Software Support CD or the HP website at www.hp.com. Change the boot order in the Maintenance and Service Guide: "HP Compaq Business Notebook nc8200 Series." 5. Table 1 Minimum Versions of Microsoft Windows Professional. Software installation Perform the following steps before manually installing Windows XP Professional: 1. Remove the primary hard drive from the nc6200. 5 For installation, refer to make the Multibay the first boot device on models configured with TPM...
... nc8200. - Remove the primary hard drive from the HP Software Support CD or the HP website at www.hp.com. Change the boot order in the Maintenance and Service Guide: "HP Compaq Business Notebook nc8200 Series." 5. Table 1 Minimum Versions of Microsoft Windows Professional. Software installation Perform the following steps before manually installing Windows XP Professional: 1. Remove the primary hard drive from the nc6200. 5 For installation, refer to make the Multibay the first boot device on models configured with TPM...
HP Compaq notebook single image white paper
Page 9
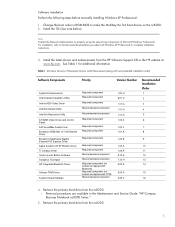
... of the system Changes operating system settings to unpack in Table 3. Appendix B: SoftPaqs Unpacking a SoftPaq file Several switches can be used on the internal keyboard 9 Table 3 SoftPaq descriptions Name ADI SoundMax Audio Driver Ethernet Drivers Modem Drivers Video Drivers Synaptics TouchPad Driver System Enhancements System Default Settings System ROMPaq Quick Launch Button Software Description Enables the integrated Audio hardware Enables integrated NIC devices select models Enables integrated modem devices select models Enables the integrated video hardware Provides added...
... of the system Changes operating system settings to unpack in Table 3. Appendix B: SoftPaqs Unpacking a SoftPaq file Several switches can be used on the internal keyboard 9 Table 3 SoftPaq descriptions Name ADI SoundMax Audio Driver Ethernet Drivers Modem Drivers Video Drivers Synaptics TouchPad Driver System Enhancements System Default Settings System ROMPaq Quick Launch Button Software Description Enables the integrated Audio hardware Enables integrated NIC devices select models Enables integrated modem devices select models Enables the integrated video hardware Provides added...

Hardware and Software Guide
Page 4
Contents Default Power Settings 2-9 Turning the Notebook or Display On or Off 2-10 Initiating or Resuming from Standby 2-11 Initiating or Restoring from Hibernation 2-12 Using Emergency Shutdown Procedures 2-14 Power Options 2-14 Accessing the Power Options Properties 2-15 Displaying the Power Meter Icon 2-15 Setting or Changing a Power Scheme 2-16 Using a Security Password 2-16 Processor Performance Controls 2-17 Battery Packs 2-19 Identifying Battery Packs 2-20 Inserting or Removing a Primary Battery Pack. . . . 2-21 Charging Battery Packs 2-23 Charging a New Battery Pack...
Contents Default Power Settings 2-9 Turning the Notebook or Display On or Off 2-10 Initiating or Resuming from Standby 2-11 Initiating or Restoring from Hibernation 2-12 Using Emergency Shutdown Procedures 2-14 Power Options 2-14 Accessing the Power Options Properties 2-15 Displaying the Power Meter Icon 2-15 Setting or Changing a Power Scheme 2-16 Using a Security Password 2-16 Processor Performance Controls 2-17 Battery Packs 2-19 Identifying Battery Packs 2-20 Inserting or Removing a Primary Battery Pack. . . . 2-21 Charging Battery Packs 2-23 Charging a New Battery Pack...

Hardware and Software Guide
Page 83
... increase screen brightness. Hold down the hotkey to decrease screen brightness. The BIOS date may display in a decimal format, such as 10/19/2004 F.07. Using Hotkeys with External Keyboards The following table describes how certain hotkeys are used on external keyboards: Notebook Keys External Keyboard Keys fn+esc scroll lock+scroll lock+esc* fn+f4 scroll lock+scroll lock+f4* fn+f8 scroll lock+scroll lock+f8* *Pressing the scroll lock 2 times on an external keyboard is the version number of the system ROM. Pointing Devices and Keyboard Decreasing Screen Brightness (fn...
... increase screen brightness. Hold down the hotkey to decrease screen brightness. The BIOS date may display in a decimal format, such as 10/19/2004 F.07. Using Hotkeys with External Keyboards The following table describes how certain hotkeys are used on external keyboards: Notebook Keys External Keyboard Keys fn+esc scroll lock+scroll lock+esc* fn+f4 scroll lock+scroll lock+f4* fn+f8 scroll lock+scroll lock+f8* *Pressing the scroll lock 2 times on an external keyboard is the version number of the system ROM. Pointing Devices and Keyboard Decreasing Screen Brightness (fn...

Hardware and Software Guide
Page 157
... Bluetooth wireless devices, you have a wireless notebook. ■ An 802.11 wireless notebook can connect to the illustration that most notebook models. The illustrations in this chapter identify the standard external features included in corporate offices, your notebook. Wireless networks include wireless local area networks (WLANs) or "hotspots." Your notebook has a button that can be used to enable and disable 802.11 and Bluetooth wireless devices and an associated light to indicate the state of the wireless devices...
... Bluetooth wireless devices, you have a wireless notebook. ■ An 802.11 wireless notebook can connect to the illustration that most notebook models. The illustrations in this chapter identify the standard external features included in corporate offices, your notebook. Wireless networks include wireless local area networks (WLANs) or "hotspots." Your notebook has a button that can be used to enable and disable 802.11 and Bluetooth wireless devices and an associated light to indicate the state of the wireless devices...
Hardware and Software Guide
Page 178
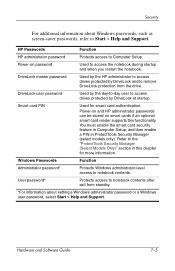
... Manager (select models only). DriveLock user password Used by DriveLock and to remove DriveLock protection from standby. *For information about Windows passwords, such as screen-saver passwords, refer to Start > Help and Support. Refer to access the notebook during startup and when you restart the notebook. User password* Protects access to Computer Setup. HP Passwords Function HP administrator password Protects access to notebook contents after exit from the drive. Hardware and Software Guide 7-5 Security For additional information about setting a Windows...
... Manager (select models only). DriveLock user password Used by DriveLock and to remove DriveLock protection from standby. *For information about Windows passwords, such as screen-saver passwords, refer to Start > Help and Support. Refer to access the notebook during startup and when you restart the notebook. User password* Protects access to Computer Setup. HP Passwords Function HP administrator password Protects access to notebook contents after exit from the drive. Hardware and Software Guide 7-5 Security For additional information about setting a Windows...
Hardware and Software Guide
Page 180
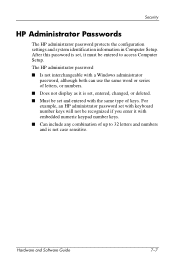
... password, although both can use the same word or series of letters, or numbers. ■ Does not display as it with the same type of up to access Computer Setup. Hardware and Software Guide 7-7 Security HP Administrator Passwords The HP administrator password protects the configuration settings and system identification information in Computer Setup. After this password is set with keyboard number keys will not be entered to 32 letters and numbers and is set, entered, changed...
... password, although both can use the same word or series of letters, or numbers. ■ Does not display as it with the same type of up to access Computer Setup. Hardware and Software Guide 7-7 Security HP Administrator Passwords The HP administrator password protects the configuration settings and system identification information in Computer Setup. After this password is set with keyboard number keys will not be entered to 32 letters and numbers and is set, entered, changed...

Hardware and Software Guide
Page 182
... the notebook. Open Computer Setup by turning on password, type the password in the New password and Verify new password fields, and then press f10. Use the arrow keys to 32 letters and numbers and is displayed in Computer Setup. For example, a power-on password set with keyboard number keys will not be set and entered with embedded numeric keypad number keys. ■ Can include any combination of keys. To manage the password: 1. Hardware and Software Guide 7-9 After this password is set, it is set a power...
... the notebook. Open Computer Setup by turning on password, type the password in the New password and Verify new password fields, and then press f10. Use the arrow keys to 32 letters and numbers and is displayed in Computer Setup. For example, a power-on password set with keyboard number keys will not be set and entered with embedded numeric keypad number keys. ■ Can include any combination of keys. To manage the password: 1. Hardware and Software Guide 7-9 After this password is set, it is set a power...
Hardware and Software Guide
Page 186
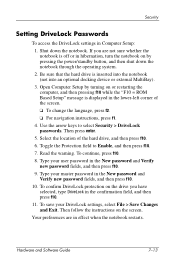
... hard drive is displayed in effect when the notebook restarts. To confirm DriveLock protection on or restarting the computer, and then pressing f10 while the "F10 = ROM Based Setup" message is inserted into the notebook (not into an optional docking device or external MultiBay). 3. Use the arrow keys to Enable, and then press f10. 7. Type your DriveLock settings, select File > Save Changes and Exit. Select the location...
... hard drive is displayed in effect when the notebook restarts. To confirm DriveLock protection on or restarting the computer, and then pressing f10 while the "F10 = ROM Based Setup" message is inserted into the notebook (not into an optional docking device or external MultiBay). 3. Use the arrow keys to Enable, and then press f10. 7. Type your DriveLock settings, select File > Save Changes and Exit. Select the location...

Hardware and Software Guide
Page 204
... the notebook restarts. ✎ To connect a NIC to a Preboot eXecution Environment (PXE) or Remote Program Load (RPL) server during startup without using MultiBoot, quickly press f12 when the Network Service Boot message appears in the lower-left corner of the screen (select models only). 8-4 Hardware and Software Guide To enable a device or location for inclusion in MultiBoot: 1. To enable a NIC, select the Security menu > Device Security, and then select Internal network adapter boot...
... the notebook restarts. ✎ To connect a NIC to a Preboot eXecution Environment (PXE) or Remote Program Load (RPL) server during startup without using MultiBoot, quickly press f12 when the Network Service Boot message appears in the lower-left corner of the screen (select models only). 8-4 Hardware and Software Guide To enable a device or location for inclusion in MultiBoot: 1. To enable a NIC, select the Security menu > Device Security, and then select Internal network adapter boot...

Hardware and Software Guide
Page 205
...; Changing the boot sequence also changes the logical drive designations. If this drive is connected to an optional docking device (select models only) that CD-ROM drive becomes drive C and the hard drive in the hard drive bay becomes drive D. ■ Starting up from a CD-ROM drive with a disc that boots as drive C, that contains a hard drive. This hard drive will be enabled in Computer Setup as USB hard disk. For example, the notebook is placed before the hard drive in the hard drive bay in the boot order...
...; Changing the boot sequence also changes the logical drive designations. If this drive is connected to an optional docking device (select models only) that CD-ROM drive becomes drive C and the hard drive in the hard drive bay becomes drive D. ■ Starting up from a CD-ROM drive with a disc that boots as drive C, that contains a hard drive. This hard drive will be enabled in Computer Setup as USB hard disk. For example, the notebook is placed before the hard drive in the hard drive bay in the boot order...
Hardware and Software Guide
Page 215
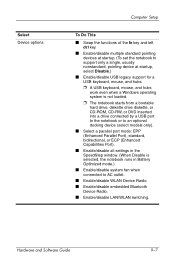
Hardware and Software Guide 9-7 Select Device options Computer Setup To Do This ■ Swap the functions of the fn key and left ctrl key. ■ Enable/disable multiple standard pointing devices at startup. (To set the notebook to support only a single, usually nonstandard, pointing device at startup, select Disable.) ■ Enable/disable USB legacy support for a USB keyboard, mouse, and hubs. ❐ A USB keyboard, mouse, and hubs work even when a Windows operating system is not loaded. ❐ The notebook starts from a bootable hard drive, diskette drive diskette, or...
Hardware and Software Guide 9-7 Select Device options Computer Setup To Do This ■ Swap the functions of the fn key and left ctrl key. ■ Enable/disable multiple standard pointing devices at startup. (To set the notebook to support only a single, usually nonstandard, pointing device at startup, select Disable.) ■ Enable/disable USB legacy support for a USB keyboard, mouse, and hubs. ❐ A USB keyboard, mouse, and hubs work even when a Windows operating system is not loaded. ❐ The notebook starts from a bootable hard drive, diskette drive diskette, or...

Hardware and Software Guide
Page 222
... any device, cable, or cord. Access the page on battery power, docked in an optional docking device, or connected to an optional power source. Identify the BIOS update that provides software for your computer: ❏ Select Start > Help and Support, and then click a software update link. - You may need to access this information to locate the update later, after it has been downloaded to your hard drive. b. At the download area: a. You will be downloaded. To download a BIOS update: 1. Make...
... any device, cable, or cord. Access the page on battery power, docked in an optional docking device, or connected to an optional power source. Identify the BIOS update that provides software for your computer: ❏ Select Start > Help and Support, and then click a software update link. - You may need to access this information to locate the update later, after it has been downloaded to your hard drive. b. At the download area: a. You will be downloaded. To download a BIOS update: 1. Make...
Hardware and Software Guide
Page 244
... (network) jack 1-20, 1-22, 5-38 ROM determining current version of 3-10 ROMPaq 11-3 S screen saver 2-34 scroll lock key 3-10 scrolling regions, TouchPad 1-6, 3-2 Secure Digital (SD) MemoryCard 1-13, 5-17 security cable lock, connecting 7-27 security cable slot 1-16, 1-17 security features 7-1 security features on notebook Computer Setup 7-3 security passwords 2-16 serial number, computer 11-2 serial number, notebook 1-27, 9-4 serial port 1-18 Service Tag 1-27 Setup utility accessing 9-2 Advanced menu 9-6 enabling bootable devices 8-4 File menu 9-4 restoring default settings 9-3 Security menu...
... (network) jack 1-20, 1-22, 5-38 ROM determining current version of 3-10 ROMPaq 11-3 S screen saver 2-34 scroll lock key 3-10 scrolling regions, TouchPad 1-6, 3-2 Secure Digital (SD) MemoryCard 1-13, 5-17 security cable lock, connecting 7-27 security cable slot 1-16, 1-17 security features 7-1 security features on notebook Computer Setup 7-3 security passwords 2-16 serial number, computer 11-2 serial number, notebook 1-27, 9-4 serial port 1-18 Service Tag 1-27 Setup utility accessing 9-2 Advanced menu 9-6 enabling bootable devices 8-4 File menu 9-4 restoring default settings 9-3 Security menu...
HP Compaq nx6110, nc6110, nx6120 and nc6120 Notebook PCs - Maintenance and Service Guide
Page 55
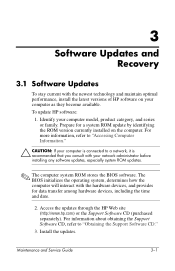
... your computer is connected to "Obtaining the Support Software CD." 3. The BIOS initializes the operating system, determines how the computer will interact with the hardware devices, and provides for a system ROM update by identifying the ROM version currently installed on your computer model, product category, and series or family. Maintenance and Service Guide 3-1 Prepare for data transfer among hardware devices, including the time and date. 2. Install the updates. Identify your...
... your computer is connected to "Obtaining the Support Software CD." 3. The BIOS initializes the operating system, determines how the computer will interact with the hardware devices, and provides for a system ROM update by identifying the ROM version currently installed on your computer model, product category, and series or family. Maintenance and Service Guide 3-1 Prepare for data transfer among hardware devices, including the time and date. 2. Install the updates. Identify your...
HP Compaq nx6110, nc6110, nx6120 and nc6120 Notebook PCs - Maintenance and Service Guide
Page 59
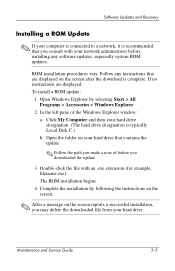
.... 2. Open Windows Explorer by following the instructions on the screen. ✎ After a message on the screen reports a successful installation, you may delete the downloaded file from your hard drive. If no instructions are displayed on your hard drive that contains the update. ✎ Follow the path you made a note of the Windows Explorer window: a. Double-click the file with your network administrator before you downloaded the update. 3. Maintenance and Service Guide 3-5 Software Updates and Recovery Installing a ROM Update...
.... 2. Open Windows Explorer by following the instructions on the screen. ✎ After a message on the screen reports a successful installation, you may delete the downloaded file from your hard drive. If no instructions are displayed on your hard drive that contains the update. ✎ Follow the path you made a note of the Windows Explorer window: a. Double-click the file with your network administrator before you downloaded the update. 3. Maintenance and Service Guide 3-5 Software Updates and Recovery Installing a ROM Update...


