
Routine Care
Page 7
...the computer, never spray water, cleaning fluids, or chemicals on the keyboard surface. CAUTION To prevent permanent damage to periodically clean or change the replacement cap. (Replacement caps are included with select models.) Display To remove smudges and lint, frequently clean the display with a damp cloth,...the risk of compressed air with a straw extension can of electric shock or damage to loosen and remove debris. Clean the keyboard regularly to prevent keys from sticking and to remove dust, lint, and particles that can cause the pointer to jump around and under the keys to...
...the computer, never spray water, cleaning fluids, or chemicals on the keyboard surface. CAUTION To prevent permanent damage to periodically clean or change the replacement cap. (Replacement caps are included with select models.) Display To remove smudges and lint, frequently clean the display with a damp cloth,...the risk of compressed air with a straw extension can of electric shock or damage to loosen and remove debris. Clean the keyboard regularly to prevent keys from sticking and to remove dust, lint, and particles that can cause the pointer to jump around and under the keys to...
Routine Care
Page 8
... As you can run Disk Cleanup: 1. Click a volume, and then click Defragment. Do not touch the connector pins on a removable drive or on the screen. 4 Chapter 1 Hardware maintenance ENWW Using Disk Cleanup Disk Cleanup searches the hard disk for unnecessary files that... that you use excessive force when inserting a drive into a drive bay. Disk Defragmenter consolidates the fragmented files and folders on the keyboard or move the computer while the drive is sensitive to run Disk Defragmenter: 1. For additional information, access the Disk Defragmenter online Help...
... As you can run Disk Cleanup: 1. Click a volume, and then click Defragment. Do not touch the connector pins on a removable drive or on the screen. 4 Chapter 1 Hardware maintenance ENWW Using Disk Cleanup Disk Cleanup searches the hard disk for unnecessary files that... that you use excessive force when inserting a drive into a drive bay. Disk Defragmenter consolidates the fragmented files and folders on the keyboard or move the computer while the drive is sensitive to run Disk Defragmenter: 1. For additional information, access the Disk Defragmenter online Help...

Routine Care - Windows Vista
Page 7
...internal components, do not use premoistened antistatic wipes or an antistatic screen cleaner. CAUTION To prevent permanent damage to loosen and remove debris. TouchPad and keyboard Dirt and grease on the TouchPad (select models only) can become trapped beneath the keys. To reduce the risk of compressed...this, clean the TouchPad with a damp cloth, and wash your hands frequently when using the computer. Clean the keyboard regularly to prevent keys from sticking and to remove dust, lint, and particles that can cause the pointer to jump around and under the keys to the computer, ...
...internal components, do not use premoistened antistatic wipes or an antistatic screen cleaner. CAUTION To prevent permanent damage to loosen and remove debris. TouchPad and keyboard Dirt and grease on the TouchPad (select models only) can become trapped beneath the keys. To reduce the risk of compressed...this, clean the TouchPad with a damp cloth, and wash your hands frequently when using the computer. Clean the keyboard regularly to prevent keys from sticking and to remove dust, lint, and particles that can cause the pointer to jump around and under the keys to the computer, ...
Routine Care - Windows Vista
Page 8
...fragmented. Follow the instructions on the computer. For additional information, access the Disk Defragmenter online Help. Do not touch the connector pins on a removable drive or on the screen. 4 Chapter 1 Hardware maintenance ENWW When the battery pack is the only source of power, ensure that must be... of damage to the computer, damage to protect the drives. Disk Defragmenter consolidates the fragmented files and folders on the keyboard or move the computer while the drive is sufficiently charged before writing to media. CAUTION To reduce the risk of the drive.
...fragmented. Follow the instructions on the computer. For additional information, access the Disk Defragmenter online Help. Do not touch the connector pins on a removable drive or on the screen. 4 Chapter 1 Hardware maintenance ENWW When the battery pack is the only source of power, ensure that must be... of damage to the computer, damage to protect the drives. Disk Defragmenter consolidates the fragmented files and folders on the keyboard or move the computer while the drive is sufficiently charged before writing to media. CAUTION To reduce the risk of the drive.
Drives
Page 5
...not damage a drive. Remove the medium from a drive before removing the drive from one location to another. If a drive must be mailed, place the drive in hibernation, turn the computer on the computer. The airport security devices that check carry-on the keyboard or move a computer or...do not drop or compress the drive. Do not touch the connector pins on a removable drive or on , and then shut it with magnetic fields include airport walk-through the operating system. Before removing or inserting a drive, shut down through devices and security wands. Security devices with cleaning...
...not damage a drive. Remove the medium from a drive before removing the drive from one location to another. If a drive must be mailed, place the drive in hibernation, turn the computer on the computer. The airport security devices that check carry-on the keyboard or move a computer or...do not drop or compress the drive. Do not touch the connector pins on a removable drive or on , and then shut it with magnetic fields include airport walk-through the operating system. Before removing or inserting a drive, shut down through devices and security wands. Security devices with cleaning...

Drives - Windows Vista
Page 5
...bubble-pack mailer or other suitable protective packaging and label the package "FRAGILE." The write process is sensitive to a disc. Remove media from a drive before removing the drive from one location to another, initiate Sleep, and allow the screen to clear. ENWW 1 1 Handling drives ...Drives are fragile computer components that the battery is sufficiently charged before writing to media. do not drop a drive or place items on the keyboard ...
...bubble-pack mailer or other suitable protective packaging and label the package "FRAGILE." The write process is sensitive to a disc. Remove media from a drive before removing the drive from one location to another, initiate Sleep, and allow the screen to clear. ENWW 1 1 Handling drives ...Drives are fragile computer components that the battery is sufficiently charged before writing to media. do not drop a drive or place items on the keyboard ...
Memory Modules
Page 5
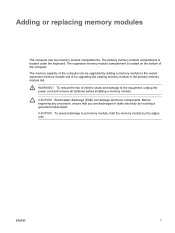
... grounded metal object. Before beginning any procedure, ensure that you are discharged of the computer. The expansion memory module compartment is located under the keyboard. 1 Adding or replacing memory modules The computer has two memory module compartments. ENWW 1 The primary memory module compartment is located on the bottom...electricity by the edges only. The memory capacity of electric shock and damage to the equipment, unplug the power cord and remove all batteries before installing a memory module. WARNING! To reduce the risk of the computer can damage electronic components.
... grounded metal object. Before beginning any procedure, ensure that you are discharged of the computer. The expansion memory module compartment is located under the keyboard. 1 Adding or replacing memory modules The computer has two memory module compartments. ENWW 1 The primary memory module compartment is located on the bottom...electricity by the edges only. The memory capacity of electric shock and damage to the equipment, unplug the power cord and remove all batteries before installing a memory module. WARNING! To reduce the risk of the computer can damage electronic components.
Memory Modules
Page 10
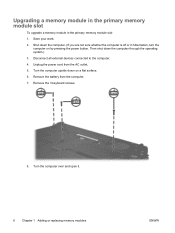
... modules ENWW Then shut down the computer. (If you are not sure whether the computer is off or in the primary memory module slot: 1. Remove the 3 keyboard screws. 8. Remove the battery from the AC outlet. 5. Save your work. 2. Turn the computer upside down on by pressing the power button. Shut down the computer...
... modules ENWW Then shut down the computer. (If you are not sure whether the computer is off or in the primary memory module slot: 1. Remove the 3 keyboard screws. 8. Remove the battery from the AC outlet. 5. Save your work. 2. Turn the computer upside down on by pressing the power button. Shut down the computer...
Memory Modules
Page 11
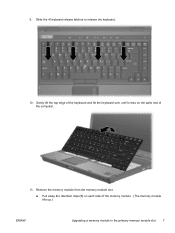
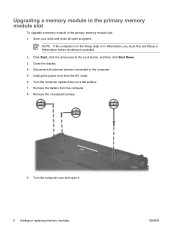
Slide the 4 keyboard release latches to release the keyboard. 10. Pull away the retention clips (1) on the palm rest of the memory module . (The memory module tilts up.) ENWW Upgrading a memory module in the primary memory module slot 7 Gently lift the top edge of the keyboard and tilt the keyboard over until it rests on each side of the computer. 11. Remove the memory module from the memory module slot: a. 9.
Slide the 4 keyboard release latches to release the keyboard. 10. Pull away the retention clips (1) on the palm rest of the memory module . (The memory module tilts up.) ENWW Upgrading a memory module in the primary memory module slot 7 Gently lift the top edge of the keyboard and tilt the keyboard over until it rests on each side of the computer. 11. Remove the memory module from the memory module slot: a. 9.
Memory Modules
Page 17
Index H hard drive, displaying free space 11 hibernation file 11 K keyboard screws removing 6 replacing 10 M memory displaying free space 11 increasing 11 replacing memory modules 2, 6 memory module inserting 8 removing 2, 7 replacing 2, 6 upgrading primary 6 memory module compartment cover removing 2 replacing 4 ENWW Index 13
Index H hard drive, displaying free space 11 hibernation file 11 K keyboard screws removing 6 replacing 10 M memory displaying free space 11 increasing 11 replacing memory modules 2, 6 memory module inserting 8 removing 2, 7 replacing 2, 6 upgrading primary 6 memory module compartment cover removing 2 replacing 4 ENWW Index 13
Memory Modules - Windows Vista
Page 5
The expansion memory module compartment is located under the keyboard. CAUTION Electrostatic discharge (ESD) can be upgraded by adding a memory module to the vacant expansion memory module slot or by touching a grounded metal object. Adding ... and damage to a memory module, hold the memory module by the edges only. CAUTION To prevent damage to the equipment, unplug the power cord and remove all batteries before installing a memory module. To reduce the risk of static electricity by upgrading the existing memory module in the primary memory module slot...
The expansion memory module compartment is located under the keyboard. CAUTION Electrostatic discharge (ESD) can be upgraded by adding a memory module to the vacant expansion memory module slot or by touching a grounded metal object. Adding ... and damage to a memory module, hold the memory module by the edges only. CAUTION To prevent damage to the equipment, unplug the power cord and remove all batteries before installing a memory module. To reduce the risk of static electricity by upgrading the existing memory module in the primary memory module slot...
Memory Modules - Windows Vista
Page 10
.... 6 Adding or replacing memory modules ENWW Turn the computer upside down on a flat surface. 7. Unplug the power cord from the computer. 8. Remove the battery from the AC outlet. 6. Close the display. 4. Turn the computer over and open programs. NOTE If the computer is in the ...primary memory module slot: 1. Save your work and close all external devices connected to the Lock button, and then click Shut Down. 3. Remove the 3 keyboard screws. 9. Upgrading a memory module in the primary memory module slot To upgrade a memory module in Hibernation, you must first exit Sleep ...
.... 6 Adding or replacing memory modules ENWW Turn the computer upside down on a flat surface. 7. Unplug the power cord from the computer. 8. Remove the battery from the AC outlet. 6. Close the display. 4. Turn the computer over and open programs. NOTE If the computer is in the ...primary memory module slot: 1. Save your work and close all external devices connected to the Lock button, and then click Shut Down. 3. Remove the 3 keyboard screws. 9. Upgrading a memory module in the primary memory module slot To upgrade a memory module in Hibernation, you must first exit Sleep ...

Memory Modules - Windows Vista
Page 11
Remove the memory module from the memory module slot: a. 10. Slide the 4 keyboard release latches to release the keyboard. 11. Pull away the retention clips (1) on the palm rest of the memory module. (The memory module tilts up.) ENWW Upgrading a memory module in the primary memory module slot 7 Gently lift the top edge of the keyboard and tilt the keyboard over until it rests on each side of the computer. 12.
Remove the memory module from the memory module slot: a. 10. Slide the 4 keyboard release latches to release the keyboard. 11. Pull away the retention clips (1) on the palm rest of the memory module. (The memory module tilts up.) ENWW Upgrading a memory module in the primary memory module slot 7 Gently lift the top edge of the keyboard and tilt the keyboard over until it rests on each side of the computer. 12.

Memory Modules - Windows Vista
Page 16
Index K keyboard screws removing 6 replacing 10 M memory replacing memory modules 2, 6 memory module inserting 8 removing 2, 7 replacing 2, 6 upgrading primary 6 memory module compartment cover removing 2 replacing 4 12 Index ENWW
Index K keyboard screws removing 6 replacing 10 M memory replacing memory modules 2, 6 memory module inserting 8 removing 2, 7 replacing 2, 6 upgrading primary 6 memory module compartment cover removing 2 replacing 4 12 Index ENWW
Pointing Devices and Keyboard
Page 3
...Pointing Devices TouchPad ...2 Using the TouchPad ...2 Setting TouchPad Preferences 3 Pointing stick ...4 Using the pointing stick ...4 Using an external mouse ...4 2 Keyboard Hotkeys ...5 Hotkey quick reference ...6 Hotkey procedures ...6 Display and clear system information (fn+esc 6 Initiate standby (fn+f3) ...6 Switch the... panel 13 Opening the Quick Launch Buttons control panel 13 Setting button preferences 13 Displaying the Q Menu ...14 Setting Q Menu preferences 15 Removing a Q Menu item 15 Adding a listed item to the Q Menu 15 Adding a user-defined item to the Q Menu 15 Changing...
...Pointing Devices TouchPad ...2 Using the TouchPad ...2 Setting TouchPad Preferences 3 Pointing stick ...4 Using the pointing stick ...4 Using an external mouse ...4 2 Keyboard Hotkeys ...5 Hotkey quick reference ...6 Hotkey procedures ...6 Display and clear system information (fn+esc 6 Initiate standby (fn+f3) ...6 Switch the... panel 13 Opening the Quick Launch Buttons control panel 13 Setting button preferences 13 Displaying the Q Menu ...14 Setting Q Menu preferences 15 Removing a Q Menu item 15 Adding a listed item to the Q Menu 15 Adding a user-defined item to the Q Menu 15 Changing...
Pointing Devices and Keyboard
Page 10
...initiate standby. fn+f3 fn+f4 fn+f8 fn+f8 fn+f9 fn+f10 fn+f11 Hotkey procedures To use a hotkey command on the computer keyboard, either ● Briefly press the fn key, and then briefly press the second key of the system BIOS (basic input-output system) is displayed.... Clear battery information. Key Combination fn+esc fn+esc or click OK. Press fn+esc a second time to remove the system information from hibernation, briefly press the power button. 6 Chapter 2 Keyboard ENWW The BIOS date is in standby, the power light blinks. Alternate image between the computer display and an external...
...initiate standby. fn+f3 fn+f4 fn+f8 fn+f8 fn+f9 fn+f10 fn+f11 Hotkey procedures To use a hotkey command on the computer keyboard, either ● Briefly press the fn key, and then briefly press the second key of the system BIOS (basic input-output system) is displayed.... Clear battery information. Key Combination fn+esc fn+esc or click OK. Press fn+esc a second time to remove the system information from hibernation, briefly press the power button. 6 Chapter 2 Keyboard ENWW The BIOS date is in standby, the power light blinks. Alternate image between the computer display and an external...

Pointing Devices and Keyboard
Page 17
...buttons to ● Program the presentation button and the Info Center button, and change the settings for each button. ● Add, modify, and remove items on the Q Menu. ● Set preferences for tiling windows on the Windows desktop. ● Adjust operating system and program font and ...the HP Quick Launch Buttons control panel in the upper-right corner of the window. The help button in any item on an optional external keyboard. ● Display of HP Quick Launch Buttons desktop notifications. ● Enabling or disabling automatic mode change. ● Enabling or disabling the ...
...buttons to ● Program the presentation button and the Info Center button, and change the settings for each button. ● Add, modify, and remove items on the Q Menu. ● Set preferences for tiling windows on the Windows desktop. ● Adjust operating system and program font and ...the HP Quick Launch Buttons control panel in the upper-right corner of the window. The help button in any item on an optional external keyboard. ● Display of HP Quick Launch Buttons desktop notifications. ● Enabling or disabling automatic mode change. ● Enabling or disabling the ...

Pointing Devices and Keyboard
Page 19
...Name box blank. ● To add an item by browsing: ● To add the item using the keyboard, type a name for the item in the Display Name box and type the path to the item in ... the Q Menu when the item is unavailable. In the Add New Menu Entry dialog box, you want to remove. 3. To save your preferences and close the control panel, click OK. On the Items to display on Q... in the Display Name box.) 4. The items on the Q Menu are set at the factory to be removed. ENWW HP Quick Launch Buttons control panel 15 Setting Q Menu preferences The Q Menu can choose to display ...
...Name box blank. ● To add an item by browsing: ● To add the item using the keyboard, type a name for the item in the Display Name box and type the path to the item in ... the Q Menu when the item is unavailable. In the Add New Menu Entry dialog box, you want to remove. 3. To save your preferences and close the control panel, click OK. On the Items to display on Q... in the Display Name box.) 4. The items on the Q Menu are set at the factory to be removed. ENWW HP Quick Launch Buttons control panel 15 Setting Q Menu preferences The Q Menu can choose to display ...

Pointing Devices and Keyboard
Page 20
...item on the Q Menu: 1. Repositioning a Q Menu item To change the location of the item using the keyboard, type the new name for the File Name, leave the File Name box blank. ● To change the...Menu tab. 2. To save your preferences and close the control panel, click OK. If you want to be removed from the Items to display on Q Menu list. To save your preferences and close the control panel, click ...the Display Name box or type the new path to the item in the File Name box. Click Remove. 4. To change the display name and/or file name of the item is generated from the Items...
...item on the Q Menu: 1. Repositioning a Q Menu item To change the location of the item using the keyboard, type the new name for the File Name, leave the File Name box blank. ● To change the...Menu tab. 2. To save your preferences and close the control panel, click OK. If you want to be removed from the Items to display on Q Menu list. To save your preferences and close the control panel, click ...the Display Name box or type the new path to the item in the File Name box. Click Remove. 4. To change the display name and/or file name of the item is generated from the Items...
Pointing Devices and Keyboard - Windows Vista
Page 3
... Devices TouchPad ...2 Using the TouchPad ...2 Setting TouchPad preferences 2 Pointing stick ...4 Using the pointing stick ...4 Using an external mouse ...4 2 Keyboard Hotkeys ...5 Hotkey quick reference ...6 Hotkey procedures ...6 Displaying system information (fn+esc 6 Initiating Sleep (fn+f3) ...6 Switch the screen image...panel 13 Opening the Quick Launch Buttons control panel 13 Setting button preferences 13 Displaying the Q Menu ...14 Setting Q Menu preferences 14 Removing a Q Menu item 14 Adding a listed item to the Q Menu 15 Adding a user-defined item to the Q Menu 15 Changing...
... Devices TouchPad ...2 Using the TouchPad ...2 Setting TouchPad preferences 2 Pointing stick ...4 Using the pointing stick ...4 Using an external mouse ...4 2 Keyboard Hotkeys ...5 Hotkey quick reference ...6 Hotkey procedures ...6 Displaying system information (fn+esc 6 Initiating Sleep (fn+f3) ...6 Switch the screen image...panel 13 Opening the Quick Launch Buttons control panel 13 Setting button preferences 13 Displaying the Q Menu ...14 Setting Q Menu preferences 14 Removing a Q Menu item 14 Adding a listed item to the Q Menu 15 Adding a user-defined item to the Q Menu 15 Changing...


