Installing Microsoft Windows Vista on Selected HP Products
Page 3
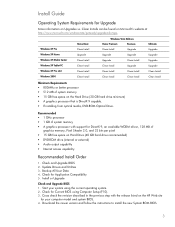
... Install Clean Install Windows Vista Editions Home Premium Business Clean Install Upgrade Upgrade Upgrade Upgrade Clean Install Clean Install Upgrade Clean Install Clean Install Clean Install Clean Install Ultimate Upgrade Upgrade Upgrade Upgrade Clean Install Clean Install Minimum Requirements ƒ 800MHz or better processor ƒ 512 MB of system memory ƒ 15 GB free space on Hard Drive (40 GB...
... Install Clean Install Windows Vista Editions Home Premium Business Clean Install Upgrade Upgrade Upgrade Upgrade Clean Install Clean Install Upgrade Clean Install Clean Install Clean Install Clean Install Ultimate Upgrade Upgrade Upgrade Upgrade Clean Install Clean Install Minimum Requirements ƒ 800MHz or better processor ƒ 512 MB of system memory ƒ 15 GB free space on Hard Drive (40 GB...
Hardware Reference Guide - dx 2200MT
Page 3
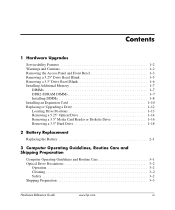
...Access Panel and Front Bezel 1-3 Removing a 5.25" Drive Bezel Blank 1-5 Removing a 3.5" Drive Bezel Blank 1-6 Installing Additional Memory 1-7 DIMMs 1-7 DDR2-SDRAM DIMMs 1-7 Installing DIMMs 1-8 Installing an Expansion Card 1-10 Replacing or Upgrading a Drive 1-12 Locating Drive Positions 1-13 Removing a 5.25" Optical Drive 1-14 Removing a 3.5" Media Card Reader or Diskette...Shipping Preparation Computer Operating Guidelines and Routine Care 3-1 Optical Drive Precautions 3-2 Operation 3-2 Cleaning 3-2 Safety 3-2 Shipping Preparation 3-3 Hardware Reference Guide www.hp.com iii
...Access Panel and Front Bezel 1-3 Removing a 5.25" Drive Bezel Blank 1-5 Removing a 3.5" Drive Bezel Blank 1-6 Installing Additional Memory 1-7 DIMMs 1-7 DDR2-SDRAM DIMMs 1-7 Installing DIMMs 1-8 Installing an Expansion Card 1-10 Replacing or Upgrading a Drive 1-12 Locating Drive Positions 1-13 Removing a 5.25" Optical Drive 1-14 Removing a 3.5" Media Card Reader or Diskette...Shipping Preparation Computer Operating Guidelines and Routine Care 3-1 Optical Drive Precautions 3-2 Operation 3-2 Cleaning 3-2 Safety 3-2 Shipping Preparation 3-3 Hardware Reference Guide www.hp.com iii

Hardware Reference Guide - dx 2200MT
Page 11
To achieve the maximum memory support, you install unsupported DIMMs. Hardware Reference Guide www.hp.com 1-7 The sockets are not supported ✎ The system will not start if you can be : ■ industry-standard 240-pin ■...In addition, the computer supports: ■ 256Mbit, 512Mbit, and 1Gbit non-ECC memory technologies ■ single-sided and double-sided DIMMS ■ DIMMs constructed with up to 2GB (2 x 1GB) of memory. Hardware Upgrades Installing Additional Memory The computer comes with x4 SDRAM are labeled DIMM1 and DIMM2. DIMMs constructed with double...
To achieve the maximum memory support, you install unsupported DIMMs. Hardware Reference Guide www.hp.com 1-7 The sockets are not supported ✎ The system will not start if you can be : ■ industry-standard 240-pin ■...In addition, the computer supports: ■ 256Mbit, 512Mbit, and 1Gbit non-ECC memory technologies ■ single-sided and double-sided DIMMS ■ DIMMs constructed with up to 2GB (2 x 1GB) of memory. Hardware Upgrades Installing Additional Memory The computer comes with x4 SDRAM are labeled DIMM1 and DIMM2. DIMMs constructed with double...
Hardware Reference Guide - dx 2200MT
Page 12
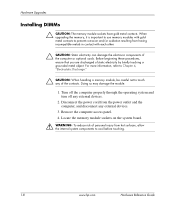
... Doing so may damage the module. 1. Remove the computer access panel. 4. When upgrading the memory, it is important to use memory modules with gold metal contacts to cool before touching. 1-8 www.hp.com Hardware Reference Guide Turn off the computer properly through the operating system and turn ...off any external devices. 3. Locate the memory module sockets on the system board. Å WARNING: To reduce risk of static ...
... Doing so may damage the module. 1. Remove the computer access panel. 4. When upgrading the memory, it is important to use memory modules with gold metal contacts to cool before touching. 1-8 www.hp.com Hardware Reference Guide Turn off the computer properly through the operating system and turn ...off any external devices. 3. Locate the memory module sockets on the system board. Å WARNING: To reduce risk of static ...
Hardware Reference Guide - dx 2200MT
Page 13
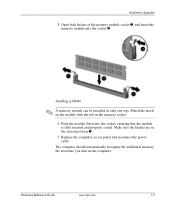
Open both latches of the memory module socket 1, and insert the memory module into the socket, ensuring that the module is fully inserted and properly seated. Installing a DIMM ✎ A memory module can be installed in the closed position 3. 7. Replace the computer access panel and reconnect the... cable. Push the module down into the socket 2. Hardware Reference Guide www.hp.com 1-9 The computer should automatically recognize the additional memory the next time you turn on the memory socket. 6. Hardware Upgrades 5. Match the notch on the module with the tab on the computer. ...
Open both latches of the memory module socket 1, and insert the memory module into the socket, ensuring that the module is fully inserted and properly seated. Installing a DIMM ✎ A memory module can be installed in the closed position 3. 7. Replace the computer access panel and reconnect the... cable. Push the module down into the socket 2. Hardware Reference Guide www.hp.com 1-9 The computer should automatically recognize the additional memory the next time you turn on the memory socket. 6. Hardware Upgrades 5. Match the notch on the module with the tab on the computer. ...

HP Compaq dx2200 MT Business PC, 1st Edition
Page 23
...By establishing a supervisor password in a programmable flash ROM (read only memory). This is ready to be sure to the system is turned on... by model or software version. 3.1 Initial Configuration and Deployment HP computers come with recovery of a ROM flash failure, for a valid ...PC Deployment section of the computer. The Boot Block is a flash-protected section of the ROM that checks for example, if a power failure were to upgrade... Block recovery mode, complete the following steps: Service Reference Guide, dx2200 MT 415606-001 3-1 After a brief software "unbundling" process, ...
...By establishing a supervisor password in a programmable flash ROM (read only memory). This is ready to be sure to the system is turned on... by model or software version. 3.1 Initial Configuration and Deployment HP computers come with recovery of a ROM flash failure, for a valid ...PC Deployment section of the computer. The Boot Block is a flash-protected section of the ROM that checks for example, if a power failure were to upgrade... Block recovery mode, complete the following steps: Service Reference Guide, dx2200 MT 415606-001 3-1 After a brief software "unbundling" process, ...

HP Compaq dx2200 MT Service Reference Card, 1st Edition
Page 1
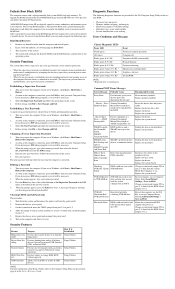
... Speed - View. Set Supervi- Setup Exit With- out Saving Service Reference Card HP Compaq dx2200 MT Series Business PC © 2006 Hewlett-Packard Development Company, L.P. The informa- tion contained herein is...5, 7, 9, 10, 11, 12, 14, and 15. BIOS write Protection - Disables/enables ROM BIOS upgrading. Execute Disable Bit - Disables/enables Execute Disable Bit (XD) to 32MB, 64MB, or Auto. Hyper-...checked for a bootable operating system image. Allows you to select the Unified Memory Architecture (UMA) frame buffer size to prevent malicious buffer overflow attacks Enhanced ...
... Speed - View. Set Supervi- Setup Exit With- out Saving Service Reference Card HP Compaq dx2200 MT Series Business PC © 2006 Hewlett-Packard Development Company, L.P. The informa- tion contained herein is...5, 7, 9, 10, 11, 12, 14, and 15. BIOS write Protection - Disables/enables ROM BIOS upgrading. Execute Disable Bit - Disables/enables Execute Disable Bit (XD) to 32MB, 64MB, or Auto. Hyper-...checked for a bootable operating system image. Allows you to select the Unified Memory Architecture (UMA) frame buffer size to prevent malicious buffer overflow attacks Enhanced ...
HP Compaq dx2200 MT Service Reference Card, 1st Edition
Page 2
... Replace the device. Reset jumpers to start. Change system board jumper JP2 to the device. To upgrade the ROM, download the latest ROM BIOS image from the power outlet. 2. Establishing a User Password...both a supervisor and a user password for system configuration in the previous section. 5. Replace memory modules ... Turn on or restart the computer. Insert a bootable diskette, or CD containing ... prompt appears, type your current password, then select the desired Set...Password item from HP are in Windows, click Start > Shut Down > Restart. 2. System halts after...
... Replace the device. Reset jumpers to start. Change system board jumper JP2 to the device. To upgrade the ROM, download the latest ROM BIOS image from the power outlet. 2. Establishing a User Password...both a supervisor and a user password for system configuration in the previous section. 5. Replace memory modules ... Turn on or restart the computer. Insert a bootable diskette, or CD containing ... prompt appears, type your current password, then select the desired Set...Password item from HP are in Windows, click Start > Shut Down > Restart. 2. System halts after...
Troubleshooting Guide
Page 10
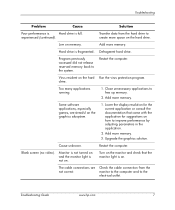
... on . Cause unknown. Troubleshooting Guide www.hp.com 7 Restart the computer. Add more memory. Upgrade the graphics solution. Turn on the monitor and check that came with the application for suggestions on how to create more memory. Transfer data from the not correct. Lower... current application or consult the documentation that the monitor light is not on the hard drive. The cable connections are stressful on memory. Add more space on . Restart the computer. Defragment hard drive. monitor to the computer and to the system. experienced (...
... on . Cause unknown. Troubleshooting Guide www.hp.com 7 Restart the computer. Add more memory. Upgrade the graphics solution. Turn on the monitor and check that came with the application for suggestions on how to create more memory. Transfer data from the not correct. Lower... current application or consult the documentation that the monitor light is not on the hard drive. The cable connections are stressful on memory. Add more space on . Restart the computer. Defragment hard drive. monitor to the computer and to the system. experienced (...
Troubleshooting Guide
Page 13
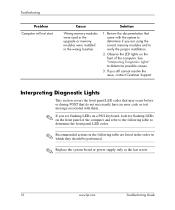
... to the following table to determine the front panel LED codes. ✎ Recommended actions in the following table are using the correct memory modules and to verify the proper installation. 2. Interpreting Diagnostic Lights This section covers the front panel LED codes that may occur before ...do not necessarily have an error code or text message associated with the system to determine possible causes. 3. Cause Wrong memory modules were used in the upgrade or memory modules were installed in which they should be performed. ✎ Replace the system board or power supply only as ...
... to the following table to determine the front panel LED codes. ✎ Recommended actions in the following table are using the correct memory modules and to verify the proper installation. 2. Interpreting Diagnostic Lights This section covers the front panel LED codes that may occur before ...do not necessarily have an error code or text message associated with the system to determine possible causes. 3. Cause Wrong memory modules were used in the upgrade or memory modules were installed in which they should be performed. ✎ Replace the system board or power supply only as ...


